Modeling has a beneficial effect on the child, his creative imagination, thinking abilities, develops fine motor skills and gives a wonderful mood. In this article we have prepared a selection simple crafts from salt dough especially for children.
You will need: cup wheat flour, a glass of extra salt, half a glass cold water, Bowl.

Recipe

The finished salted dough should not stick to your hands or crumble. It should be cool and easy to sculpt. I recommend watching the video master class!
There are two most common ways to dry salt dough. The first method: the finished craft will dry on its own. The main thing is that it should not be exposed to direct sunlight, otherwise it will crack. The craft can be placed on a flat surface and wait a few days. Second method: dry the finished craft in the oven for 3 to 6 hours (depending on the size of the craft). Drying occurs in batches with breaks. One approach is 1-2 hours. For quick drying in one go, set the oven to 75-100 degrees, and then the craft will dry in an hour. At a temperature of 120 degrees, the craft will dry in 30 minutes, but it is better to dry it naturally.
There are two most common ways to color salt dough. The first method: after drying, paint the finished craft with acrylic paints or gouache using a brush. Second method: food coloring is diluted in water, then added while preparing the dough. When the craft is completely painted and dried, it must be coated with transparent manicure or furniture varnish in 2-3 layers. Each layer must dry before applying the next. This way the craft will be preserved

You will need: salted dough, rolling pin, cookie cutters, stars, hearts, etc..., cocktail tube, thread or rope for hanging, acrylic paints or gouache, brush, clear manicure polish.
Master Class

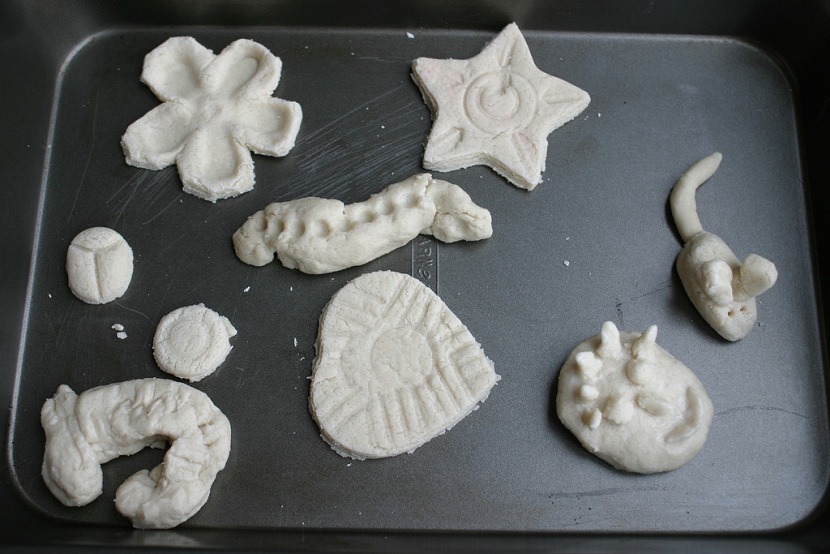
The salt dough figures are ready!

You will need: salt dough, gouache, brush, foil, water, permanent marker, clear manicure polish.
Master Class
- Mold the sheep's feet into 4 balls.
- Make a ball of foil, then roll it in the dough so that it is inside. This will be the body of a sheep.
- Attach the body over the legs using water.
- Make the head, ears, eyes and horn curls. Attach with water.
- Roll small flat balls and attach them as wool using water.
- Dry the craft.
- Paint the sheep with paints and wait until it dries completely.
- Draw eyes, eyelashes and outline the contours of the curls with a marker.
- Cover the craft with varnish and wait until it dries completely.
The salt dough lamb is ready!

You will need: salt dough, rolling pin, stack, toothpick, paints, brush, glitter, clear manicure polish, cocktail tube, thread for further hanging.
Master Class
- Roll out the dough into a thin layer using a rolling pin.
- Draw a house on the dough, then cut out with a stack.
- Make dots along the contour of the house, window, chimney with a toothpick.
- Make a hole for further hanging with a cocktail tube.
- Dry the craft.
- Paint the house, decorate it with glitter and wait until it dries completely.
- Attach thread for further hanging.
The salt dough house is ready!
Salt dough owl

You will need: salt dough, felt-tip pen cap, stack, paints, brush, clear manicure polish.
Master Class
- Roll the dough into a ball.
- Press it down to make a flat circle.
- Make feathering by pressing with the cap.
- Fold the sides of the circle towards the center.
- Fold the upper part of the circle into the center and form ears.
- Make the owl's eyes by pressing with the cap of a felt-tip pen.
- Dry the craft.
- Paint the owl and wait until it dries completely.
- Cover the craft with varnish.

You will need: colored salt dough, cookie cutters, cocktail straw, rolling pin, glass, water, clear nail polish.
Master Class

The salt dough figure frame is ready!
Salt dough bear

You will need: salt dough, stack, pva glue, black and pink paint, brush, clear manicure polish.
Master Class
- Blind the eyes and nose, paint them black and set aside to dry.
- Make 2 flat circles for the paws, paint them pink and set aside to dry.
- Make an oval shaped body of the bear.
- Roll into a ball for the head.
- Glue the head to the body.
- Make a flat ball, draw a smile with a stack and glue it to the face.
- Blind the paws, then glue them and draw the fingers in a stack.
- Roll the ball and glue it in place of the tail.
- Glue on the eyes and nose.
- Glue pink circles onto the bear's back legs.
- Dry the craft.
- Cover the craft with varnish.
The salt dough bear is ready!

You will need: salt dough, glass, acrylic paints, glitter, brush, ribbon for hanging, cocktail tube, dog's paw for imprinting on the dough or your fingers, transparent glue, rolling pin.
Master Class


You will need: colored salt dough, stack, clear manicure polish, toothpick.
Master Class

The salt dough star is ready!
Salt dough caterpillar
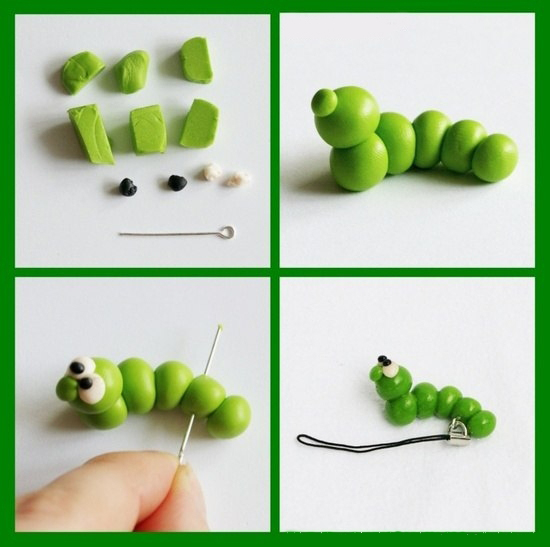
You will need: colored dough, knife, pva glue, toothpick, pendant, clear manicure polish.
Master Class
- Roll out the sausage.
- Cut it into 6 equal parts.
- Roll into balls.
- Glue 5 balls together.
- Glue the head.
- Make a nose and eyes, then glue them on.
- Poke a toothpick into the hanging area.
- Dry the craft.
- Apply varnish and wait until completely dry.
- Attach the pendant.
The salt dough caterpillar is ready!
Salt dough apple

You will need:
Master Class
- Make half an apple, make the inside flat, pressing it onto a flat surface.
- Make a thin flat center and glue it to the main part.
- Roll 6 seeds and a stick, then glue to the apple.
- Blind the leaves, then glue them.
- Dry the craft.
- Apply varnish and wait until completely dry.
The salted dough apple is ready!
Salt dough elephant

You will need: colored salt dough, pva glue, clear manicure polish.
Master Class
- Make the elephant's body by rolling an elongated ball.
- Make 4 legs in the shape of plump sausages.
- Make a proboscis.
- Make the elephant's ears in this way: roll out 2 flat cakes, glue flat cakes of the same shape of a smaller size and a different color to them.
- Make a small ponytail.
- Blind your eyes.
- Assemble the elephant in the following sequence: glue the legs to the body, then glue the proboscis, then the ears, eyes and tail.
- Dry the craft.
- Apply varnish and wait until completely dry.
The salt dough elephant is ready!
Salt dough dachshund

You will need: salt dough, simple pencil, scissors, cardboard, paints, brush, rope, toothpick, foam sponge, clear varnish, PVA glue.
Master Class

The salt dough dachshund is ready!
Boletus mushroom made from salt dough

You will need: salt dough, light bulb, paints, brush, foil, cardboard, masking tape, superglue, PVA glue, paper napkins, clear varnish, stack.
Master Class

Boletus mushroom made from salt dough is ready! I recommend watching this video!
Funny salt dough pigs

You will need: salt dough, paints, brush, foam sponge, stack, thin rope, toothpick, black gel pen, PVA glue.
Master Class

Funny salt dough pigs are ready! I recommend watching this video!

You will need: salt dough, nail scissors, PVA glue, acrylic paints or gouache, manicure brush.
Master Class

Salt dough hedgehog is ready!
Salted play dough is a safe material for children's crafts. You can use it to make cool Christmas tree decorations of any shape. Let's look at a few master classes prepared by designers.
Salt dough recipe
For dough crafts, take:
- 1 glass of salt;
- 1 cup flour;
- water;
- colored gouache.
This is the simplest salt dough recipe. To improve it, add 5 tablespoons of sunflower oil.
IDEA! The paint can be replaced with juice (cherry or beetroot). If a child eats a piece of dough while modeling, he will definitely not be poisoned. The dough can be colored at the end.
How to make dough at home? Step by step:
- Place all ingredients into a deep plate. First dry, then only water and oil.
- Mix everything so that the dough turns out like dumplings. It shouldn't be oak.
- To make the mixture faster, turn on the mixer.

IDEA! If the toys are small or you need to make small parts, make the dough separately with PVA or starch. There may be some glue left after wallpapering. Use it instead of PVA.


How to make crafts from salt dough with your own hands
Salt dough, the recipe for which will be easy to master even for children, is a very flexible material, but its composition is absolutely safe. Add food colors or even natural ones (fruit or vegetable juices) to it. Even if you leave your child alone to sculpt, nothing will happen to him.
Modeling tools:
- rolling pin;
- flat working surface;
- ball pen;
- paint brush;
- cup;
- threads;
- medium size needle;
- silicone baking molds;
- any stencils for patterns;
- paint (acrylic or gouache);
To prevent the gouache from cracking, add glue to it.


Cover the figure with paint and varnish

The dye is added not only at the stage of kneading the dough, but also during modeling. Simply divide the dough into several parts (1 part = 1 color), make a depression in the center and add dye. When sculpting, it will be distributed evenly throughout the piece.
 Using a regular brush you need to paint the indentations from the paw
 When the figurine is ready, coat it with varnish, so the paint will definitely not roll off and become lighter. The aerosol form will facilitate the coating process.

If the varnish is liquid, cover the toy in several layers. Cover thickly in one layer. It can also be matte.
IMPORTANT! If you dry the toy properly, you can do without varnish. It is needed if you are not entirely sure that you did everything correctly.

What could go wrong?
- Cracks or bubbles appeared after drying. This means you dried the figurine incorrectly. Most likely, the temperature is high with the oven door closed. Try sanding these areas with sandpaper.
- Cracks may also appear after painting. Let the craft dry completely and only then paint. Dry the figurine in natural conditions, sand the cracks and paint again.
- If any part of the figure breaks off, glue it with PVA.
- Store the figurines in a dry place at normal room temperature. They can be put in any cardboard box, then nothing will happen to them for the next holiday.
Simple Christmas tree toys made from salt dough for beginners
Let's watch a few step-by-step master classes and figure out how to make simple but interesting Christmas tree toys from dough.

Idea 1. Gingerbread men
Try to do gingerbread men with kids. This will be a lot of fun. Do the most difficult stages of the work, and let them knead the dough themselves. Show what kind of face the little man will have, let them try to repeat it.


Idea 2. Flat colorful figures
 We will need: flour, salt, water - for the dough; blender; dyes for its color; molds in the form of circles and hearts; rolling pin; ribbons, twine or thread, a sharp object for making holes and decorating figures; baking parchment


Idea 3. Snowflakes with patterns
How to save on holiday packaging and make it yourself, look in the article
What else can you make from salt dough to decorate a Christmas tree? Let's try to make snowflakes.
 Take the same composition for the test, acrylic paint in three colors (we have white, black and blue). Tools include a ballpoint pen, a stationery knife and a round object for squeezing. Markers will also come in handy

Idea 4. Shiny figures
The advantage of products made from salt dough is their weight - the toys are very light. The branches will not bend.


 You can make a lot of toys and decorate the Christmas tree with them. It will be very beautiful
Option 5. Circles with flowers


Idea 6. Silver stars
 Let's try to make shiny stars for the Christmas tree


Idea 7. Name tags for gifts
Labels can be not only in the shape of hearts, flowers or rectangles. For New Year's gift try making a house or a snowflake.
IMPORTANT! What to give to friends and family on New Year and Christmas 2018 read the article
Idea 8. Lace plates are very interesting for children to make three-dimensional figures. You can start with simple vegetables. Use faux thread to make segments on your pumpkin.


Flour can be used not only to bake pies and cook dumplings. Try using this raw material for beautiful crafts made from salt dough. We invite you to master a new female hobby, the results of which will not be difficult to find practical application.
History does not know who first came up with the idea of creating sculptures from flour, water and salt, but there is a version that beautiful crafts from salt dough were invented by confectioners. Creative chefs became bored with baking quickly stale buns and, having improved the recipe, invented a material that does not deteriorate over the years and does not lose its attractiveness. Today, testoplasty is a popular women's hobby that you should definitely try.
Testoplasty is a fun hobby with a serious approach
Salt dough is a plastic material from which you can make crafts no less interesting than polymer clay. Ready-made figurines can be easily painted and decorated, turning into real works of art that can easily find a place not only in the home and office, but also in a museum. The presence of salt in the dough preserves the finished product and protects it from various pests that are partial to flour products.
The main advantage of testoplasty is the availability of materials. The cost of the finished craft is mere pennies, and products for modeling, as well as for crafts, are always available in any home.
Having mastered modeling from salt dough, you will be able to make small souvenirs for sale and turn into new ones. The figurines can be sold online, in in social networks or offer your masterpieces in public places: at train stations, in parks, on the beach.
Nowadays, many cities hold open fairs, where everyone has the opportunity to sell what they have lovingly made with their own hands. Charms, refrigerator magnets, and kitchen decor are in great demand.

Salt dough recipe for crafts
This versatile salted craft dough requires just three ingredients: flour, salt and water.
Flour should only be used premium, which does not contain bran or any improving additives. Never buy pancake, pancake or self-raising flour - during drying, the dough made from it will begin to rise, which will lead to cracks.
You should also take plain salt without iodine and other additives, but clean and white. “Extra” is ideal. If you cannot find finely ground salt, you can take pure coarse salt, dissolving it in water, taken in the volume according to the basic recipe.
Before mixing, the water must be passed through a filter and cooled. It is recommended to use ice water prepared in the freezer.
Ingredient proportions:
- Flour – 300 grams;
- Salt – 300 grams;
- Water – 200 ml.
Video recipe from experienced craftsmen
Some craftsmen use additives to improve plasticity, for example, starch, vegetable oil or glue. However, for the first masterpiece it is better to prepare salty dough for crafts according to the basic recipe. It is important to consider that flour and salt are taken in equal proportions by weight, but salt is heavier than flour, so it turns out to be half as much in volume! For example, a glass of flour will require half a glass of salt!
Secrets of sculpting and shaping figures
Working with dough does not require any special talent, but it is unlikely that you will be able to sculpt something special the first time. In air, the mixture of flour and salt quickly hardens, so it should be stored in a tightly closed jar, separating it as necessary. required quantity for sculpting a separate element. If the mass was colored different colors, then portions of different shades should be stored in separate containers.
There are many techniques for working with dough. It can be rolled out into a layer, and then figures can be cut out and compositions can be formed from them, like flowers from sugar mastic and cold porcelain. At the joints, the parts are moistened and gently pressed against each other. The same dough, diluted to a more liquid consistency, is also used as glue.
For large volumetric figures, wire frames are used or placed inside jars and boxes, which reduces the volume of raw materials and speeds up the drying process. To fasten the elements, you can use toothpicks, using them to secure the parts to be joined.
Finished works are dried in the open air or baked in the oven, which significantly speeds up the process of acquiring the required strength. The oven is turned on to the highest setting during drying. low temperature, and the door is opened slightly. At high temperatures the craft may crack.

How to decorate dough products
To form reliefs and three-dimensional figures, you can use any available materials: stencils, coins, toothpicks, sushi sticks, combs, pocket knives, cream injector, cookie cutters, paring knives, etc.
Figures made from unpainted dough have a light beige tint, but the mass can be colored at the kneading stage, and finished goods cover with varnish, acrylic paints, watercolor or gouache.
Can be used as dyes natural products, for example cocoa or beet juice. If dyes require dilution with water, the total volume of liquid indicated in the recipe should be reduced.
Video: delicious strawberries for beginners
Look at the selection of beautiful crafts, perhaps you will fall in love with this creativity and make it your hobby. Try to do it first a simple figurine- or colorful. If you have small children, make casts of their arms and legs, in 20 years this craft will become high value.
Beautiful crafts from dough: photos for inspiration


Master classes on creating figurines
If you are interested in this simple technique, try starting with simple crafts. We have prepared several master classes available for beginners.


You can make various souvenirs from this unusual material, and then paint them. It is strong and durable and can please a person for many years.
How to prepare play dough
It turns out that you can not only bake pies and cakes from the dough, but also make wonderful paintings, toys and much more. It’s easy to sculpt from it, almost like plasticine, and the dried toy becomes hard and, unlike plasticine, will not melt in your hands. Salt dough makes wonderful and original surprise gifts, and you can prepare such material for modeling quite quickly. In addition, it will not require much expense from you - everything you need for this exciting work will probably be found in your home.
Of course, the composition of this magical dough is different from the one from which grandmothers bake cheesecakes. There is no single, “correct” recipe; each master uses his own. We will try to stick to one of the directions, but if you want, you can experiment with the proportions of water, flour and salt. Just make sure there are no cuts or abrasions on your hands, otherwise salt may get into the wound.
For work we will need:
- flour -1.5 cups;
- salt - 1 glass;
- water - 1 glass;
- dry wallpaper glue - 1-2 tbsp. l.;
— sunflower oil- 1 tbsp. l.;
- mixing utensils;
- rolling pin;
- cutting board or any smooth surface;
- plastic bag for storage.
Operating procedure
1. Pour flour and salt into a container and carefully add water little by little (be sure to first flour, then water, and not vice versa, otherwise lumps may form) and mix. If lumps form in the dough, knead them with your hands. So we mix the whole dough until it becomes soft and homogeneous in composition.
2. Add sunflower oil to this mass so that the dough does not stick to your hands, and wallpaper glue so that the dough becomes like plasticine, bendable and elastic. Mix all this thoroughly again and knead the remaining lumps.
3. Now take the dough and place it on a cutting board. Using a rolling pin, roll out the dough several times to completely eliminate the possibility of lumps appearing.
4. Place the dough in plastic bag and put it in the refrigerator for an hour. After an hour, the dough is ready to use.
During modeling, you should not take all the dough out of the bag at once - it will quickly dry out in the air. It is better to pinch off the necessary pieces and cover the rest with a bag. If there is dough left after modeling, you can put it in the refrigerator - there it can be stored for several days.
If your hands are wet, the dough will stick to them. You need to dust them with flour. And in order to fasten the parts together, on the contrary, the dough needs to be wet. To do this, we wet the parts that we want to glue together using ordinary water and paint brushes.
After the dough figures are molded, you need to dry them; this can be done in two ways.
Method one- just leave the toy at room temperature to dry for 3-4 days or more - it all depends on the size of the toy and the temperature of the room.
Method two- roasting in the oven. Place the toy on a baking sheet and place in a preheated oven. The temperature should not be very high, it is better to bake on low heat for 30-60 minutes. The figurine is ready when it acquires a light brown tint, but in no case dark.
It is best to paint a toy with tempera or acrylic paints, as they are the most durable - watercolor will look pale and absorb quickly, and gouache will leave marks on your hands.
The finished product can be coated with clear varnish if desired. And remember, although toys may look durable, they will actually break easily if accidentally dropped on the floor. Therefore, do not leave them on the edge of the table or in places where they can easily break. Glue the salted figures onto frames and pictures securely, so that they do not fall over time.
DIY salt dough gifts. Step-by-step master classes
|
DIY decoupage of the “Dogs” magnet from salt dough. Step-by-step instruction with photo Author: Pavlukhina Vera Aleksandrovna, teacher additional education MAOU DO Youth Center "Zvezdochka" Tomsk Purpose: making a magnet from salt dough. Objectives: - introduce the technology of making a magnet from salt dough using decoupage technique; - convey your experience through direct and commented demonstration of consistent activities; - increase the motivation and creative activity of master class participants... |
|
Making Christmas tree decorations with children preparatory group. Master class with step by step photos.Christmas tree decoration“Mitten” made from salt dough. Step-by-step instructions with photos This toy is beautiful decoration Christmas tree. The Christmas tree toy “Rukavichka” is completed in one academic hour of work, but how much joy and delight it brought to its author, and it is difficult for the teacher-mentor to convey it simply in words. We invite everyone to the master class! |
|
Christmas tree from salt dough. Spot painting. Master Class with step by step photos. Authors: Polina Tsygina, 7 years old, student at the “City of Masters” MAOU DO Youth and Youth Center “Zvezdochka” in the city of Tomsk and Vera Aleksandrovna Pavlukhina, additional education teacher, MAOU DO Youth and Youth Center “Zvezdochka”, Tomsk Master class will be interesting for primary school children age, their parents, perhaps younger children and simply creative people who love to create decorations with their own hands. Purpose: decorations for Christmas trees... |
|
Autumn crafts from salt dough for preschoolers step by step with photos Master class " Bright colors autumn" (autumn trees made of salt dough) The autumn forest, playing with colors, Weaves wreaths from the crowns of the trees, Pampering warm days with its sunny caresses. This is immeasurable pleasure - Walking along the festive path Along the rainbow maples, probably, With a bouquet of deciduous trees in your hand. Author of the master class: Denisenko Dina Vladimirovna, teacher of additional education at a municipal government institution of additional education... |
|
Master class “Fairy Meadow Kolobok”. Modeling from salt dough and plasticine. Step-by-step instructions with photos for childrenAuthor: Olga Kopylova, 8 years old, studying at GKURS (I) Republican orphanage boarding school for mentally retarded children. Teacher: Pargisheva Raisa Nikolaevna State Public Institution of the Republic of Sakha (Yakutia) Republican orphanage boarding school for mentally retarded children. The master class is intended for additional education teachers, technology teachers, parents, as well as everyone who wants to master the technique of modeling from... |
|
Master class “Frog Princesses” using the salt dough modeling technique. Author: Maya Popova, 9 years old, studying at the Republican Children's Home Boarding School. Teacher: Pargisheva Raisa Nikolaevna GKU RS(Y) Republican Children's Home Boarding School. The master class is intended for additional education teachers, technology teachers, parents, as well as anyone who wants to master the technique of modeling from salt dough. Purpose: souvenir. Goal: to make a souvenir using the technique of modeling from salt dough Objectives: Educational... |
|
Do-it-yourself Easter egg stand step by step with photo EGG STAND "EASTER HEN" Purpose: Use for decoration festive table. Objectives: Educational: Consolidation of the skill of step-by-step work execution. Master the technique of making a souvenir. Developmental: Develop hand coordination, imagination, perseverance. Educational: To cultivate neatness, to encourage the desire to make gifts with your own hands. Necessary materials: salt dough, modeling board, stacks, karan... |
|
Master class of the panel “Three Little Pigs” using the technique of modeling from choux salted dough. Author: Anastasia Nemchinova, studying at the Municipal Budgetary Institution of Preschool Children and Youth Association “Salty Fantasies” in Millerovo Teacher: Nazarova Tatyana Nikolaevna, additional education teacher at the Municipal Budgetary Institution of Preschool Children and Youth in Millerovo Master- The class is intended for technology teachers, additional education teachers, for those who want to master the technique of working with choux salted dough, as well as for those who want to make their own interior decorations... |
|
DIY souvenir for Easter made from salt dough. Step-by-step instructions with photos Crafts using the technique of modeling from salt dough for "Easter" for children 7-10 years old. Author: Kolupaeva Oksana Grigorievna, additional education teacher, Municipal Budgetary Institution of Children's and Youth Center "Harmony", r.p. Chany, Chanovsky district, Novosibirsk region. The master class is designed for children 7-10 years old. Purpose: making a candlestick for the Easter holiday. Goal: creating a “Chicken” candlestick from salt dough. Objectives: Educational: teach children how to sculpt... |
|
Master class with step-by-step photos of the souvenir “Baby Timosha” using the technique of modeling from salt dough. Author: Daria Vinichenko, a student at the MBU Pre-D&Y Association “Salty Fantasies” in Millerovo Teacher: Nazarova Tatyana Nikolaevna, additional education teacher at the MBU Pre-D&Y Millerovo The master class is intended for technology teachers, additional education teachers, and those who want to master the technique of working with salt dough. Purpose: souvenir, gift for a newborn. Purpose: making souvenirs... |
|
Master class “Gift for Mom” using the technique of modeling from choux salted dough. Author: Nazarova Tatyana Nikolaevna teacher of additional education at the Municipal Budgetary Institution of Preparatory Children's and Youth Children's and Youth School in Millerovo. The master class is intended for teachers of additional education, technology teachers, and for those who want to make gifts with my own hands. Purpose: gift for March 8th. Purpose: making decorative cutting board using the technique of modeling from choux salted dough. Objectives: Educational: master manufacturing techniques... |
|
Crafts using the technique of modeling from salt dough for Maslenitsa for children 7-8 years old Author: Kolupaeva Oksana Grigorievna, teacher of additional education, Municipal Budgetary Institution of Children's and Youth Center "Harmony", b. village Chany, Chanovsky district, Novosibirsk region. The master class is designed for children 7-8 years old. Purpose: making a souvenir for the Maslenitsa holiday. Goal: creating a souvenir from salt dough. Objectives: Educational: teach children to sculpt salt dough using a template. Developmental: develop accuracy when working with dough. ... |
|
New Year's toy "Cockerel" using testoplasty technique. Master class with step-by-step photos on how to make it. volumetric crafts“Cockerel” made from salt doughThe master class will be of interest to additional education teachers, teachers, children of primary and secondary school age who have been involved in testoplasty for 2-3 years, their parents and creative people who are interested in this type creativity. Purpose: Decorative decoration, Christmas decoration Christmas tree, handmade gift. Usage: For interior decoration... |
|
Master class with step-by-step photos " New Year's toys"using the salt dough modeling technique. The master class will be useful for educators and teachers of additional education. Goal: to make a craft using the salt dough modeling technique. Objectives: - teach children to work with salt dough - develop fine motor skills - instill in children a desire to make crafts with their own hands For work you need: flour, salt, water, modeling board, paints, varnish, molds for modeling, stencils, stacks, knife, skewer, bowl, rolling pin, k... |
|
Master class with step-by-step photos “Mouse with cheese” using the technique of modeling from salt dough. Tatyana Nikolaevna Nazarova, teacher of additional education at the Municipal Budgetary Institution of Preparatory Children's and Youth Children's and Youth, Millerovo. The master class is intended for those who want to master the technique of making a souvenir using the salt dough modeling technique. The material will also be useful to teachers of additional education and teachers of extended day groups. Purpose: souvenir, gift. Goal: making a souvenir “Mouse with Cheese”. Objectives: Educational: master technical... |
We invite you to immerse yourself in the world of art without leaving your apartment! To make it easier for you to learn a new activity, we have prepared useful tips and master classes.
The origins of this type of creativity are deeply rooted in the history of our culture. The same Kolobok is an excellent artistic example of a product made from salt dough.
Anyone can work with the dough. Surely you have a handful of flour at home! In addition, the dough is much more plastic than gypsum and more durable than plasticine.
How to prepare play dough
If you have finally decided to master the process of making crafts, then it would be useful to learn how to make salt dough. We offer several recipe options from which you can choose any one you like.
- 1 tbsp. fine salt;
- 1 tbsp. flour;
- 5 tbsp. l. sunflower oil;
- water;
- colored gouache or natural juice.
Stir thoroughly into deep container dry ingredients, add oil and a little water. To give the dough a certain color, carefully stir in juice (for example, carrot or beetroot).
- 1.5 tbsp. flour;
- 1 tbsp. salt;
- 125 ml water.
Mix everything and knead the dough like dumplings. To sculpt thin relief figures, add one more thing to choose from: 1 tbsp. l. PVA glue, 1 tbsp. l. starch or a mixture of wallpaper glue and water.

- 2 tbsp. wheat flour;
- 1 tbsp. salt;
- 125 ml water;
- 1 tbsp. l. hand cream (vegetable oil).
Combine all ingredients and knead thoroughly until smooth. You can use a blender or mixer to speed up the process. The dough turns out very soft and pliable.
- 1 tbsp. flour;
- 1 tbsp. finely ground salts;
- 125 ml water.
This is a recipe for salt dough for sculpting large products. First of all, combine the salt with the flour, and then add water little by little, kneading until an elastic mass is obtained.
- 1.5 tbsp. flour;
- 1 tbsp. salt;
- 4 tbsp. l. glycerin (sold at the pharmacy);
- 2 tbsp. l. wallpaper glue + 125-150 ml of water.
This dough is well suited for making delicate works. We recommend using a mixer for mixing - it makes the task much easier.
Tools you need for creativity
In addition to the fact that you need to learn how to make salted dough for modeling, it is also important to prepare the necessary tools and a set of accessories:
- a small rolling pin or bottle of water (you can’t live without it!);
- modeling board;
- knife;
- ballpoint pen refill (for creating holes and patterns);
- brush;
- container with water;
- shaped cookie cutters;
- buttons, beads, rings, lace, etc. for making impressions;
- paints.

All this will be useful to you for creative work with the dough.
Basic drying methods
When the product is ready, it must be properly dried. There are several methods. Let's look at the most popular of them.
Method 1 - In the oven (preheated)
Drying in a slightly open oven at a temperature of 55-80 °C (the craft is placed in a preheated oven). Place the product on a lined parchment paper baking sheet or heatproof bowl. The process may take about an hour or longer depending on the size of the figurine.
Method 2 - Natural conditions
This means drying in the open air (but not directly sun rays). This method takes longer than the first, but is more effective. It is best to place the product on a wooden or plastic surface. Air drying takes about 3-4 days. But we do not recommend drying it on a radiator - this can lead to the craft cracking and crumbling.
Method 3 - In the oven (cold)
According to this method, crafts made from salt dough should be placed in cold oven and only then turn it on, eventually heating it to 150 °C. The products should cool there while the oven cools down.
Figures made from unpainted dough are attractive in themselves. However, after drying, they can be decorated with gouache, watercolor or acrylic paints. They are good because they dry quickly, do not smudge and do not leave marks on your hands.

Coloring methods:
- Mix watercolor paints with water with a brush and apply to the product so that they do not spread.
- Mix gouache with PVA glue and evenly cover the craft with this mixture.
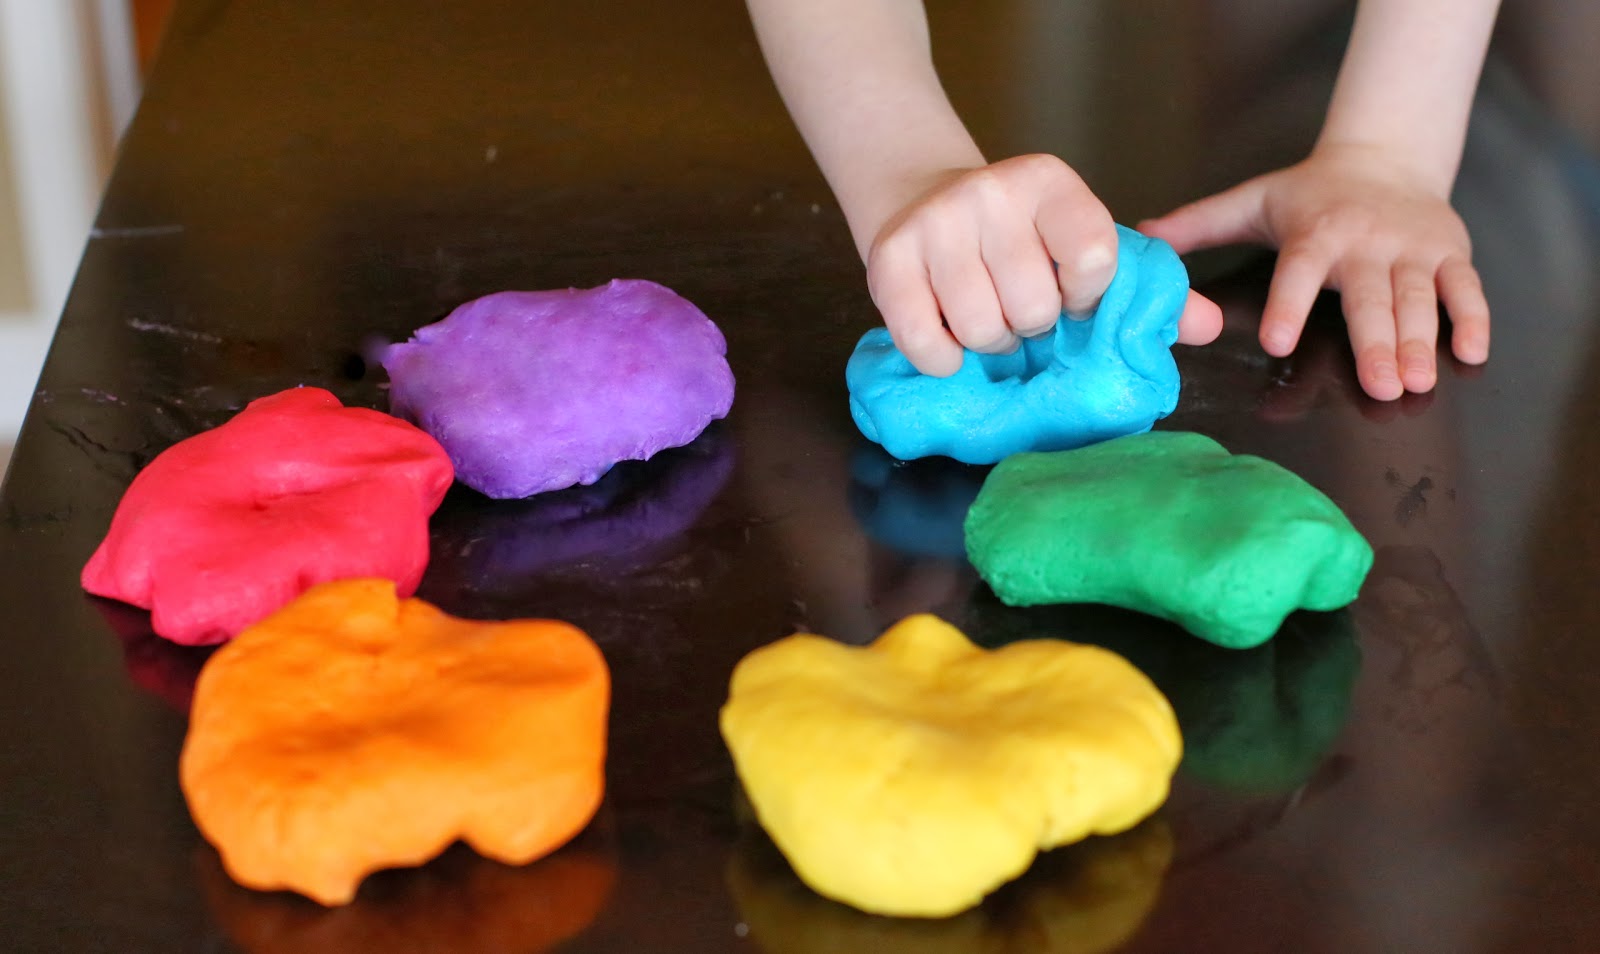
- You can give the dough a certain color while kneading. Divide it into parts - there should be as many of them as the shades you need to paint. Roll them into balls, make a hole in the middle of each and drop a couple of drops there food coloring, diluted in water. After this, knead the dough so that it colors evenly.
Modeling from salt dough also allows you to use various elements for decoration. These can be cereals, pasta, buttons, shells, beads, all kinds of threads and ribbons. The scope for imagination is unlimited!
Why is varnishing needed?
Finished products are varnished so that the paint does not fade or wash off, and appearance the work did not deteriorate over time. Varnishing is used if necessary and solely at the request of the author.
You can add shine to the product with varnish:
- liquid - you need to cover the product with it in several layers, the result is ruddy and natural;
- thick - it better protects the craft from moisture; you can use either a varnish that imparts a mirror shine or a matte one.
It is preferable to use aerosol varnish. A single application is enough for the colors to sparkle brighter and the work to become protected from damage.
Although, practice shows that proper drying allows you to not even resort to varnishing - the product will retain its original appearance for many years.
Possible problems and their solutions
Here is a list of problems that may arise when drying or decorating a toy made from salt dough:
- The dough has bubbles or cracks after drying. This may be caused wrong choice flour or failure to follow drying rules. The simplest and most inexpensive flour for modeling is suitable - low-grade rye or wheat. And the product should be dried without undue haste in a slightly preheated oven with the door ajar. In general, it is better if the craft dries naturally.
- The product is cracked after painting. This can happen if you start painting a craft that has not yet dried enough. Dry it on fresh air, smooth out the roughness with sandpaper and repaint.
- The product is cracked due to its large thickness. In this case, with reverse side or you need to remove excess dough from below. In order for a large product to dry evenly in the oven, it must be turned over periodically.
- An element has broken off. You can try gluing it with PVA glue, but it’s better to just smooth out the unevenness and decorate it with some kind of decoration.
- The craft has faded after painting. An additional coating of varnish can restore the color to its former richness and make the craft brighter.
Crafts made from salt dough
According to some assumptions, the first dough moldings were used by cooks to decorate baked goods. Today, you can sculpt anything from such a wonderful material: paintings, souvenir figurines, and toys.
So, when you already know how to make salt dough, let's start creating crafts from it.
2015 is the year of the wooden sheep, so the most popular souvenir is a sheep made from salt dough. We offer you a workshop for making such a figurine.
Want something interesting?
You will need:
- fine table salt;
- Wheat flour;
- cold water;
- foil;
- brush;
- whitewash;
- gouache;
- black marker.
Step-by-step sequence of actions:
- Combine equal proportions of flour and fine salt, add some water.
- Knead elastic dough and send it to cool in the refrigerator for two hours.
- After this time, you can start sculpting. Make 4 balls from the salt dough. These will be the sheep's feet. Place them as shown in the picture.
- Roll up a piece of foil and place it in the dough ball. Then you need to roll a ball out of the flatbread - this is the body of the lamb, it needs to be laid on top of the paws.
- Now use pieces of dough to form a head, curled horns, ears and eyes.
- To get something like curly sheep's wool, roll a lot of small balls and place them evenly on the back of our animal.
- The workpiece is ready. All that remains is to place it in the oven, preheated to the minimum temperature. The sheep should dry thoroughly without cracking. At a temperature of 50 °C it will take about 3 hours to dry and up to half an hour to cool.
- Then cover the entire surface of the figure with white. Wait until they are completely dry.
- Color the sheep with gouache. And using a permanent marker you can draw eyelashes, a mouth, outline horns and other details as desired.
- Finally, varnish the lamb. The varnish will add shine and smoothness, giving the craft a finished look.

Testoplasty allows you to create not only small voluminous souvenirs, but also entire paintings from salt dough. Of course, creating them will require some skills, patience and perseverance. However, the result can exceed all expectations, becoming a wonderful gift for loved ones or decorating the interior of your home.
We act in stages:
- Creating a painting, like any other dough craft, begins with preparing the dough itself. Various variations There are many recipes, but the most popular is this: 1 tbsp. finely ground salt, 2 tbsp. flour, 200 ml water. Knead elastic salted dough for crafts, pack it in a plastic bag and put it in the refrigerator for a couple of hours.
- Take out the finished material and you can start creating by pinching off a piece of dough from the bag (it crusts quite quickly in the air).
- To connect parts together, use water rather than glue.
- It is most convenient to create a picture on foil. It is necessary to dry the result: in the oven or in the air.
- When the craft is dry, paint it with gouache and cover it with two layers of varnish.
- Finally, attach the picture to canvas or any other fabric in the frame.
All kinds of cats, birds, snowmen, bears, dachshunds, flowers and much more look very beautiful. You can create paintings based on the plot of a particular fairy tale - this will be especially interesting for children. You can see some examples of work for inspiration in the pictures.

Symbolic mucous figurines
Salty dough - great alternative clay. And crafts made from it can become a unique decoration for your home or original idea for a gift. It has long been believed that flour in the house is a symbol of prosperity and family well-being.

Regardless of what kind of figures you plan to make, the dough for them can be prepared according to one of the recipes given above.

- Roll out the dough with a rolling pin until it is 0.5 cm thick.
- Make imprints of any cookie cutters on this sheet. These are future salt dough figures.
- Turn on the oven and line a baking tray with baking paper.
- Using a wooden spatula or simply using your hands, transfer the figures to the baking sheet.
- Using a cocktail straw or a toothpick, make a hole in each of the figures so that you can then thread a thread through it and hang the figures, say, on a Christmas tree (or hang around the house).
- Bake the products in the oven at minimum temperature for several hours.
- Transfer them to a flat surface and let cool.
- Color the toys as you wish.

Here are some more examples of mukosolek designs that are easy to make and look amazing!


- Each recipe for salted dough for crafts involves using exclusively wheat or rye flour(but definitely not pancake salt) and finely ground salt (not iodized, since the dough will not be homogeneous, but with large inclusions).
- The mixing water should be very cold. Add it in portions, carefully kneading the dough. Depending on the flour you choose, different amounts of water may be required.
- The dough should not stick to your hands or crumble. If it doesn't stick well, add a little water, and if it sticks, add a little flour.
- Salt dough is perfectly stored in the refrigerator in a plastic bag or in a container with a tight-fitting lid. Use it piece by piece as needed because ready dough When exposed to air, it quickly becomes covered with a dry crust, which spoils the appearance of the products. The test shelf life is 1 week.
- Crafts made from small elements look more elegant. To ensure that the parts adhere well to each other, moisten the joints with water using a brush.
- To tint the dough itself, add a little food coloring diluted in water (for easter eggs). From the dough different colors You can create new shades: to do this, simply knead the multi-colored pieces with your fingers.
Testoplasty is not just children's fun, but also a correctional activity that allows you to develop fine motor skills, perseverance and imagination of children, cultivating aesthetic taste. And for adults this is great way self-expression and recuperation. We wish you inspiration, and let creativity be only a joy!
