Yes, Easter is just around the corner. It's time to think about what gifts you can give to your family and friends. And although the assortment in stores today is quite wide, you want to surprise the person you are preparing it for with something. After all, it may well happen that someone will give the same thing as you for a holiday.
What gifts can you make with your own hands?
But so that the gifts do not turn out to be identical, they need to be... made with your own hands! Then it will definitely be unique. What can you do with your own hands?
- from clothes;
- some cute little thing;
- make a box or carved shelf out of wood;
- something or ropes;
- embroider a portrait of the recipient;
- make a wall panel using patchwork technique;
- using the felting technique - felting wool - make slippers or boots, a toy or a hat;
- make an organizer or cup for pencils out of papier-mâché.
Easter souvenirs
As a gift to unfamiliar people, small souvenirs that are easy to make with your own hands are perfect. These can be a variety of small Easter-themed items: towels with embroidery in the shape of hens and chicks, oven mitts in the shape of Easter bunnies, soft toys - hens and rabbits holding a basket of eggs in their paws.

And crafts made from salt dough are also perfect. From this material you can also make hens and chicks, rabbits and a glass stand for an egg. By the way, a souvenir egg can also be made from dough and brightly colored.
Master class “Easter bunny made from salt dough”

Making this craft is not as difficult as it might seem at first glance.
- First we prepare the products for the test. We will need to measure fine salt - one volume part, ordinary flour - two parts. We will take as much water as needed.

- Pour all the ingredients into a container and add water little by little, stirring. It is convenient to use a mixer. The dough should not be liquid - approximately resemble dumpling dough.

- Knead it well on the board.

- To make the figure not so heavy, and for the dough to dry well without cracks, you need to make the rabbit hollow inside. You can use an egg shell for this. By making small holes on both sides of the egg, the insides are blown out, and the shell itself remains empty.

- The dough is rolled out and a rabbit paw stand is cut out of it. It is worth remembering that the dough in the open air very quickly loses its elasticity and dries out. Therefore, the remaining piece should be immediately placed in a plastic bag.

- Now we place an empty shell on the paws.

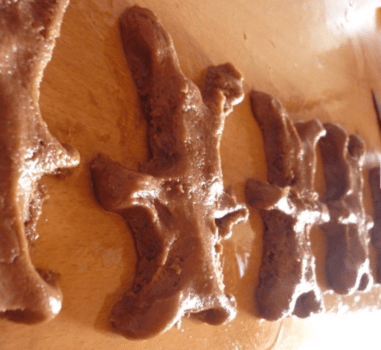
- We coat it with dough, form a head with ears and a tail. So that when drying, the hot air inside the shell does not make bulges and holes in the dough when escaping, we need to make a couple of invisible holes right through the shell, trying to get into the holes through which the insides of the egg were blown out.

- After the rabbit is sculpted, you need to dry the figurine. I use a microwave oven. But you should not immediately dry the rabbit on the cooking mode and for a long time. It is better to carry out the procedure in several stages of 2 minutes each, starting with the “defrost” mode. Each time you check the product, you should remove it and inspect it. If cracks appear, they should be immediately covered with moistened dough.

- The dried figurine needs to be painted. You can use watercolor or gouache, although acrylic or oil paints work great. The rabbit can be striped or polka dotted, checkered or flowered - the brighter it is, the better.

This cute trinket will appeal to everyone, because the holiday of Bright Resurrection comes every year, which means that every year the person who was presented with this souvenir will take out a rabbit to decorate a dish with paints, and remember the one who created this masterpiece with his own hands.
Dough modeling is a fun way to spend time with children. After all, they not only sculpt, but also cook: they can experiment with the flour mixture in the process of measuring and mixing ingredients, and then observe the metamorphoses that occur with the finished product when temperatures change during the drying process.
In addition, crafts made from salt dough are harmless to children, they do not contain allergens and can be safely tasted.

Figures made from homemade flour mixture are harder and preserve better than plasticine.
Basic play dough recipe
Before making modeling dough, you need to imagine what kind of products will be made, whether the dough needs to be painted, how long the modeling will take, and what drying mode will be chosen.

The basic recipe for craft dough consists of one part salt and two parts wheat flour to which 2 tsp citric acid is added. for 1 cup salt and 1 tbsp. l. vegetable oil. The amount of water added during kneading should be equal to the amount of salt.

Dough preparation method
The dough is prepared in the following order:
- Mix flour with salt and citric acid and pour this mixture into a saucepan;
- Place the pan over moderate heat and gradually add water, stirring constantly, until the dough comes away from the pan and can be rolled into a ball.
- Remove from heat and knead the dough with your hands.

Food coloring or gouache must be diluted in water, which is added before kneading the dough.

During operation, depending on the required consistency, the salt-flour mixture can be further diluted with water or oil, or flour can be added for hardness.

It is better to prepare the dough in small portions if possible, right before starting to model, and store it only in a tightly closed container or cling film.

Drying salt dough crafts
In order for handmade salt dough crafts to retain their shape and not break or crack, you need to choose the correct drying mode. You can simply leave the figures to dry naturally in the air, or you can place them in the oven.
There are two different methods for oven drying. The first is to preheat the oven, then turn it off and place the figures in the heated space. You can also bake the products at 100 degrees, making sure that there is no burning.

A master class on making dough crafts involves, first of all, experimenting with the material: the composition of the dough and its drying mode, so failures in this process are inevitable.
Helpful advice: When starting sculpting with children, you need to set them up so that the first success, after many not entirely aesthetic attempts, becomes a real miracle for them.

It is better to start with simple and uniform shapes, such as round beads of various colors and sizes. You can use them to make garlands to decorate your room.

Then you can master more complex silhouettes - stars, hearts, and three-dimensional figures - New Year's snowflakes, Christmas trees, Easter eggs with patterns, egg coasters, chickens.

You can time the production of figurines to coincide with the holidays, or choose more neutral motifs for all occasions, making souvenirs and gifts in the form of stylized horseshoes, suns, stars, airplanes and funny faces.

During modeling, you can use special molds for modeling and baking, and other things, according to the prompting of your imagination: garlic crush - for making thin ropes from dough, bottle caps - for cutting out circles, plastic toy parts - for making prints, almost everything Whatever you have on hand, from toothpicks to toy car wheels, can become a tool for modeling dough.
Note!


It is easy to make holes in the salt dough, both decorative and for hanging on threads. Holes on flat figures retain their shape when dry.

But when making more voluminous parts, such as spherical balls, in order to create a hole for the thread, you need to pierce the figure with a toothpick or other sharp instrument made of wood or plastic and do not remove it until the product dries.

Helpful advice: To glue the dough elements, just wet the individual areas and apply them to each other.

You can make garlands, keychains, medals and pendants from voluminous and flat figures. You can fashion chests and cups for storing jewelry, small treasures and pencils.

Volumetric figurines of animals
Three-dimensional figurines of animals are especially popular among children; they can be made in accordance with popular step-by-step instructions, which are intended for plasticine and clay crafts.
Note!


You can sculpt from dough without dyes, then paint the finished figurine and, after drying, coat it with varnish.

You can also cut out various figures: having made a model of them from cardboard, place it on a smooth dough previously rolled out with a rolling pin and carefully cut out along the edges. Then you can paint the figurine, add the necessary texture - roughness, strokes, make eyes, a nose or decorations from beads.

A wonderful homemade gift could be a photo frame or a unique candlestick.

Making panels that combine elements of mosaic, applique and modeling can captivate both children and adults. For the little ones, simple drawings are suitable: you first need to draw a silhouette on parchment, then carefully fill it with dough along the lines.

You can also conceive and implement more complex ideas using beads, mosaics of cereals, dried flowers, etc.
Note!


Photos of dough crafts


Joint creativity unites! It's good to make crafts from salt dough as a family project. From which you can make a couple of cute Easter bunnies. The older generation will knead the dough and make sure it dries, and the younger generation will enjoy decorating the crafts. It's time to get down to business!
We will need:
Wheat flour 200 g;
- extra salt 200 g;
- water 130 ml;
- paints;
- brush;
- White paper;
- a simple pencil;
- stationery scissors;
- knife;
- foil;
- satin ribbon;
- sponge;
- pin;
- colorless varnish;
- heart-shaped button;
- artificial eyes.

First, let's prepare templates for our Easter bunnies - draw them on paper with a pencil (you can get the template here: rabbit 1 And rabbit 2).


We sift the flour, since it is not desirable for any debris to get into the product. Cool the water in the refrigerator. Dissolve extra salt (it is better to use regular extra salt, which does not contain iodine) in cold water, add flour and knead the elastic dough. Flour and salt of the same weight (200 g in our case) are completely different in volume, this is about a glass of flour and half a glass of salt. Sometimes, when kneading, if you don’t get an elastic dough, add either water or flour depending on the circumstances.

Roll out half of the salt dough into a layer approximately 0.5 cm thick. We attach a template of one rabbit cut out of paper. 
We run a knife around the perimeter, remove the paper and we have one Easter bunny blank. 
In the same way, we cut out a second rabbit from the salt dough, only we make another hole in it, into which the ribbon will then be threaded. This will be a salt dough pendant rabbit.


Place them on foil (parchment is not recommended because the dough sticks to it) and put them in the oven to dry. Drying time depends on the thickness of the salt dough product and on the characteristics of the oven; it can be gas or electric with different minimum temperatures. At high temperatures, products tend to swell and crack. Therefore, we turn on the minimum possible and dry for at least 1 hour. Let the products cool. If the rabbits have not yet dried enough (when you tap on the product, a ringing sound should be heard), then dry it completely.
Dilute pink paint (mix red and white) with a small amount of water in any small container (jar lid). Cut a piece from the sponge and hold it in one part with a clothespin. Dip the sponge into the diluted paint and apply it with patting movements to the rabbit with two protruding ears. This method will allow you to quickly and evenly paint the entire area.

In the same way, but with yellow paint, paint the second rabbit. 
On the pink rabbit we draw eyes, a nose and antennae with black paint (a felt-tip pen). Red for lips, brown for eyelids. 
Next, we paint its entire surface with flowers and circles of various colors. 
Let's move on to the second rabbit. We outline the edge with black paint. On the protruding ear we draw something similar to a carrot - we design the middle of the ear. On the second ear we draw a real carrot with a green tail.

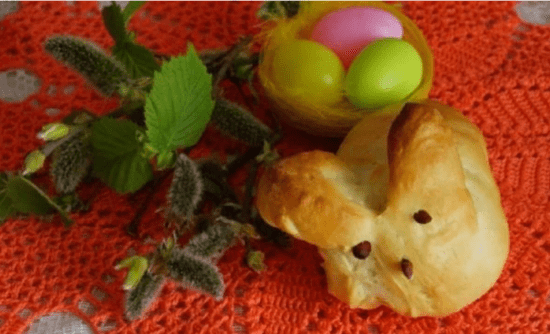
Glue on a heart button (this will be the nose) and artificial eyes. Using black paint, draw a line down from the nose and draw antennae. 

Let the paints dry, and for a glossy shine we cover our Easter bunnies with regular colorless nail polish. The final touch remains, we tie a bow made of satin ribbon to the ears of the pink rabbit, and thread a ribbon into the left hole of the second rabbit, which we tie in a knot. Our Easter crafts made from salt dough are ready!


Now they can be used to decorate your apartment for Easter. It will also be a nice gift for friends and family. Happy Easter to you, dear handicraftsmen, and good luck to you in your creative endeavors!
Irina Nagibina
Сhudesenka.ru
There is an offer to bake yourself some wonderful little animals for the holiday - Easter bunnies. And, yes, again a couple of options...
Honey bunnies
Based on site materials http://fastfoodinfo.ru/honey_bunny_buns/
As they say, everything ingenious is simple. And the simpler the more interesting and tastier it is. The recipe for plump, cute and cute bunnies will be somewhat similar to Japanese manju. This recipe is easy to make and perfect for Easter.
For preparation you will need:
- 1 cup plus one tablespoon of warm water (37 g)
- 1/3 cup butter (80 g)
- 2 tablespoons yeast
- 1/4 cup sugar (60 g)
- 1 teaspoon salt
- 1 egg
- 3.5 cups flour
- 1/3 cup warmed honey

Preparation:
1. In a large bowl, combine water, oil, yeast and sugar and let sit for 15 minutes. Add salt, flour, egg and knead the dough.
2. Preheat the oven to 200 degrees. Divide the dough into 24 balls. Give the balls the shape of an egg - from the side of the muzzle the oval should be narrower. Place baking paper on a baking sheet, “seat” the rabbits and let them rest a little in a warm place for about 15 minutes so that the dough rises slightly.


3. Take kitchen scissors and make ears for the rabbits as in the photo. The main thing is to make deep cuts almost to the bottom of the dough, otherwise the ears will lose their shape. Bake for about 11-13 minutes at 200 degrees or until golden brown.

4. While the buns are cooling, spread the tops of the buns with liquid honey. Use a toothpick or match to make holes - eyes.

But that's not all. Buns are buns, but you eat them and that’s it... But keep them as a souvenir? Therefore, here is option number two for you - as a keepsake.
And as a souvenir, we will make ourselves exactly these rabbits, only from salt dough. The thought just occurred to me that these cuties would be amazingly suitable for decorating Easter baskets and wreaths.
Remind me of the recipe? It's simple - a glass of flour, half a glass of salt and 125 ml of water. We make crumbs according to the previous scenario and bake at 100 C for 1-2 hours (depending on size).


And from the same dough we will make small eggs - let them be quail, all that remains is to paint them with imagination and specks... And that’s all! And use them anywhere!

Easter bunny (hare) - a festive decoration for Easter 2019 will delight both adults and children. Easter symbol in the culture of some countries of Western Europe and the USA. The symbol has pagan roots, dating back to festivals dedicated to fertility and spring. The Easter Bunny, as a symbol of fertility and wealth, has been a symbol of Easter in Germany since the 16th century and has since spread throughout the world. They make toys and sweets, as well as souvenirs in the shape of bunnies.
Many people associate Easter not only with Easter cakes, colorful eggs, but also with the Easter bunny (hare).
According to legend, this rabbit hides colorful chocolate Easter eggs in his rabbit nest. On Easter morning, kids try to find this bunny's nest in order to get chocolate sweets in the form of eggs. But according to the legend that parents tell their children, this can only happen to well-mannered, good and obedient children. And most importantly, those who manage to find such an Easter egg will be happy all year.
Easter bunnies or bunnies are a common pastry in some Western European countries, Canada and the USA. They are made sweet and savory, in different shapes and with different fillings. I offer this option for Easter baking.
Ingredients:
For the test:
Flour - 280 gr.
Butter at room temperature - 125 gr.
Cottage cheese - 180 gr.
Vanillin - 2 pinches
Salt - 1 pinch
For filling:
Medium apples - 2 pcs.
Cognac - 1 tbsp. (optional)
Ground cinnamon - 0.5 tsp.
Sugar - 3-5 tbsp.
Chopped nuts - 1 tbsp.
Flour or starch - 0.5 tbsp.
Butter - 0.5 tbsp.
Canned berries (optional) to taste
How to cook Easter bunnies for Easter 2019

For the filling, wash, peel and cut the apples into cubes. Place in a saucepan, add butter, sugar (or honey), cinnamon, cognac, flour. Simmer over low heat until thickened, stirring occasionally. Add nuts and berries. Leave to cool.

For the dough, mix butter, flour, salt, vanillin. Add cottage cheese. You can add 1-2 tablespoons of sugar to taste.

Roll the dough into a ball. If the dough crumbles, you can add a spoonful of sour cream. If it sticks to your hands, add a spoon or two of flour. Wrap in a bag or film and put in the refrigerator for 40-60 minutes.

Lightly roll out the dough, fold it, roll it out again. Fold and roll out again. This will add layering to it. Using the template, cut out 10-12 hare figures.

Make holes in half of the pieces to allow steam to escape.
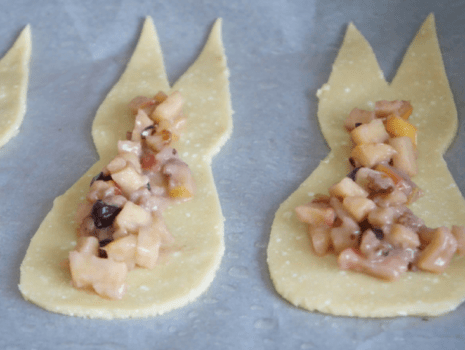
Place the cut out shapes on a baking sheet and add some filling. Brush the edges of the dough with egg or water.

Place the dough pan with holes on top and secure the edges.

Brush the hares with egg and sprinkle with sesame seeds. Make noses and eyes from berries and raisins. Place the baking sheet with the bunnies in the refrigerator while the oven heats up.

Bake at 220 degrees for 10-15 minutes.

Delicious holiday bunnies are ready! You can also make a savory filling (minced meat, or cheese with herbs). You can make regular bagels from leftover dough and filling.
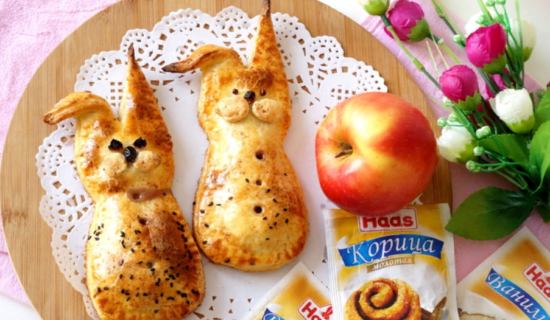
They turned out to be very cute bunnies, the kids will love them. Bon appetit! Happy holiday!
DIY Easter bunny (hare) made from dough
From the suggested amount of dough you will get 3 fairly large rabbits. The finished bunnies can be sprinkled with powdered sugar on top or decorated with icing sugar and colorful sprinkles. If you do not have a special mold, then the dough can be placed in a mold measuring 20x30 centimeters and bake 1 cake. And from it, using a special rabbit cutter, cut out rabbits.

Ingredients:
Dough
Butter - 75 g
Honey – 50 ml
Milk – 50 ml
Wheat flour - 200 g
Baking powder - 1 tsp.
Sugar - 130 g
Chicken eggs - 1 pc.
For greasing the mold
Butter - 1 tbsp. l.
Wheat flour - 1 tbsp. l.
How to make an Easter bunny out of dough
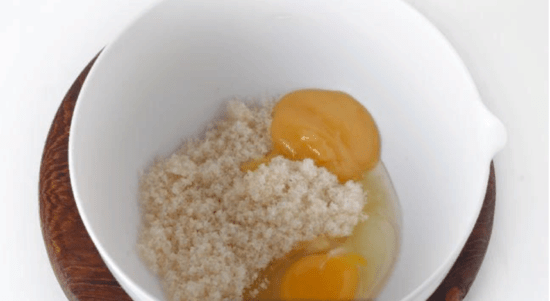
Combine 130 g of sugar, 50 ml of honey, 1 egg and beat for 4-5 minutes until light foam.

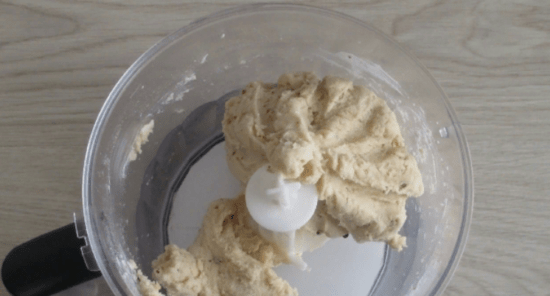
Add melted and cooled butter (75 g), milk (50 ml). Beat for another 1 minute.

Add flour (200 g) sifted with baking powder (1 tsp).

Beat on low mixer speed just until ingredients combine.

Grease a special mold with a rabbit-shaped indentation with a thin layer of butter and sprinkle with a thin layer of flour (1 tablespoon each).

Place some of the dough into the cavity so that it is flush with the sides.

Bake at 180°C for 10-11 minutes until golden brown. Remove from oven and cool.


Remove the rabbit from the mold. This rabbit can be sprinkled with powdered sugar on top or painted with sugar icing. Bon appetit!
Options for brightly decorated baked goods for children

For decoration you will need confectionery icing and decor. So, for the glaze, take 1 egg white and start whisking it by hand using a whisk, gradually adding powdered sugar. Bring to the desired consistency and, at the very end, add lemon juice. Divide the finished glaze into bowls, add 1 drop of coloring and you're done! Place in pastry bags or syringe. Everything is ready for decoration.

First we make the contours of the hares and leave them to dry.


Mix powdered sugar with juice, dilute thick syrup. Brush the round cookies with syrup and leave to harden. Leave a little syrup for gluing the bunnies' ears.

Make ears from mastic or marzipan and glue them with syrup. Ready to draw faces and bunnies. Children will really like these adorable bunnies!
Prepare and decorate Easter baked goods with your children. They will enjoy participating in such an important, responsible holiday creativity together with adults - preparing for Easter. They will have bright memories of such a family Easter celebration for the rest of their lives. Happy holiday!
On a note
If you don't have powdered sugar on hand at home, you can quickly make powdered sugar at home using a coffee grinder or a stone mortar.

Such beauty immediately puts you in a festive mood!
Baking Easter shortbread bunnies
These are shortbread cookies with sour cream in the shape of bunnies without using molds.
For these Easter bunnies cookies, firstly, you do not need to buy special molds. And secondly, the sizes of the products can be any you desire. Molding is elementary!
In addition to Easter, such cookies can also be prepared for the New Year, for example, in the Year of the Rabbit.
 Ingredients:
Flour - 230-250 g
Sour cream – 100 g
Butter - 100 g
Sugar - up to 100 g
Ground nuts – 0.3-0.5 cups
Baking powder - 0.3 tsp.
Vanilla sugar - 1 tsp. optional
Salt - 1 pinch
Preparation:

Pieces of butter should be ground with sour cream, granulated sugar, a pinch of salt and spices to taste (vanilla, cinnamon).

It is convenient to do this with knives for kneading the dough in a blender bowl, but you can also do it manually - with a fork or spatula.

Add flour with baking powder and mix.
Stir ground nuts into the dough.
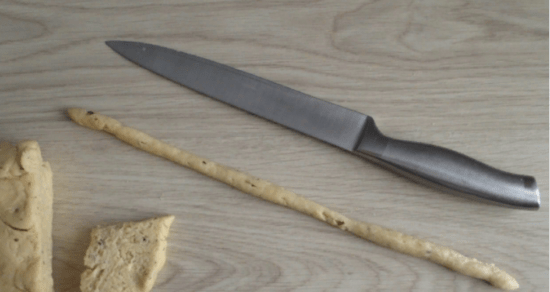
Determine what size you want the cookies to be. For small bunnies, strips or ropes of dough about 30 cm long and 7-10 mm in diameter were required.
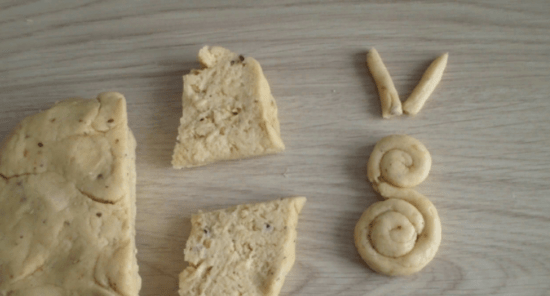
To obtain a figurine, start twisting the workpiece in spirals from the ends to the center so that the head is smaller and the body is larger. Shape the silhouette and attach the ears.

Place the cookie dough on a baking sheet, greased or lined with baking paper. And bake them in a preheated oven at 180-200 degrees until browned, about 20 minutes.

Easter bunnies cookies are ready. Bon appetit!
Advice
Add cocoa to the dough and get bunnies that look brown and taste chocolate.Easter bunnies made from gingerbread dough
Ingredients:
100 ml cream 20%
3 tbsp. l. cocoa
1 egg
180 g brown sugar
3 tbsp. l. honey
100 g butter
2 cups (200 ml volume) flour
2 tsp. baking powder
For the glaze
2 tbsp. l. powdered sugar
2 tbsp. l. lemon juicePreparation:
Pour cocoa powder into the heated cream and mix thoroughly.
Combine (beat with a blender) sugar, honey, egg and butter. Add cocoa and cream to this mass.
Now gradually add the sifted flour with baking powder. Don’t pour it all in at once; you may need less flour.
Knead into a smooth elastic dough, wrap it in cling film and refrigerate for 30 minutes.
After 30 minutes, take it out, roll it into a thick roller, which we cut into pieces 1.5 cm thick. Preheat the oven to 200 C.
We roll each piece with our hands into a flat cake, which we give it the shape of a brother rabbit.
Place the gingerbread cookies on a baking sheet lined with parchment and bake for 15 minutes.
For the glaze, mix the powder with juice and apply the outline of the gingerbread cookies. Or cover the surface of each gingerbread with a thin layer, and make an outline with a gel pencil for cakes.
The result was delicious honey gingerbread in the shape of hares. Bon appetit! Happy Easter!Cooking Easter bunnies from very tender yeast dough
Another wonderful recipe for holiday baking in the shape of bunnies that will delight children and adults.
Ingredients:
Flour - 700 g
Chicken eggs - 3 pcs.
Water – 80 ml
Pressed yeast - 30 g
Granulated sugar - 3 tbsp. l.
Salt - 0.5 tsp.
Sour cream – 350 gPreparation:
Heat the water until warm, in the microwave. Crumble the yeast into it and add 1 tsp. sugar, mix. And let stand in a warm place for 10 minutes until a foamy cap forms.
Whisk the eggs and sugar for 5 minutes.
Then add sour cream and mix.
Now add our activated yeast.
And sift the flour on top, be sure to sift, the baked goods will be tender and airy.
Knead soft, plastic dough. You may need a little less or more flour, depending on the moisture content of the flour and the size of the eggs.
Leave the dough in a warm place for 1-1.5 hours, during which time it will triple in size.Forming bunnies from dough
Place the dough on a table lightly sprinkled with flour and knead it lightly. Tear off small pieces of dough and roll into balls.
Then roll each ball into a slightly uneven sausage to form a rabbit.
Make a cut on one side, these will be the ears.
And bend this part back onto the body. Make a tail out of a small piece of dough.
Make eyes and nose from apple seeds. You can make it from cloves, then the finished rabbits will acquire a pleasant, spicy aroma.
Place the future rabbits on a baking sheet, let them rise for 15-20 minutes, during which time we preheat the oven to 200 degrees.
Before baking, you can brush them with egg or sweet water.
Bake for 20-25 minutes until golden brown.
The result is these funny rabbits (you can also draw antennae to make them look more similar). Have fun baking, make your family happy and bon appetit!On a note
The secret to a successful test is that all products should be at room temperature. It’s better to take the sour cream and eggs out of the refrigerator in advance so that they warm up.DIY Easter bunny (hare) - popular crafts for Easter 2019,
I offer beautiful and original options for holiday crafts.
The Easter bunny can act as an independent gift toy, souvenir, or in the form of a stand for paints, or act as a basket for other holiday paraphernalia, as well as decorate the interior.
Making funny paper rabbits
Invite the children to make cool bunnies together for the holiday. The result of joint creativity will delight you!
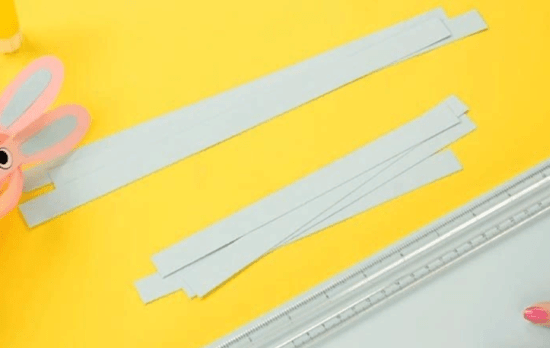
To make this craft you will need: paper, glue, cardboard, scissors.
Detailed instructions for the work process
First, cut thin strips into rectangles.
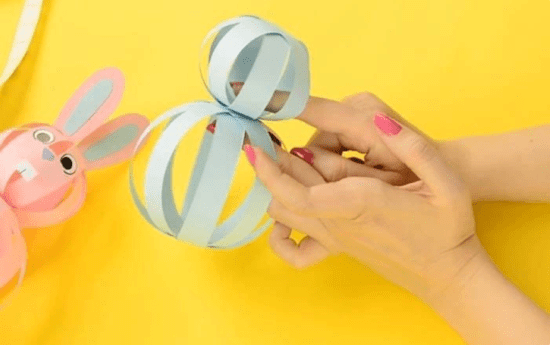
Then glue the eight-pointed star together, spreading glue down the middle.
Now also glue the top of the paper together to form a ball.
Make another ball in the same way, but just smaller in size. Connect them to each other using glue.
Cut out the ears and glue the pink center.
Cut out the following elements: eyes, muzzle, teeth. Draw a nose. Glue all the elements.
The result was great creative bunnies. Happy holiday!
How to make an adorable rabbit from textiles
Happy holiday!
Crocheted Easter bunny (hare)
Happy holiday!
We make a bunny from salt dough or plasticine
An excellent tool for making any souvenir is plasticine or salt dough. If you have imagination, you can easily make this furry symbol of Easter. You will need: any material for modeling, stacking.
Simple options for ready-made eared animal crafts
A simple option made from a terry towel is an interesting quick gift for children.
“Sleeping” fabric bags are a cute big-eared symbol of the holiday - bunnies.
Original coasters made of salt dough in the shape of a rabbit.
Original bunnies made from plastic or paper cups, or you can also use a paper roll or egg cup.
This project is made from cardboard and glued a paper cupcake tin to the back. It's simple: prepare templates, then cut and glue.
Happy Easter to everyone! I hope the publication was useful and interesting. I wish everyone to always be positive!
For you, publications for the holiday table: delicious cottage cheese Easter custard
P.S. Very soon the whole country will proudly celebrate Aviation and Cosmonautics Day on April 12. Our courageous cosmonauts invested so much effort in the exploration of outer space. And a musical greeting card on this wonderful holiday awaits you on my blog. For older people, this will be a small journey into the past, the world of childhood - remember the magnificent emotional films “Youths in the Universe”, “Solaris”, “Milky Way”. The red thread running through them is the hope and dream of humanity - the exploration of space, other planets, worlds, knowledge of the Universe. Enjoy watching!
Dear readers, another important and useful news from my blogging mentor Denis Povag. I recommend it to those who want to earn money: