From the momscraftyspace blog
I suggest you grow sugar crystals. It will be very interesting to do this with your children!
Because such crystals are not only an unusual sweetness, but also a study of chemistry,
and children will remember the fun, tasty, sweet, colorful chemical reaction for the rest of their lives.
We will need:
wide-necked jars or glasses,
wooden skewers, clothespins,
food colors, flavors,
4 glasses of water, 10 glasses of sugar
and a little patience))
Manufacturing process
Pour 4 cups of water into a saucepan and add 4 cups of sugar.
put on fire (note that the solution will increase in volume, take a larger pan),
Bring to a boil over medium heat and add the rest of the sugar while stirring regularly.

When the sugar has all dissolved, set the pan off the heat for 15 minutes.

While our solution is cooling, prepare the sticks.
Soak them in water then put them in sugar to start
formation of crystals, the sticks are wet - the sugar will stick.
After this, be sure to let the sticks with the stuck sugar dry completely.
if the sticks are even slightly damp, you won’t succeed,
when you place them in a hot sugar solution,
all the sugar will fall off and new crystals will have nothing to grow on.

Pour sugar syrup into glass jars or glasses, add food coloring.
Slowly lower the sticks into the solution and secure with clothespins.
Make sure that the chopsticks do not touch either the bottom of the jar or each other,
There should be a distance between them for crystals to grow.

Place the jars in a warm or sunny place.
Aaaand....wait, wait, wait and wait some more.
The crystals will be ready in about a week.


I will add from myself.
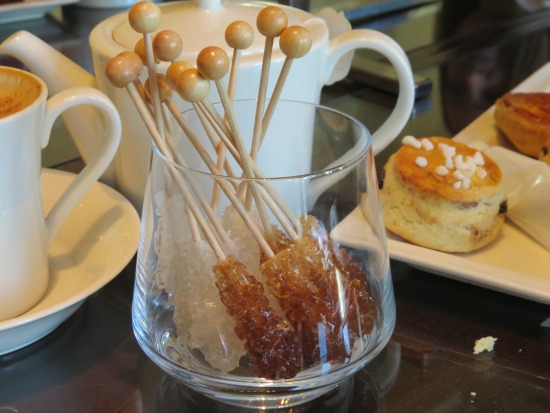
Once upon a time I was brought from abroad a beautiful box in which
Several varieties of tea and sugar sticks like this were discovered -
from white and brown sugar. I stirred freshly brewed tea,
sweetening...And I also liked to just gnaw on them))
So you can take the idea on board and create an original and delicious gift,
combining such sweet sticks and a tea mixture, also prepared with my own hands.
But in this case it is better not to use powder dyes,
They are still harmful and will color the tea in unnatural colors.
When children are born into a family, parents begin to realize how little they know about this world. Why is the faucet beeping? How does a plane fly? Why is the sun yellow? You will have to prepare answers to all these questions. But the young researcher will not stop there. He needs to see exactly how certain processes occur. How ice freezes, how snowflakes form, how crystals grow. Satisfy your young know-it-all and make sugar crystals with him.
Chemistry in our home
If you have already shown your child a standard volcano made of soda, vinegar and gouache, and are now looking for something else to surprise him with, then our article is especially for you. Miracles will begin to happen right next to you, and you won’t have to spend a lot of money. All you need is sugar, water and patience. Yes, sugar crystals don't grow overnight. This will take about two weeks. But every day they can be observed through glass.
Visiting Santa Claus
This is exactly what this adventure could be called. Sugar crystals most closely resemble oddly shaped ice icicles. If it’s summer outside and the children are missing the wonders of winter, then it’s time to invite them to create a delicious miracle together. The sugar crystals turn out very beautiful. Sparkling with many facets, they attract those with a sweet tooth. And of course, they are very tasty.
And making them is not at all difficult, but it takes a long time. Preparation will take about 20 minutes in the evening and the same in the morning. And then every day the children will run ahead of each other to see how much their crystals have grown. Invite them to keep a diary of observations, let them take photographs and take measurements. They will feel like real testers.

No age restrictions
The older the child gets, the more difficult he wants to do experiments. Therefore, edible snowflakes are of interest mainly to younger schoolchildren. Give the elders something more complicated, like experiments with bright blue crystals of copper sulfate. But usually they, after grumbling a little, begin to watch the growth of snowflakes with curiosity. Preschoolers will also be very happy to join in the observations. But the most important thing is that even if a child accidentally breaks the jar, nothing bad will happen. Well, you won't get sugar crystals on a stick.
By the way, if it doesn’t work out the first time, then you shouldn’t despair. You can try again, because the sugar syrup is already ready anyway. In addition, it can be used to make jam.

What will you need?
If you are interested in how to make sugar crystals, then let's move on to the necessary products and equipment. For the first time, you can get by with 3-4 pieces. If the kids really like the idea, then they can repeat the sweet miracle in double size. So, you need to prepare:
- Sugar - 5 cups + 4 tablespoons.
- Water - 2 cups and another 3 tablespoons.
- Bamboo skewers - 4 pieces.
- Transparent glasses.
- A saucepan for boiling syrup.
- Cardboard for securing the skewer in the glass.
- Dyes optional.
Preparatory stage
The first step is to prepare the ground for crystal growth. They will not cling to a smooth stick; they need a substrate. To do this, cook a little sugar syrup from just 2 tablespoons of sugar and 3 tablespoons of water. Stir until the grains dissolve, then carefully brush the skewers with syrup. Not completely, but only to the length over which the growth of the icicle will extend. Scatter two more tablespoons of sugar on a sheet of paper and carefully roll our skewers in it. It is important that the grains adhere evenly over the entire surface. They will be the basis on which the crystals will grow.
That's all, leave it to dry until the morning. This is also an important point, because if you immediately dip the sticks into the syrup, the sugar stuck to them will immediately melt. And it must be preserved as the backbone of the building.

We continue to work
In the morning our sticks have dried well, we can continue working. So quickly write down how to grow sugar crystals.
- Pour water into a saucepan and place on fire.
- Add half the sugar and heat until dissolved, stirring.
- Now comes the time for the rest of the sugar. And also do not forget to stir until completely dissolved.
The rich syrup is ready. Let it sit for 15 minutes and cool slightly. Schoolchildren can also master sugar crystal recipes; there is nothing complicated here. In the meantime, you need to prepare skewers on which magical icicles will grow. To do this, you need to cut out pieces from thick cardboard, slightly larger in diameter than the prepared glasses. You need to insert prepared skewers into these pieces.
What are these cardboards for? They have two tasks. They prevent future crystals from coming into contact with the walls and bottom of the glass and growing to them, and also protect the solution from dust. And the final touch. You need to pour hot syrup into glasses and place skewers in them.

Dyes and flavorings
Sugar crystals made at home can be different. Instead of water, use cherry syrup from homemade compote - and the taste will be completely different. But then you will not be able to observe the growth of crystals through the walls of the glass. Of course, they can be raised above the surface and lowered back.
But most often a small amount of food coloring is used. It must first be dissolved in water. You will need powder on the tip of a knife per glass. Dissolve this amount in a tablespoon of water, then mix with syrup. But when adding dye, the solution turns out to be less saturated and the crystals grow slightly smaller. Of course, this is not critical, but many agree that transparent icicles are the most interesting.
Observation
That's it, nothing more is required from you. Just check how the growth is going. Believe me, it's very interesting. The very next day you can notice that everything is working out. The first days are best observed and photographed through glass. But after a week, you can calmly lift the stick, examine the forming edges, and lower it back into the solution. It will take at least 14 days for the crystal to be effective. Now you can get your personal crystals, the fruits of labor and many days of waiting. Take a photo, then you can eat them like regular candies, which they are. Children claim that they turn out much tastier than store-bought sucking candies. This is not surprising, because they themselves created this miracle.
If the result is not visible
People who are trying to grow icicles for the first time periodically encounter this. The syrup is poured in, the skewers are immersed, but nothing grows on them. And usually, after a week of painful waiting, the syrup is sent to something else, and the idea is considered a failure. In fact, it is possible that the room is simply too cold. Under such conditions, the crystal will grow very slowly, but stunning, cubic faces will form.
Temperature changes can also affect growth. Try to keep them to a minimum. And another very common mistake is that when skewers are dipped into syrup, it should be slightly warm. Not cold, but not hot either. These points need to be taken into account so that everything turns out just perfect. Surprisingly, adults make such sweets for children, but they themselves usually rush to check the contents of the glasses in the morning even faster than children. That is, the activity is very exciting. And for the New Year holidays you can make such crystals for all family members. An original handmade gift.

Instead of a conclusion
Today we looked at a recipe for sugar crystals on a stick. Amazing and magical, they will form before your eyes. Of course, this is just a candy, but the process of making it will be an excellent option for joint leisure time for children and adults. As an option, you can try making a salt crystal. The principle is exactly the same. The only difference is that you can't eat it later. The salt crystal grows a little faster, the result is unique, more voluminous, but very fragile. Therefore, it will definitely not be possible to save it as a memory. But it is quite possible to observe the construction process.
Few people are able to remember school chemistry lessons without shuddering. Boring and incomprehensible formulas, vague names of substances, similar to the words of an exotic language... the only outlet was laboratory experiments! So why not remember your school days (or if you are still studying, apply the knowledge you gain in practice) and grow crystals at home? After all, crystals are one of the most beautiful phenomena of inanimate nature. Shining in the light, shiny, bizarrely shaped, transparent, colorless or with bright rich colors: scarlet, azure, lemon yellow...
Do you want to know, how to grow a crystal at home from regular sugar? Then read this article and you will find out everything!
Safety precautions when growing crystals at home
Warning! Before we move on to growing crystals at home (even such safe ones as sugar crystals) it would not be amiss to remind you of the need to comply safety precautions:
- do not use food utensils during the experiment, otherwise you may get poisoned;
- do not use unknown or expired substances;
- after completing the experiments, thoroughly ventilate the room and wash your hands with soap;
- When conducting the experiment, use gloves, safety glasses and an apron;
- If reagents come into contact with your skin or eyes, rinse them immediately with running water!
- Keep reagents away from children! Be extremely careful and careful!
And now, you can begin the experience itself.
How to grow a crystal from sugar
Let's start with perhaps the safest and most affordable option - growing a crystal from regular sugar. We will grow an unusual crystal, and a crystal on a stick! It should turn out very beautiful and unusual. So, here are step-by-step instructions on how to grow a crystal from sugar:
1. First we need to prepare the blanks - sticks on which we will grow sugar crystals at home. More precisely, we will need 2 sets of sticks. That is, there should be twice as many of them as the number of crystals to be grown (it is optimal to grow at a time 5 crystals).
Any chopsticks will do: thin twigs, sushi sticks, etc.
Then you need to make some sugar syrup. To do this, heat a quarter glass of water with two tablespoons of granulated sugar until the mixture reaches the consistency of syrup. Dip one of the sticks into the syrup and roll it in granulated sugar so that the sugar coats it evenly. One end of the stick (half or a third of the length) should remain clean. This will be the “handle” of the sugar crystal.

The first step is to prepare the preparations: roll the sticks previously dipped in syrup in granulated sugar.
Repeat the operation with the remaining sticks.
Leave the sticks to dry overnight (or, if you can't stand it, at least for 2-3 hours).
2. In the morning, take a saucepan and pour it into 2 full glasses of water. Add sugar there: 2.5 cups. Turn on low heat and stir the sugar constantly until it has completely dissolved.
Add to the resulting sugar syrup another 2.5 cups Sahara. The new mixture should also be boiled until completely dissolved.
Next, the fire is turned off, and the syrup is left on the stove to cool for 15-20 minutes. At this time, we should prepare our seed sticks. Take the sticks you prepared yesterday and tie a second stick crosswise with a thread at the top part, where there are no sugars. This is necessary so that the seed can be vertically lowered into a glass with a solution when growing a crystal from sugar.

Instead of a second stick, you can use... as a holder. an ordinary clothespin!
3. Carefully pour the hot syrup into glasses. Please note that the syrup must still be hot! Otherwise nothing will work.
If you want to the crystal was colored, you can add a little food coloring to the syrup. Add dyes of different colors to each glass of syrup and get multi-colored crystals!
Place the blank sticks vertically in the center of each glass of syrup. They should not touch the bottom of the glass, much less its walls! The second stick will serve as a holder. By the way, you can use thick cardboard instead by sticking a stick with a seed into it. Or clothespin.

Glasses with syrup and sticks - leave the preparations in a warm place for 7 days
Place the glasses with chopsticks in a warm and secluded place where no one will accidentally drop them, and cover them with film or newspaper to protect them from dust. Sugar crystals will grow at home 7 days. So be patient, it won't be that long after all!
4. After a week, you can carefully remove the crystals from the glasses and enjoy them! Don't be discouraged if something doesn't work out for you the first time. Try again and everything will definitely work out! But usually, if you do everything according to the instructions, there are no problems with growing sugar crystals at home.

These are the cute multi-colored sugar crystals you will end up with!
The resulting crystals can be given away to friends (an original gift!) or a whole armful of multi-colored crystals can be given to your girlfriend (she hardly expects this). Or you can keep it for yourself as a beautiful souvenir.
That's all. Next time you will learn how to grow a crystal at home from salt, soda and copper sulfate. Happy experiments!
Almost all of us at school grew salt crystals and then licked them. Not very tasty. But if you modify the recipe a little, you will get an unusual delicacy.
Sugar crystal is a delicious treat for your child that can be prepared at home. A delicious sugar crystal can be used to decorate any dessert or simply stir tea.
To make sugar crystals you will need:
2 glasses of water;
5 glasses of sugar;
wooden sticks for mini-kebabs, 5-6 pieces (you can take cocktail straws, but the crystal does not hold the crystal on them as well);
thick paper 5-6 pieces;
transparent glasses;
pot.
Sugar crystals on a stick: instructions
- First, over heat, dissolve 2-3 tablespoons of sugar in ¼ cup of water to obtain a thick syrup. It is better to make the syrup thicker. Now take a stick and smear the place where the crystal will grow in syrup. The length of the lubricated part should be approximately half the glass in which the crystal will grow, since part of the solution will evaporate within a week.
- Then sprinkle sugar on a piece of paper and roll a stick over it so that the sugar crystals stick properly. You need to make sure that the sugar sticks evenly, otherwise the crystal will grow uneven.

We make several sticks and leave them to dry for at least 5-6 hours. It is imperative to let them dry, otherwise, when further lowered into water, all the sugar will fall off the stick.

3. Then mix 2 cups of water and 2.5 cups of sugar in a saucepan.
Place the pan over medium heat and heat until the sugar is completely dissolved. There is no need to turn the heat on high, because if the sugar burns, the syrup will turn brown. Then pour the remaining 2.5 cups of sugar into the same pan and dissolve it as well. Then set the syrup aside for 15 minutes.
4. We need to put sheets of paper on our sticks so that the stick in the glass does not fall and the crystals grow evenly. We take cut sheets of thick paper and carefully make holes in them so that the paper sits tightly on the straw.

5. We take our pre-prepared sticks and carefully, so that the sugar does not fall off, insert them into the sheets.
6. Make sure the syrup is hot, otherwise the crystals will not grow. Pour our syrup into glasses or jars. It is better to take transparent dishes, otherwise children will take chopsticks out of containers several times a day and see what has grown.
7. If you want to get colored sticks, you can add beetroot juice or other dyes to the syrup.
8. Then we take what we got and lower it into the glass so that the workpiece does not touch either the bottom or the walls, and the paper becomes the lid. We lower it carefully so that the sugar does not come off from the workpiece.

9. We place all the sticks in our glasses. The resulting syrup is enough for 5-6 glasses.
If you wish, you can add a separate dye to each glass, then the sugar sticks will be multi-colored.

10. Now comes the hard part! You have to wait at least a week for the crystals to grow. You cannot take them out of the glasses or twist them inside the glass, otherwise the crystals will not grow. But you can watch through the glass how they grow, notice which one grows faster and which one is the most beautiful. And, of course, come up with a use for wands with crystals:
- you can stir the tea,
- put on fruit and decorate dessert,
- lick like a lollipop
- decorate the cake.

| Tell your friends about it → |
