How many different fruits can be molded from salt dough: oranges and watermelon, cherries and strawberries. In addition to fruits, dough can be used to make crafts in the form of vegetables or any other dishes. Use them to play with or simply place them on a plate and place them in your room as decoration.
You will need:
- For salted dough: 200 g flour, 200 g salt, 125 ml water, 1 tbsp. l. vegetable oil
- Baking tray
- Acrylic paints and brush
- Green and brown wire
- Green felt
- Mix salt and flour in a bowl. Gradually add cold water and knead the dough. If it crumbles, add water; if it is too liquid, add flour. When the dough is almost ready, add vegetable oil. Store the finished dough in a tightly closed container or bag in the refrigerator and pinch off small pieces needed for work.

- Shape a piece of dough into a strawberry. Then roll the cherries into rounds and poke a small hole in each so that you can insert wire sprigs into them after baking. Make a watermelon slice from a large piece of dough, and orange slices from small ones. Place all the fruits on a baking sheet and ask an adult to bake them in the oven for 1.5 hours.

- When the fruit has cooled completely, paint the outside of the watermelon slice green and the inside red, the orange slices orange, the grapes pale green, the cherries dark red. Make the strawberries a little lighter than the cherries.

- When the paint is dry, paint small yellow specks on the strawberries - these will be seeds. Leave the strawberries to dry again.

- Use black paint to paint grains on the red flesh of the watermelon.

- Mix orange and white paint on a plate and use this color to draw lines on the orange slices.

- Cut out leaves from green felt. Cut a piece of wire and fold it in half. Glue the tips into the holes on the cherries, and then drop a little glue onto the leaf to glue the leaf to the branch. Stick another leaf on the strawberry.


Discussion
very original and beautiful
good idea, I liked it
Comment on the article "Fruits made from salt dough - for playing and decoration: master class"
From May 1 to May 3, the Children's City of Professions "KidBurg" in the "Peter Raduga" shopping center invites children from 4 to 14 to the May holidays. These days, KidBurg hosts creative master classes for children and adults, new exciting professions and activities are opened. Young agronomists will be trained at the KidBurg Farm. The fashion house with its new bright catwalk collection will lift the spirits of all Kidburg residents, and the most energetic explorers will definitely be captivated by the treasure-hunting trek and the relay race to collect a backpack in...
On Saturdays, creative master classes are held at PandaPark Meshchersky. Anyone can make a themed souvenir with their own hands under the guidance of professional artist Anna Mishina. Participation is free, starts at 12.00. Topics of the master classes: January 16 – “Applique using the cutting technique” January 23 – “Bird feeder” January 30 – “Salt dough snowman”
On November 1, as part of the autumn campaign “Oh la la... le Chocolat!” The official opening of Alla Komissarova’s new chocolate studio “La Princesse Choco” will take place at the Dream House shopping center in Barvikha. On this day, guests are presented with the most unusual flavor mixes: truffle with chili pepper with its harmonious combination of the exquisite rich taste of dark chocolate and pepper; truffle with a tempting filling of tropical passion fruit, glazed with white chocolate; marzipan with orange and...
Friends! Haven't you had fun for a long time? Then take the kids and come join us for Halloween! November 1 (Sunday) A terribly fun party, games, riddles, gifts and surprises awaits you and your children at the Russian cuisine restaurant "Altai", at the address: Pyatnitskaya street, 30 building 1 (metro Tretyakovskaya, metro Novokuznetskaya) The restaurant has its own parking. At 16.00 Halloween - party for children from 2 to 6 years old and their parents. Beautiful orange pumpkins are waiting for you and your children, they will find out scary...
From June 12 to 14, the festival “Crimean Gifts and Goods of Russia 2015” will be held in the Kuzminki-Lublino natural area. Without leaving Moscow, you can briefly feel like you’re vacationing on the Crimean coast: taste Black Sea fish, try traditional Crimean kubete and chir-chir pies, enjoy aromatic tea made from Crimean herbs. And those who are planning a vacation will be able to choose a tourist route around Crimea and other regions of our country at the festival. They will gather on one site...
On May 17 at 16.00 we invite children aged 2 years and older to a fruit master class on making funny fruit hedgehogs at the Tajj Mahal restaurant, which is located at 1/2 Bolshoi Kislovsky Lane. Children will feel like real chefs, make delicious hedgehogs, learn a lot of interesting things about fruits and have a lot of fun. The restaurant has a play area for children and a special children's menu. After the master class, children will pack their crafts to take home. Ask any questions...
We invite children aged 2 years and older to a fruit master class on April 26 at 16.00 at the Bai Chaikhona restaurant, which is located at: st. Golubinskaya 16 (metro station Yasenevo). Children will become real chefs, learn a lot of interesting things about fruits and, in a warm, friendly atmosphere, make fruit peacocks, which, of course, they can pack to take home and treat to all their loved ones. Ask any questions, and also sign up You can attend the master class by calling 89036755162
During the spring holidays, on the territory of the Izmailovo Kremlin, 4 museums are open for little guests, where everyone will surely find something to their liking, and more than 20 master classes are also held. At the Museum of Bread, children can get acquainted with the history of baked goods, the technology of their production, create their own culinary masterpiece by participating in master classes “Baking and painting gingerbread cookies”, “Gingerbread house”, “Baking bagels”, “Origami from dough” and “ Modeling from salt dough." In the museum...
Recently my daughter and I went to a master class on making fruit bouquets, it was held in one of the restaurants in Moscow. It was very interesting! The children were told about the principles of composing fruit compositions, about the beneficial properties of fruits, and were introduced to the tools necessary for making fruit bouquets. My daughter made a fruit bouquet of strawberries, pineapple, oranges, apples and grapes, packed it and we took it home to enjoy with dad. If anyone is interested, I can...
From October 8 to 11, VDNKh will host the Russian agro-industrial exhibition “Golden Autumn”. Guests will enjoy a gastronomic fair, a music festival, during which popular ethno-folk groups from different countries will perform, as well as culinary and creative master classes. Regional fair on October 8-11 from 09:00 to 19:00 The Republic of Crimea will delight Muscovites with ripe figs, natural honey in honeycombs, juicy grapes, and the Moscow region will delight with game delicacies. Stavropol Territory will present...
For little sweet tooths and adult fans of light summer desserts, the Culinary Studio of Yulia Vysotskaya will host a master class “Fruit and berry jelly”. The process of preparing this tasty, funny and very healthy delicacy will be like a circus performance, where every child will be able to feel like a real magician, turning fresh fruits and berries into bright jelly with their own hands! The main sorcerer, a professional chef of the Studio, will share the secrets of creating the most...
Every year on June 10, World Ice Cream Day is celebrated, which means that on the eve of Yulia Vysotskaya’s Culinary Studio a family master class* will be held in preparation for the real holiday of this summer, fabulously delicious delicacy, adored by everyone since childhood! During the lesson, young pastry chefs, together with their mothers and fathers, grandfathers and grandmothers, will prepare ice cream of different types and flavors, learn the difference between sorbetto and granita, and experiment with adding sweet and salty ingredients...
1. Central Library No. 271 named after. F.V. Gladkov address Jana Rainis Boulevard, 1 21.12 at 11.30 Celebration “Book Planet of New Year’s Wonders” as part of the VII district festival “December Meetings” The program includes: Interactive team game programs “Snowy night on a bookshelf, or New Year’s trip to the winter fairy tale" with the travel game "Literary snowmobile using a costume insert in the image of the Fairy of the Winter Tale", the music competition "Winter...
link to the previous program with reviews [link-1] Cost-500 rubles per child. Adults are present free of charge and are seated at one common table. Group of 10 children from Tulskaya metro station. Group of 7 children from Preobrazhenskaya Ploshchad metro station. Age from 4 years to 10 years. Directions Metro Tulskaya, Varshavskoye shosse no. 2, 15 minutes on foot or two stops by tram or trolleybus or Preobrazhenskaya square, st. Preobrazhenskaya 2, 10 minutes walk from the metro Venue: Ilya Muromets restaurant [link-1] for the tip...
On June 22 and 23, we celebrate Spirits Day in the creative workshops “Chicken and Cucumber” and talk about Russian traditions of welcoming summer. We will plant cabbage, parsley and dill, make a talisman - a secret doll that will help and protect from all misfortunes, learn to weave wreaths from wildflowers, sculpt from salt dough, invent a fern flower that no one has ever seen (no one but us! ), create friends for the sad Vodyanoy and floating lanterns for the holiday of Ivan Kupala. We honor Russians...
Mayakovskaya metro station 5-7 minutes on foot Polymer clay bracelets 2 themes to choose from: sweets or fruits. During the class, beads are molded in the form of sweets or cakes, then baked right in class and then assembled into a bracelet. Cost 600 rubles Group of 8 people Children from 9 years old Duration 2 hours Adults leave the children and go for a walk. Or participate in a master class for 600 rubles.
Course content. Classes are held in Oktyabrskaya metro station in the library near the metro station. The cost of one lesson for a child is 400 rubles. The price includes all materials. Groups of 15 people. An adult can walk or watch for free; if he participates, he must also pay 400 rubles. 25.11.12 14.30 Lesson 1. “In the cave of primitive man” Life of people of the ancient Stone Age: living conditions, housing, obtaining a means of subsistence, social structure. Collective viewing and discussion of the filmstrip...
A series of master classes “Helper Dolls” with the participation of Mythograd For parents with children over 6 years old Master classes are intended for a family audience - parents with children. Moral values and pedagogical achievements of the Russian traditional culture of raising children help modern parents. Master classes are held 2 times a month on Saturdays at 16:00. in the Russian state children's library (metro Oktyabrskaya). Cost – 600 rub. per participant along with tea drinking. All materials included! Cycle...
On August 4, 2012, a delicious ECO master class for gourmets from the Berghoff company took place in the brand salon “Kukhonny Dvor” - “Fashionable Kitchens”, located at Leningradskoye Shosse, building 16, building 3. Tasty, healthy, nutritious and quick to prepare food is a real trend in our lives. Modern man wants to be energetic and keep himself in great shape, in addition, he is too busy and is not ready to regularly spend most of his time at the stove. The company "Kitchen...
You can make a huge number of crafts from salt dough, for example: flowers, animals, various figures, inscriptions, numbers, toys, paintings and whatever you want! Modeling from salt dough is called bioceramics. The advantage of salt dough is that it is convenient to work with, this material is absolutely harmless and crafts made from it will delight you for several years. In this article we will look at how to make crafts from salt dough with your own hands.
You will need: a glass of wheat flour, a glass of extra salt, half a glass of cold water, a bowl.
Recipe

The finished salted dough should not stick to your hands or crumble. It should be cool and easy to sculpt. I recommend watching the video master class!
There are two most common ways to dry salt dough. The first method: the finished craft will dry on its own. The main thing is that it should not be exposed to direct sunlight, otherwise it will crack. The craft can be placed on a flat surface and wait a few days. Second method: dry the finished craft in the oven for 3 to 6 hours (depending on the size of the craft). Drying occurs in batches with breaks. One approach is 1-2 hours. For quick drying in one go, set the oven to 75-100 degrees, and then the craft will dry in an hour. At a temperature of 120 degrees, the craft will dry in 30 minutes, but it is better to dry it naturally.
There are two most common ways to color salt dough. The first method: after drying, paint the finished craft with acrylic paints or gouache using a brush. Second method: food coloring is diluted in water, then added while preparing the dough. When the craft is completely painted and dried, it must be coated with transparent manicure or furniture varnish in 2-3 layers. Each layer must dry before applying the next. This way the craft will last for a long time.
You will need: colored salt dough, stack, clear manicure polish, toothpick.
Master Class

The salt dough star is ready!
Salt dough caterpillar
You will need: colored dough, knife, pva glue, toothpick, pendant, clear manicure polish.
Master Class
- Roll out the sausage.
- Cut it into 6 equal parts.
- Roll into balls.
- Glue 5 balls together.
- Glue the head.
- Make a nose and eyes, then glue them on.
- Poke a toothpick into the hanging area.
- Dry the craft.
- Attach the pendant.
The salt dough caterpillar is ready!
Salt dough apple
You will need:
Master Class
- Make half an apple, make the inside flat, pressing it onto a flat surface.
- Make a thin flat center and glue it to the main part.
- Roll 6 seeds and a stick, then glue to the apple.
- Blind the leaves, then glue them.
- Dry the craft.
- Apply varnish and wait until completely dry.
The salted dough apple is ready!
Salt dough elephant
You will need: colored salt dough, pva glue, clear manicure polish.
Master Class
- Make the elephant's body by rolling an elongated ball.
- Make 4 legs in the shape of plump sausages.
- Make a proboscis.
- Make the elephant's ears in this way: roll out 2 flat cakes, glue flat cakes of the same shape of a smaller size and a different color to them.
- Make a small ponytail.
- Blind your eyes.
- Assemble the elephant in the following sequence: glue the legs to the body, then glue the proboscis, then the ears, eyes and tail.
- Dry the craft.
- Apply varnish and wait until completely dry.
The salt dough elephant is ready!
You will need: salt dough, foil, a candy bowl or similar plastic container, gouache, a brush, clear manicure polish, a modeling board, a knife or a stack.
Master Class

You will need: salt dough, nail scissors, PVA glue, acrylic paints or gouache, manicure brush.
Master Class
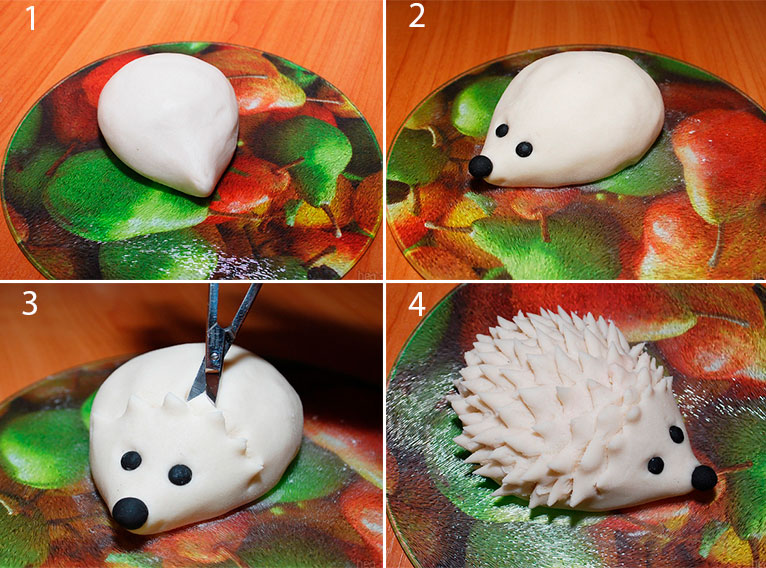
Salt dough hedgehog is ready!
Owl (eagle owl) made from salt dough
You will need: salt dough, pva glue, nail file, manicure scissors, acrylic paints or gouache, brush, wooden board with a pendant, clear manicure varnish.
Master Class

The salt dough owl is ready!
You will need: salted dough, the base on which the craft will be attached, for example, a board or plate, a glass or a knife, a sheet of paper, a simple pencil, a garlic press, a rolling pin, pva glue, acrylic paints or gouache, a brush, clear manicure polish, cloves.
Master Class

Salted dough fruit basket is ready! I recommend watching the video master class!
You will need: salt dough, knife, rolling pin, simple pencil, sheet of paper, sandpaper, acrylic paints or gouache, brush, transparent manicure varnish, glue gun or pva, base for crafts, for example: a board with a frame, transparent manicure varnish.
Master Class
- Draw a cat or print a template.

- Roll out the dough into a thin layer.
- Attach the template and cut out the cat.

- Dry the craft.
- Sand the craft with sandpaper, removing any unevenness.
- Using a simple pencil, transfer the desired design onto the cat’s body.
- Paint with paints and wait until completely dry.

- Glue the cat onto the base with the frame.
Salt dough pencil
You will need: water, flour, extra salt, cardboard jar for the frame, PVA glue, scissors, a piece of decorative rope or corrugated paper, gouache, brush, button, stacks, acrylic varnish for crafts, toothbrush.
Master Class
- Knead the salted dough in this way: add a glass of flour, a glass of salt, add water, then knead until the desired consistency of the dough. Separate part of the dough, add beige gouache, then knead.
- Roll out the cake to a thickness of 10-15 mm.

- Apply PVA glue to the outer rim of the jar and wrap it with dough. Cut off the excess with a stack and smooth the joints with a damp brush.
- Create a small dotted texture with a toothbrush on the surface of the dough.
- Knead the brown dough, roll it into a flat cake 10-15mm thick.

- Cut a 5cm wide strip of brown pastry and glue it to the bottom of the jar.
- Make 2 large owl eye bases from white dough, then glue them on.
- Make a beak out of brown dough and glue it on.
- Make eyes from turquoise dough and glue them on.
- Roll out 8 strips of pink dough, twist them into 4 flagella and make a bow, then leave it to dry for 2 hours.
- Make droplet-shaped owl wings using brown dough, then glue them on.

- Weave ropes of beige dough and glue them onto the neck of the jar.
- Roll out a sausage from white dough, draw the texture of the lace with a stack and glue it as a collar under the beak.
- Place the craft in a warm place for a day.
- Paint the bottom and wings with brown gouache and decorate with white dots.

- Draw the pupils and eyelashes with black gouache, wait until the paint dries, then paint white highlights on the eyes.
- Glue a pink bow above the wing.
- Glue a button with a bow from a corrugated strip onto the lace.
- Cover the craft with varnish and wait until it dries completely.
The salt dough pencil is ready!
Salt dough dachshund
You will need: salt dough, simple pencil, scissors, cardboard, paints, brush, rope, toothpick, foam sponge, clear varnish, PVA glue.
Master Class
- Draw a dachshund on the cardboard as shown in the image.
- Cut out the template.

- Roll out the dough to a thickness of 5 mm and cut out the dachshund according to the template.
- Roll out the oblong eyes, then glue them on.
- Blind the eyelids and glue them onto the eyes.
- Use a toothpick to outline the paws, nose, mouth, ear and body contours.

- Roll out an oval, then glue it onto the ear and smooth the seam with a wet finger. Use the same method to add volume to the dachshund's back and tail.
- Mark stripes in different directions around the entire perimeter of the dachshund, so that the stripes resemble wool.
- Dry the figurine.

- Glue a piece of rope to the back of the craft for further hanging.
The salt dough dachshund is ready!
Boletus mushroom made from salt dough
You will need: salt dough, light bulb, paints, brush, foil, cardboard, masking tape, superglue, PVA glue, paper napkins, clear varnish, stack.
Master Class
- Cover the light bulb with tape, then cover it with dough and dry the workpiece.
- Cut a ring out of cardboard and place it on the light bulb as a base for the hat.
- Form a hat from crumpled napkins, then secure with tape.

- Wrap the hat with foil.
- Roll out the dough to a thickness of 5 mm and stick around the cap.
- Remove the cap from the stem, cover the bottom with dough and make stripes in a stack.
- Glue the hat onto the leg.

- Mold the mushroom's arms, legs and nose, then glue them on PVA.
- Make a caterpillar and glue it to the hat.
- Dry the figurine.

- Paint the figurine, then leave to dry.
- Cover the craft with varnish and wait until it dries.
Boletus mushroom made from salt dough is ready! I recommend watching this video!
Funny salt dough pigs
You will need: salt dough, paints, brush, foam sponge, stack, thin rope, toothpick, black gel pen, PVA glue.
Master Class
- Roll 2 balls for the snout and use a toothpick to make the nostrils.
- Make a muzzle, glue a snout and eyes above it.
- Make triangular ears, glue them, then mark stripes with a stack at the junction of the ears and head.

- Make a heart and glue it to the bottom side.
- Make indentations along the edge of the entire circle.
- Using a toothpick, make 2 holes on the top for attaching the rope and 2 holes on the bottom for the legs.

- Roll up the arms and glue them in such a way that they hold the heart.
- Make the hooves and make holes in them for the rope.
- Dry the workpieces.
- Paint the blanks with black paint and let them dry.
- Wash off the paint from the convex parts of the workpiece under running water with a sponge and wait until it dries.

- Prime the figures with a sponge and white paint.
- Color the piglets.
- Draw small details with a black gel pen.
- Cover the craft with varnish and wait until it dries.

- Glue wool threads as hair.
- Make a pendant out of rope.
Funny salt dough pigs are ready! I recommend watching this video!
Tatiana Kukovskaya
The autumn season is ending, it is time to harvest. And I want to leave vivid memories of this period - a period of abundance! Then you should try making your own still life from fruits, vegetables or even mushrooms. To do this we will take salt, flour and water for salt dough(knead at the rate of 1 part salt and 2 parts flour, you need a little water so that the dough was elastic, food foil and clove sticks to imitate cuttings.

Knead dough and carefully crumple the foil (this material crumples easily and holds its shape well, forming a ball (future preparation apple) .


Next is taken dough. We flatten it and cover the foil pan so that the product is evenly covered test. Make a hole with your finger and insert the cutting into it. AND apple is ready!


We make the base from foil so that the craft is light, and a thin layer test allows the product to dry quickly! We dry the molded fruits or other products and prime them (white gouache + PVA glue) and paint with gouache paints!
Happy crafting!
Publications on the topic:
Testoplasty is an unconventional technique for sculpting objects, which is an original Russian invention, therefore. Therefore, introducing children.
Today, in honor of the “Apple Saved” holiday, I invited the children to make apples out of colored paper. Of course, everyone agreed and we got started.
Modeling from salt dough "My cat". Children's master class. On the first day of spring, according to a spontaneously established tradition, it is celebrated in Russia.
Good day, dear craftswomen. I offer you a simple, but very beautiful and bright craft that the guys and I made for your collection.
"PALM FOR MEMORY" We have grown up, become wiser and more mature! Now we can do a lot of things ourselves! And the year flew by, looking out of the window.
Children love to sculpt and draw. Previously, clay was often used instead of plasticine. Nowadays good clay is difficult to find. Now this is rare.
We develop:
1. fine motor skills;
2. desire to create.
Preparation of salt dough: to prepare salted dough you need to mix one glass of salt with one glass of flour, a little water, you can add a drop of vegetable oil. The dough is ready.
Vegetables and fruits made from salt dough
1. Apple - fruit made from salt dough
Roll into a ball. Make a recess at the top with a rod. Insert a stalk into it - a thin short sausage. You can put a small leaf on the side. Stick a small clove into the bottom of the apple.
2. Peach, plum
You need to either assemble it from two identical parts, smoothing the joint on one side, or draw a deep groove through the cellophane along the side of the rolled shape.
3. Pear
Roll the ball, roll it out a little to lengthen it, and then stretch the top half a little more so that it becomes thinner than the bottom. Stick a small clove at the bottom, as in the case of an apple.
4. Raspberry
You can assemble them from individual balls by placing them on a cone-shaped base. Place small leaves on top of the berry and attach the stem.
5. Strawberry
Vertical notches are made with a toothpick.
6. Peels of oranges and lemons
Create an orange peel texture with the tip of a fountain pen, using shallow touches over the entire surface.
7. Grapes
It is assembled from small round or oval balls.
8. Cross-section of salted dough fruits
Just roll out a fairly thick layer of dough, preferably between planks. Cut out a circle of the size you need using a round shape. Then, using another round shape, slightly smaller, press out a smaller circle, indicating the crust. On oranges, lemons and tangerines, draw grooves dividing the segments along the ruler. Color the finished product. This way you can make watermelon, apple, kiwi, citrus fruits, etc.
9. Pumpkin
Slightly flatten the dough ball and make indentations at the top and bottom with your finger; secure a thick stalk with a wide base in the upper indentation. Draw vertical grooves on the pumpkin through the cellophane.
10. Tail for radishes or turnips
Roll separately and attach with water, trying to disguise the joint. However, it is not necessary to make long tails for these root vegetables - they are quite fragile. It will be enough to simply mark the tail by pinching the product in the right place.
11. Salted dough vegetables - cucumbers, zucchini, eggplant, peppers
They are made quite simply: roll the sausages to the desired thickness, make them thinner where necessary, and sharpen them where necessary. Curve it as needed to give it a natural look.
12. Carrot
Using a stack or knife, randomly make short horizontal cuts. Attach several pieces of sausage to the top of the head, imitating a trimmed tail.
13. Potatoes - a vegetable made from salted dough
Punch it in places so that it looks uneven, and apply notches here and there with a stack.
_____________________________________________


Play dough http://shkola7gnomov.ru/parrents/eto_interesno/razvivayuschie_zanyatiya/id/806
There are several recipes for making salt dough:
Method 1 (the easiest) .
- 2 cups of flour
- 1 glass of salt
- 1 glass of water
Salt is dissolved in water, then flour is added and the dough is kneaded.
Method 2 (more complex)
- 1 glass of salt
- 1 cup wheat flour
- 1 tablespoon vegetable oil
- 0.5 glasses of water
The ingredients are mixed with a spoon, then kneaded with your hands until smooth, just like regular dough. The dough should be stiff, not stick to your hands and not crumble. If the dough doesn't stick together well, add water. If it sticks to your hands, add flour.
Method 3 (colored dough)
In order not to have to decorate the products, you can sculpt them directly from colored dough.
- 1/2 cup flour
- 1/3 cup salt
Dilute gouache paint of the desired color in 1/4 cup of water. Stirring constantly, add the resulting solution to the mixture of flour and salt, knead into a stiff dough.
Pieces of colored dough can be mixed, just like paints. To do this, knead 2 pieces of dough until they become homogeneous.
Drying methods
You can dry dough products in the oven; outdoors or in a combined way.
Dry in the oven at the lowest temperature (approximately 75 degrees) and with the door open to prevent it from cracking. When the dough is slightly browned, the temperature can be raised to 100 degrees. Firing time, depending on the thickness of the product, is 1-2 hours. Keep an eye on the product's readiness, as small parts dry much faster. Bubbles and cracks are a clear sign of overheating of the craft. You should reduce the temperature or move the baking sheet with the product to the top shelf.
Air drying will take much longer (about 3-4 days). It is not recommended to place crafts in direct sunlight or on a warm radiator. Since the products may crack and crumble. From time to time, the parts must be very carefully turned from one side to the other.
Combined drying is suitable for voluminous molded products. First, the craft is kept in the air for 1-2 days, and then dried in the oven.
Coloring, glazing and varnishing of products
After the product has completely dried, we begin painting it. For this you can use gouache, acrylic or watercolor paints. If you add PVA glue to the gouache when coloring, the product will have a slight shine and will not stain your hands in the future.
Frosting. When there is about an hour left before the end of drying, you can coat it with glaze to give the product a warm shade. To do this, every 5-10 minutes, apply a saline (1 part salt to 2 parts water) or egg (1 egg to 1 glass of water) solution with a brush.
Varnishing. The paint can be fixed by varnishing using acrylic varnish. It adds shine to the craft and highlights its color. Acrylic varnish is water-soluble, non-toxic and dries in 6-8 hours. A similar effect can be achieved by covering the product with PVA glue.
____________________________________________
Different types of flour can be mixed, for example wheat and rye flour .
http://www.liveinternet.ru/users/3204944/post246255711
Flour: It is best to buy premium white wheat flour, it contains enough gluten, and the color of the baked products will please the eye. But if you have a special product in mind, you can try any other as an experiment.
Salt: Thanks to the salt content, the dough holds its shape well when molded, and the finished product will be reliably protected from mold and rodents. In order for your products to have an even, smooth surface, it is better to use the finest “extra” salt. Try not to use a coffee grinder to grind salt.
Salt is added to the dough solely to protect against mice and harmful insects. Therefore, in essence, a large amount of it is not required. Too much salt can make the dough brittle and brittle after drying, which leads to the formation of cracks in the product. You can use any salt, even the cheapest one. Coarse salt is easy to grind in a coffee grinder.
Water: To make salt dough you will need water. It must be clean. It is better to filter tap water. Knead the dough in ice water, it will be more elastic.
There are many recipes for making salt dough. There is probably nothing that suits everyone. You need to experiment on your own and choose one that is pleasant to work with
First recipe:
Wheat flour - 2 cups,
“Extra” salt - 1 glass,
Water - 3/4 cup.
Second recipe:
Wheat flour - 1 cup,
“Extra” salt - 2 cups,
Dry wallpaper glue - 1 spoon,
Water - about 1 glass.
Additives: The quality of the material can be improved:
- by adding 1 tablespoon of potato starch to the classic recipe, being sure to sift it so that there are no lumps, we will increase the plasticity of the material,
- adding 1-2 teaspoons of wallpaper glue will increase the strength of the products.
Pour salt into a wide bowl, add water, then flour. Mix everything well. Place the prepared dough in a container or plastic bag.
Proceed as if you were making baking dough.
If the dough sticks to your hands, add a little flour. If it crumbles, pour in a small amount of water.
Play dough It should be quite steep, so it is more convenient to knead it finally on the table, kneading thoroughly, achieving uniformity and elasticity.
When kneading, the thickness of the dough can be adjusted: if the dough begins to crumble, add water, and if it turns out to be too soft, add salt and flour, maintaining their basic proportions. Knead the dough until it becomes elastic and pliable. The finished salt dough should be placed in the refrigerator for a couple of hours (you can leave it overnight). As it cools, it will become more plastic and homogeneous.
Attention advice! Kneading the dough on the table. Don't forget to sprinkle the surface of the table with flour. to prevent the dough from sticking
Attention advice! It is better to knead the dough in a deep bowl, gradually pouring the sifted flour into water with salt dissolved in it. When kneading dough with additives, you need to mix salt with starch or glue (or both components together) in a bowl, add water to the mixture, mix and add flour in small portions.
Advice. Salt dough left open in the air dries very quickly, so keep the container with it closed. Place the rest of the unused dough in the refrigerator, where it can be stored for a day or two.
Rye flour gives the products the warm brown hue of rustic bread. The recipe for salted rye dough is almost indistinguishable from the classic one.
Recipe for salted dough made from rye flour.
♦ 3 cups (about 300 g) wheat flour
♦ 1 cup (about 100 g) rye flour
♦ 2 cups (about 400 g) salt
♦ 1.5 cups (about 250 ml) water
The weight of rye dough may not correspond to the volume required for a given product, so for the same product it is necessary to prepare slightly more dough from rye flour than from wheat flour.
ADVICE. The elasticity of the dough and the strength of products made from it can be increased by adding 1-2 teaspoons of dry wallpaper glue, diluted in a small amount of water or mixed with flour and salt before adding water.
KNEADING THE DOUGH.
To prevent the salted dough from tearing and crumbling, you need to knead and knead it well until it becomes elastic.
ADVICE. To get a dough that lends itself well to processing, use a mixture of wheat and rye flour. The dough made from rye flour alone is too hard and difficult to sculpt.
The most convenient way to store salt dough is in the refrigerator, placing it in a plastic bag. For colored dough, it is better to use separate jars with a lid. But it is best to knead the amount of dough that you can process within 2-3 days.
During long-term storage, the dough becomes damp and, when baked, gives an unattractive gray tint (at the same time, unwanted spots may appear in the most unexpected places). If this does happen, don’t be upset and try to paint this product with paints.
note that fresh dough and dough that has been in the refrigerator for 2-3 days will give two different tones when baked (even when adding salt and flour to the latter). Therefore, if you have a very small piece left from the previous batch, try using this property. It will be even more interesting if you tonally highlight individual fragments of a product, for example, mittens, a hat, a scarf, buttons, etc. Otherwise, it is best to hide the rest of the dough inside a large figure.
If you decide to create a colored craft from salt dough, then the recipe for ordinary salt dough will not suit you, try making colored, colored dough.
Coloring can be done at the mixing stage, as well as while kneading the dough.
At the stage of kneading the dough, coloring is done when the composition is based on a combination of two colors.
The first color is white (natural dough according to the classic recipe), the second is brown. 
To obtain it, add regular cocoa powder when kneading (do not forget to sift it through a sieve before using). You can add instant coffee instead of cocoa (after dissolving 2-3 teaspoons in a minimum amount of boiling water). The amount of cocoa or coffee depends on the intensity of the brown tone you want to get. The more shades your product has, the more interesting it will look.
Please also note that additional brown spots will appear during the baking process. Since brown is not the main color in the composition, you should not mix it in large quantities. Note that cocoa and coffee produce different shades of brown. Choose the one you like best, or use both.
Red and orange dyes are the most intense, therefore, to obtain dough of these colors, you can use not the whole, but only half a bag for one prepared bun weighing 100-150 g. For coloring salt dough, you can use any food coloring, but dyes for Easter eggs are suitable Not all.
In order to get dough of various colors and shades, you need to start with the primary colors: yellow, red, blue. To do this, you will need food coloring, which is sold in powder form.
Prepare the dough according to the classic recipe.
Attention! It's better to make two servings at once. Use one portion to make dough of primary colors. After kneading, put the second one in the refrigerator: it will come in handy later when you need to prepare tints.
. For primary colors, dilute the powder of each color separately in 1 teaspoon of water, stirring well.
. Prepare a cup of flour, a cup of salt, a cup of water and a teaspoon.
Attention! When working with colored dough, keep in mind that it will lighten a little as it dries. Divide the first portion of the dough into koloboks weighing 100-150 g. Take one kolobok, make a depression in it, pour in the diluted dye and knead the dough thoroughly. To prevent it from becoming liquid, add a little salt and flour, maintaining the basic proportions.
Make all the primary colors one by one.
Try to achieve bright, rich and not very light tones as a result. Additional colors can be obtained by mixing the main ones. Warm red gives very nice pure colors when mixed with yellow, and adding pink to blue produces different shades of purple. To get a dark brown color, you can add cocoa powder and some orange dough to the dark purple dough. Beautiful combinations can be achieved by mixing green dough with blue or yellow.
If, when starting work, you know in advance what colors you will need, prepare them immediately in the required quantity; but most often additional shades are created in the process of work - in small portions.
Advice. You can add an unusual color and pleasant smell to your dough (which will make the work much more pleasant) if you add a little spice (or any of them): nutmeg, cumin, paprika, gray and black pepper, cinnamon, curry.
Salt glazing. Using this technique, the product will sparkle with shimmering shades in beige and brown tones. During the last hour of firing, keep the product in the oven at a temperature of 150 degrees and brush it repeatedly with a brush dipped in salt water. If you want the product to brown more, increase the temperature to 200 degrees and glaze with salt when the product reaches the desired shade of brown. Note. Since the “salt glaze” is formed by salt crystals, products treated in this way do not need to be varnished.
White color. The product will remain white after air drying or after drying in the oven if the firing temperature did not exceed 125 degrees.
The effect of rich baking. The products will look like buns made from yeast dough if, during the last hour of firing in the oven at a temperature of 150 degrees, you first apply a “salt glaze” to them, and then use a brush to brush them with a mixture of milk and water or a mixture of egg yolk and water. If the temperature is raised to 200 degrees, the brown color will be darker.

Brown color. During the last hour of drying at a temperature of 150 degrees, brush the products with beetroot syrup diluted with water.
You can find almost all the equipment in your own kitchen, and if you need to purchase something additional, the costs will not be too high.
A small rolling pin, a baking sheet, a jar of water, a brush for moistening the dough, a strainer, a garlic squeezer, molds for cutting out the dough, foil, a small knife and stacks - you will need all this in the process. You should always have a cup of flour and a board for rolling out dough on hand, and, finally, a small saucepan with water and a towel, because in the process of work you often have to wash your hands and clean tools from sticky dough.
The textured pattern is applied to the workpieces using various stamps. As a rule, everything that is at hand is used as such devices, the main thing is that the design is sufficiently embossed. Gradually, you will accumulate a wide variety of items that leave all kinds of imprints on the dough: toothpicks and combs, embossed buttons and a tailor’s wheel for transferring patterns, attachments for a pastry syringe, etc.
The article uses materials from the publication: Irina Khananova “Salt Dough”, 2006. To fully familiarize yourself with the materials in the book, we recommend purchasing it from distributors or the publisher.
Let's look at how to use household items to make unusual dough crafts. Treating salt dough with household items often produces impressive results. For example, with a comb you can apply an openwork pattern to the dough, and with the help of various simple things you can make the surface of the product in relief.
Garlic squeezer. If you use a garlic squeezer, the dough will form spaghetti-shaped curls. From these you can make hair, wool and other decorative details for models. 
Attachments for culinary syringe. If you press the attachments for a culinary syringe into the dough, you get decorative patterns of circles, stars and hearts.

Tea strainer. From the dough passed through a tea strainer, the finest “vermicelli” is obtained, if very finely ground salt was used when kneading the dough.

Comb. Using a comb, you can imprint a ribbed longitudinal pattern on the dough by pressing the edges of its teeth into the dough. Use the tips of the sharp teeth of the comb to make a pattern of dots.

FINGERPRINTS ON THE TEST. Relief indentations can be made by pressing beautiful buttons, ears of corn, and herbs into the dough. From buttons with a beautiful relief pattern, you can make unique seals. To do this, take a wooden dowel and glue it to the button with universal glue. If there is a loop on the back of the button, drill a hole in the dowel for it. If the button has holes, fill them at the junction of the button and dowel with glue.

Can be done special roller, on which you cut out a decorative pattern in advance and then print it on the dough. To press blades of grass, ears of grass, or flowers into the dough, lightly press them into the dough with your fingers. Then roll them carefully with a roller. Use tweezers or your hands to remove the printed items.

CONVEX RELIEFS. If you press the dough into a wooden model or mold with a depression, you will get raised reliefs. To make the contours of the relief clearer, use fine salt when preparing the dough. First, use a brush to lightly flour the pan, and then press the dough firmly into it. Remove the dough from the mold very carefully.
You can, on the contrary, press the dough with a mold and achieve the same effect. This method is simpler. Roll out the dough to a thickness of 1 cm, press the mold firmly into it, after sprinkling it with flour, and then carefully remove the mold. Trim the edges with a sharp knife. Rinse the mold with water and a soft brush. Dry the product at room temperature, but not on a radiator.
All kinds of metal forms can be used if the designs on them are not too deep.
ADVICE. You can make your own molds from plaster. They will serve you for a very long time.
To master basic modeling techniques, you can practice on a small piece of dough.
The most important thing is to prevent wrinkles and cracks from appearing on the outside of the product.
The surface must be even and smooth, because when varnishing the finished composition, even a small crack will become bright and spoil the appearance of the entire work.
In order for working with salt dough to be a pleasure, and for the crafts to be of good quality, it is necessary to follow a certain work procedure 
1. Before you start modeling, cover a baking sheet with foil. In order for the foil to hold well and not slide on the baking sheet, it must first be moistened with water using a wet cloth, and after applying the foil, remove excess liquid. A ruler, comb or a special spatula are suitable for this.
2. Carefully move the edge of the ruler along the foil, expelling water and air from under it so that the surface becomes absolutely even.
If you have prepared a frame for your future product in advance, then make a mark on the foil, outlining the inner perimeter of the frame with a ballpoint pen and sketching the intended picture. Only after this start working so that you can adjust the dimensions of the composition being made.
Advice: Do not remove all the dough from the refrigerator at once. Take a small piece first, and take out the next small portion as needed. Cool dough is easier to sculpt, it holds its shape well, does not float and sticks less to your hands.
For modeling, it is most convenient to use an inverted baking sheet with low sides.
Attention! Typically, foil has two sides: shiny and matte. When working on a shiny surface, the eyes get tired very quickly, so the matte side should be the working surface.
Advice. Try to sculpt or cut the product directly on the baking sheet, while the back side of the product remains flat and there is no damage when transferring it to the place of drying and firing.
There are several ways you can achieve a finished puff pastry product that will delight you, your children and your friends.
Air drying at room temperature.
Remember: the thicker the product, the longer it will take.
In the oven (gas or electric stove).
Dry the craft first in the open air (2-3 days), then in the oven at a temperature of 50 degrees, gradually increasing the temperature, but not higher than 150 degrees. If the temperature is too high, the product may swell, sometimes even cracks appear. It is impossible to fix bulging crafts, and cracks are easy to cover up. To do this, dilute a little PVA glue, mix well and apply this mixture to the crack, then rub this mixture.
Drying time in an electric stove oven:
1 hour - at 50 degrees,
1-2 hours at 75 degrees,
1 hour - at 100 - 125 degrees,
0.5 hours - at 150 degrees.
Advice. Cover a baking sheet with food foil, place salted dough figures on it and place in the oven to dry. To check. To see if the figures have dried well, you need to tap them with your finger. If the sound is muffled, then it needs to be dried further, and if it is loud, then it means the dough has dried out.
On the heating battery.
This method is convenient to use in winter, when the central heating radiators are well heated. Place the craft on foil or cloth and leave it on the radiator until completely dry.
To ensure that the crafts are well preserved, after they are dried and painted, cover them with a transparent liquid varnish. This will reliably protect them from moisture. If you don't like mirror shine, then use matte varnish.
Like
Lesson summary for modeling salt dough
on the topic: “Rosy apple on a platter” (2 parts)
The full cycle of making an “apple on a saucer” craft from salt dough takes two to three weeks. In the conditions of a preschool educational institution, in the middle group (4 - 5 years old), it is necessary to conduct 2 lessons (part No. 1; part No. 2) for 20 minutes each. Children of this age find it difficult to come to terms with delayed results. But on the other hand, this situation instills patience in the students. In addition, children develop their powers of observation. Children have the opportunity to observe the “behavior” of salt dough during natural drying at room temperature. They see how the properties of the dough change and how voluminous crafts are dried.
Part No. 1
Subject: Ruddy apple on a saucer (modeling)
Tasks:
Cognitive:
· Learn to sculpt an apple and a saucer from life;
· Learn the technology of working with salt dough;
· Learn to make a dent with your thumb and pull back the sides of the saucer;
· Learn to sculpt from a whole piece;
· Strengthen the ability to roll a ball in a circular motion.
Educational:
· Develop aesthetic taste when decorating a saucer.
Educational:
Cultivate patience and accuracy.
Materials: Flour, salt, water, vegetable oil, gouache, brushes, sippy cups, boards.
Dictionary enrichment:rosy, poured, saucer
Progress of the lesson
Guys, soon we will celebrate the Apple Savior and today we will make delicious, but inedible crafts from salt dough in the form of such wonderful apples. (Apple demonstration)
I have a real apple, not a magic one, but pourable, sweet, and juicy. And I have a regular saucer.
- Apple, what shape? What geometric figure does an apple look like? (round, on a ball)
- How should you sculpt a ball? (circular movements)
Invite the children to demonstrate the technique of sculpting a ball in the air.
- Right. I'll make a ball of salt dough.
But it's not an apple yet. Look carefully at a real apple and tell me what details need to be made to make the dough ball look like an apple? (a branch with a leaf on top and a small dry flower on the bottom)
Take a twig with a leaf from a bush and insert it into the ball.
On the other hand, insert a spicy clove.
The apple is ready.
- Look at the saucer. Tell me, children, what shape is it? (round)
To make a saucer, you need to take a lump of salted dough and roll it into a ball.
Make a dent in the ball.
Pull back the sides of the saucer. From time to time, pressing the dough with your fingers, turn the workpiece in a circle. The walls of the saucer must be formed evenly.
- Now let's start sculpting.
During productive activities, the teacher needs to monitor the correct execution of modeling techniques. If there are difficulties, prompt and show the children the correct actions with salt dough.
- What difficulties did you encounter while sculpting? (children's answer)
What did you like? (children's answer)
- What should we do with our crafts to make the apples and saucer brighter and more expressive? (color with paints)"
Children, today you have made wonderful preparations, and when the salt dough is dry, we will paint the apples and saucer with paints.
Part No. 2
Subject: Painting an apple and a saucer in gouache.
Tasks:
Cognitive:
· Learn to paint a three-dimensional object (apple);
· Introduce plate painting;
· Learn fine painting on the plane of a plate.
Educational:
· Develop aesthetic taste;
· Develop creative imagination.
Educational:
Cultivate accuracy, bring the work started to the end.
Progress of the lesson
Apple Spas is approaching, and our work continues. The apples and saucers that we made from salt dough last time have already dried out.
- Children, take the dough apple in your hands. Tell me what it is like? (hard, knocks loudly on the table, does not stick to your hands)
- In order for our apples to become bright, ruddy, plump, what do you think we need to do with them? (color)
That's right, today we will color the apples and saucers - we will paint them with paints. Look carefully at how to do this.
In front of you are paints, a brush, paper for painting the apple so as not to stain the table, water, a napkin to blot the brush from excess water.
Wet the brush in water and apply a thick coat of paint onto the bristles of the brush. Apply paint to the apple carefully, without leaving unpainted spots.
We painted the apple very beautifully. Now let's color the saucer.
- Children, what colors do you like? (children's answers)
So you paint the saucer with your favorite color. However, be careful not to leave white spots on the surface of the saucer.
After the children have painted the apples and saucers, you need to admire the crafts, praise them, and find out what problems the children encountered in working with paints.
The fairy tale about apples continues, but our work ends. Let's leave the apples and saucers on the window to dry.
