Home moonshine still
A few words about the theory of moonshine
The myth that moonshine is only for the Slavs is, to put it mildly, disingenuous. The production of strong alcohol by distillation is part of the culinary and everyday culture of many peoples living in different parts of the world. It is enough to name such drinks as:
- whiskey;
- Calvados;
- rakia;
- gin;
- chacha;
- tequila;
- cognac.
to make sure that our domestic moonshine is not alone in the list of products obtained by distillation.
Homemade moonshine will be no different from factory-made drinks if you follow the recipe for preparing the mash and strictly follow the distillation technology. We’ll talk about the raw materials for fermenting mash another time, but in this material we’ll talk about the distillation process and, based on this, we’ll tell you whether it’s possible to make a simple moonshine still at home, and what you’ll need for this.
How does distillation happen?

Distillation process
This chemical process is extremely simple technologically; it is not difficult to reproduce it at home. The bottom line is that substances dissolved in water (mash) have different vaporization temperatures and are released from the solution sequentially - first lighter, then heavier, and only at 100C does the water itself begin to actively evaporate.
If the solution is not brought to a boil, and the vapors entering a separate container are cooled, then individual substances will condense in it, separated from others that differ in boiling point. The process was invented a long time ago; it is difficult to say who invented it first. The primacy is attributed to Arab scientists, but this is a rather controversial statement.
Temperature conditions for distillation of alcohol (moonshine)
Braga, at its core, is an aqueous solution of alcohol resulting from the activity of special fungi - yeast, well known to everyone who has seen bread being baked at least once in their life. In the process of vital activity, yeast converts the sugar in the wort into ethyl alcohol and related substances - acetaldehyde, methyl alcohol, and various esters.
When the concentration of ethyl alcohol in the mash is 13-14% of its volume, the fermentation process stops naturally, and it becomes completely ready for distillation - the extraction of alcohol, of which there is about 1.4 liters in 10 liters of starter.
The difficulty lies in the fact that when the mash is heated, along with the alcohol, its companions - aldehydes and ethers, which are completely undesirable in the composition of moonshine, evaporate. They begin to evaporate at a temperature of 65C and accompany the alcohol to T = 73C. After reaching this point to T=85C, only alcohol evaporates. At higher temperatures, heavier components appear in moonshine, popularly called “fusel oils.” They spoil both the color and taste of the drink, so you should get rid of them as radically as possible.
How to make a moonshine still with your own hands
You can find many recommendations for this case on the Internet. Drawings, instructions, tips, recommendations should be studied, but choose from them only what is consistent with the theory of moonshine. A moonshine still at home should ensure not only high-quality distillation of the product, but also safe operation. We should not forget that alcohol burns very well, its vapors are explosive, a decent pressure is formed in the distillation cube, and the mash is heated almost to the boiling point.

Main structural parts of a moonshine still
A home appliance must consist of several required parts:
- container for mash;
- fridge;
- dry steam filter;
- pipelines;
- mechanical cleaning filter;
- thermometer;
- safety valve (optional).
How to make them correctly at home? There is no single recipe - that’s why they are at home. Everything that more or less corresponds to the required parameters in terms of material of manufacture and dimensions is used. But, nevertheless, there are certain limits and restrictions - what can be used and what is undesirable.
Container for mash (cube)
Any metal container made of aluminum, stainless steel or enamel pan with a volume of 25 liters or more is suitable for this purpose. It should be noted that it should be filled with mash no more than 75-80% of the volume. The distance from the surface of the liquid to the inlet of the pipeline must be at least 10 cm.
During the heating process, the mash may foam. If the inlet is too close to the surface, then some of the mash may fall into the pipeline and, consequently, into the moonshine. This leads to cloudiness and a significant deterioration in taste.
The second requirement is an airtight lid. The container must be tightly closed so that light vapors do not escape through the cracks. The pressure inside the cube, with a working pipeline, is not too high, but sufficient for the lion's share of alcohol vapor to escape into the atmosphere through seal defects.

A can is perfect for a cube
For this reason, it is very convenient to use an aluminum milk can at home. It has a conveniently closing lid with a clamping device, a seal, and you can buy it at a very affordable price. Making the necessary changes to the design at home is also easy.
The changes concern only the lid. You need to make two holes in it - for a pipeline fitting with a diameter of at least ½ inch and for installing a thermometer. Some craftsmen also provide a pressure gauge, but, I repeat, the pressure inside the cube is not so great and there is no special need for this device.

Thermometer is a necessary attribute in the device
But you need to install a thermometer. It is very important to control the temperature of the process. This is directly related to the quality of the resulting product. To brew moonshine at home, instead of a pressure gauge, you can (even preferably) insert an adjustable steam valve into the lid of the cube, which is set to a critical pressure level depending on the design features. But this is done as an option. If the distillation process is constantly monitored, there should be no threat of explosion.
Holes in the lid can be made using a drill and a suitable size drill bit. If there are none, which rarely happens for a home craftsman, then you need to remove the cover and find a mechanic with a lathe or drilling machine. The hole for the steam line should have a diameter of ½ - ¾ inches. Practice shows that these are optimal sizes in terms of throughput.
The standard gasket-seal under the lid in the can is rubber and is not designed for high temperatures. Its qualities can be improved by wrapping it with FUM tape. This is used to seal threaded connections in plumbing. To improve the quality of the gasket, it, already wrapped with tape, is immersed in boiling water for a few seconds.
The tape can withstand temperatures up to 200C and such an operation does not threaten it in any way, but the density of the winding increases. If technical capabilities are available, the seal can be made of high-temperature rubber or silicone. You can buy them in sheets measuring 50x50 cm or so. These materials are easy to cut, and anyone can make a gasket out of them at home.
Steam line
Stainless steel or copper is suitable for the steam line. The best option is a corrugated stainless tube, which is used for gas supply. You can buy it in gas equipment stores. If this is not possible, then you can use a regular pipe with a diameter corresponding to the diameter of the fitting.

Steam outlet for the device
The difficulty here is that the finished gas pipe is equipped with union nuts, the threaded fitting for which is easy to select and hermetically install in the container lid. In the case of a rigid tube, threads will need to be welded to its ends, which not everyone can do at home.
Brass or ordinary steel cannot be used - in an alcohol atmosphere they oxidize and form compounds that have not been fully studied, but their effect is clearly not aimed at improving the quality of the drink. It is also undesirable to use plastic pipes - many types of polymers, when heated to 80 degrees or more, release toxic substances with an unpleasant odor, and they are even more dangerous in contact with alcohol.
The steam line is bent in a “P” configuration. One end is connected by a threaded fastener to the outlet of the cube, the other - to the inlet fitting of the dry steam filter.
Steam chamber (reflux condenser). Why is it needed and is it needed at all?
Technically, this device is extremely simple, even primitive, however, it works very effectively, eliminating up to 60-80% of heavy fractions of harmful impurities from moonshine. It consists of a vessel with a volume of 1-3 liters, depending on the performance of the device. For a home-made apparatus with a cube with a capacity of 25 liters and a steam line with a diameter of ½ inch, a steam steamer of 1-1.5 liters is sufficient.

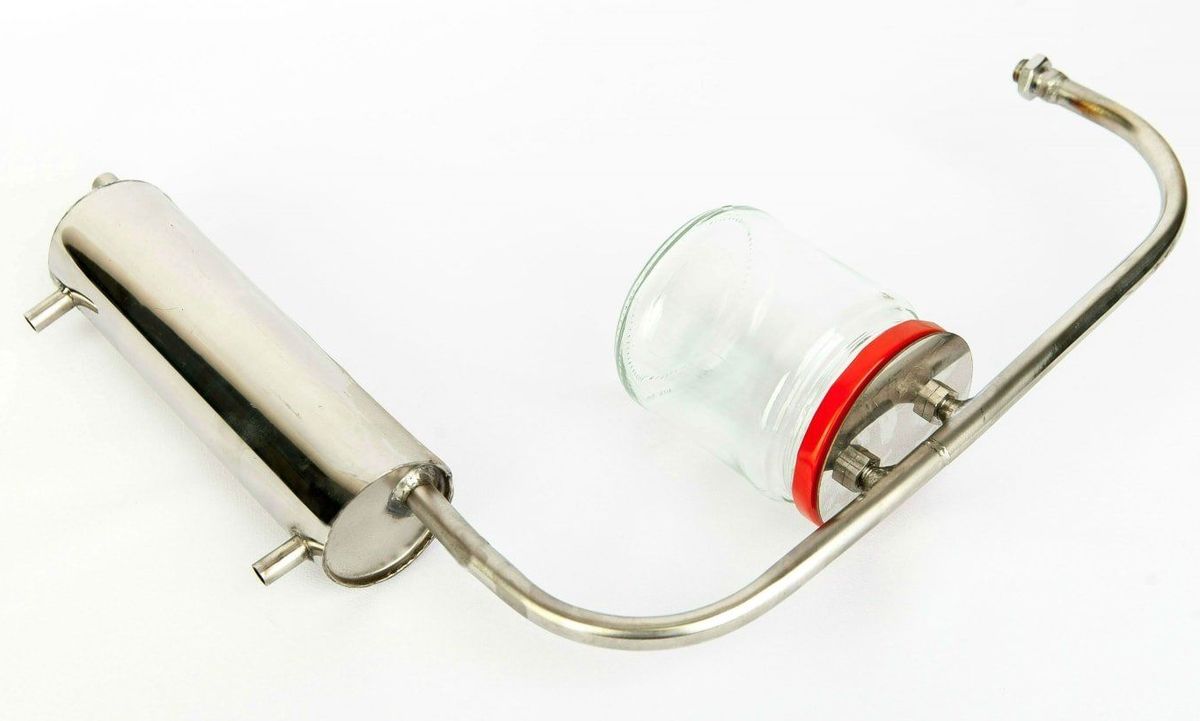
Steamer from a glass jar
The filter housing can be an ordinary glass jar with a screw cap. In the lower part, if possible, it is advisable to drill a hole at a height of 1 cm from the bottom and install a tap to drain the filtered liquid. A little later we will publish an article on making a steamer.
The housing can also be any sealed stainless steel container, which can be made from a pipe with a diameter of 100 mm, if it is possible to work with argon welding.
The most important part of the steamer is the lid. Two tubes with threaded tips are embedded in it. One enters the jar to a length of up to 1/3 of the height of the container. A steam line from the distillation cube is connected to it. The second extends no more than 1 cm below the cut of the lid. It is connected to the outlet pipe, which goes to the refrigerator. All connections are threaded, the filter cover is screwed on tightly.
The filter works like this: vapors of alcohol and heavier fractions of impurities, which have a slightly higher boiling point than alcohol, enter the steam chamber and are cooled there to a liquid state. A new portion of steam constantly heats up the liquid in the filter, the alcohol evaporates and goes into the pipeline to the refrigerator.
The thermal energy of the steam is not enough to evaporate the heavy fractions, and they remain in the filter in the form of a liquid (quite poisonous, by the way). The sludge is periodically drained, which is why a tap is needed, and poured into the sewer. Different lengths of the inlet and outlet pipes are necessary so that the vapors do not mix before the condensation process begins. There is no need to cool the steamer.
Fridge
A very important part of the moonshine still. Making it at home is very simple. For this, a piece of any pipe about 1 m long with a diameter of 50-100 mm is used. The pipe is closed on both sides with hermetically sealed caps with holes through which the steam line passes. With a steam line thickness of ½ inch and a refrigerator length of 0.6-1 m, a coil or other device that increases the contact area with running water is not required.
Running water is used for cooling. Two fittings are mounted into the refrigerator body for a regular rubber hose - inlet and outlet. They are installed at opposite ends of the housing, perpendicular to the axis, so it is more convenient to connect them. You can also install fittings with a threaded connection. The connection method, as well as the material of the refrigerator body (steel, plastic, aluminum) are not regulated. Running water comes into contact only with the outer part of the steam line and does not affect the chemical composition of the product.
The dimensions of the refrigerator are approximate. They can be established experimentally. It is important that the outlet liquid is cooled to a temperature below 40-50C.
You can reduce the size of the refrigerator by installing a coil inside of a copper or stainless tube with a diameter not lower than the main steam line. In this case, the contact surface area increases and the cooling efficiency increases without increasing the dimensions of the refrigerator. Drawings of a spiral cooler and other types (Graham, Dimroth, Allin) can be found on the Internet. Any laboratory cooler circuit that can be implemented at home using improvised means is suitable for a moonshine still.
Mechanical filter
At the outlet of the refrigerator, under the pipe, it is recommended to install a glass funnel filled with birch sawdust or tightly packed shavings, into which you can add several crushed tablets of activated carbon. The fusel oils remaining after the reflux condenser, mechanical impurities from the steam line, particles of mash, and foam settle there and the moonshine acquires crystal transparency and a unique aroma.
All that remains is to assemble the apparatus and light the fire on the stove.
And here is a video on assembling a moonshine still:
Unfortunately, the statistics of poisoning with vodka and other alcohol make us think. Sometimes counterfeit goods that are very dangerous to health end up in stores, so some people have a question about how to make a moonshine still at home. With proper production, you can only get a high-quality product.
General description and principles of operation
 The circuit of the moonshine still is simple, like everything ingenious. In design and operation, it is not much different from the distiller used in many chemical laboratories.
Device structure. The main components are the following:: container for raw materials (mash); refrigerator with coil; tube to connect them.
To obtain higher quality moonshine, the device is sometimes supplemented with: a steamer; bubbler; carbon or wood filter.
You can buy a ready-made device. However, many are more interested in assembling it themselves. They even do electrical installations using automation.
Mechanism of operation
 The raw material is mash based on sugar or starch. Yeast is also added here. The composition is optimal for the growth of the necessary microorganisms - fungi.
In the process of life they will release waste- alcohols in concentrated form, of which only ethyl is of interest. During distillation the following happens:
- In the distillation cube, the mash is heated and breaks down into liquid and vapor containing alcohols.
- The vapor moves through the tube, the coil. Alcohols are divided into fractions (types).
- In the refrigerator, a container of water, suitable alcohol is cooled and condensed.
The difference between moonshine and rectified
 It is worth considering that even if you carry out this procedure several times, using additional devices (filter, bubbler, steamer), harmful impurities will remain. The quality of the product depends only on their volume.
There is a method that allows you to obtain alcohol with a minimum amount of impurities. This is rectification, in which alcohols are divided into fractions in several stages. To carry it out, you will need more complex equipment, which is difficult to make yourself.
The rectificate can be found at the pharmacy: this medical alcohol(95.57%). Moonshine is also called distillate based on its production method.
The following drinks are prepared using rectification:
- vodka;
- liqueurs, etc.
In the process of obtaining rectification properties are lost required for some drinks. For example, the aroma of cognac appears due to fusel oils, so this drink is best made from distillate. It is usually obtained in a professional industrial way. As an option, flavorings are added to the rectified product.
The opinion that rectified alcohol is safer than moonshine is erroneous. The purer the alcohol, the its intoxicating effect is stronger. Molecules move from the blood into the nervous system faster, and harmful products take longer to be eliminated. The poison is better absorbed and comes out harder.
Installation assembly
 Distillation cube. Any container with suitable qualities is suitable for a distillation cube. It is often heated on the stove.
The main requirement is tightness. Some weld the container themselves from regular or stainless steel. This option may be unreliable for the following reasons:
- The mash sticks, but there is no way to stir it, since it needs to be sealed.
- When exposed to high temperatures and pressure, poor quality seams will come apart.
Fridge. The quality of the refrigerator as part of the distillation unit determines: operating speed; quantity of product. Refrigeration structures are divided into two types:
- cumulative;
- flow-through
In running water, the water moves, so it does not have time to heat up. The design includes tubes.
- Through the first, water enters the refrigerator.
- From the second - it comes out.
Storage refrigerator- closed container with water. Inferior in quality to flow-through: the amount of condensate and the volume of product are reduced. Cooling is not as effective, which is why there is 15-20% less moonshine.
You can find many drawings of a storage refrigerator for a homemade moonshine still. The simplest design is regular plastic bucket with holes for draining and collecting water and a coil inside. In winter it is especially convenient, as you can collect snow and ice.
In storage containers, the hole for draining should be at the top, for collection - at the bottom. It is advisable to keep the temperature in the distillation cube as low as possible. This will result in less steam and more product.
The moonshine will come out through another hole. To control, try on the wrist. If it’s cool, the cooling system is excellent, if it’s hot, it’s bad. In the latter case, the product will be about a third less.
Coil - tube, placed in the refrigerator and connected to a cube or, if available, to a steamer. The longer, the better the steam is cooled. The following simple manufacturing options are common:
- Copper tube measuring 15-20 mm, screwed onto the base. During winding, it is advisable to fill it with sand to prevent deformation that would interfere with the escape of condensate. To prevent sleep, they plug it with a rod, for example, made of wood. The base is in a vice.
- Siphon hose, the desired length is 2 m. It is also twisted into a spiral. Fastened using nipples, gaskets, nuts. Additionally, a sealant is applied to any coil.
Steamer and bubbler
 The steamer is an optional part of the design of a moonshine still, made at home with your own hands.
He is needed for removing fusel oils. It is located between the still and the coil. With its help the following happens:
- The pressure and temperature decrease, so the vapor becomes liquid. The next wave of vapor pushes them out.
- Fusel oils collect on the walls of the vessel. When you repeat the procedure 2-3 times, almost no of them remain.
The drink itself is often called fusel because of its characteristic taste and smell. Fewer amounts of these oils make the product safer for health: The hangover is not so severe.
It is not possible to completely get rid of them during moonshine brewing (distillation). In many well-known drinks, these oils are necessarily left in a certain amount (whisky, rum, etc.). Such products are “advanced” analogues of moonshine. Three steam steamers are often used in a cascade. The advantages here are:
- the moonshine comes out to be of very high quality, with a high degree of purification;
- already on the first distillation the strength is about 80%.
Three containers - the optimal number: if it is less, then the effect will be insufficient; a larger number plays almost no role.
The volume of one steamer is approximately 10 times less than that of a container with mash. It's easy to make. Usually a glass jar of the required volume is taken, and the lid is “modernized” to it.
The lid must be screwed on. Two holes are made in it, for example, with a knife or screwdriver. You need to try to avoid burrs. Fittings are inserted into the holes and secured with nuts. Next, the tubes are put on.
Periodically, the water is drained to avoid it getting into the coil, and then into the moonshine. The steamer is also used for flavoring. Add something to taste, for example:
- berries, preferably dried;
- herbs;
- citrus peels, etc.
Feel free to experiment with scents. They will be barely distinguishable, and more by smell than by taste.
The bubbler is used for the same purposes as the steam steamer. The differences are more related to the design. In the bubbler there is usually liquid, through which the pairs are passed. The supply tube is lowered much lower, almost to the bottom of the container.
Connecting tubes and filters
If flexible hoses are used for connection, it is better to choose silicone ones. If you use PVC pipes, toxic substances will be released upon contact with hot vapors. Externally, these materials are sometimes confused. You can distinguish by some signs:
- A piece of PVC burns with a lot of smoke and an unpleasant odor. Silicone does not smoke, has almost no smell, and leaves behind a light ash.
- The silicone is pleasant and silky to the touch.
- PVC hardens at -10 °C, silicone remains elastic.
Filters for purifying the finished product are made, for example, like this:
- The bottom of a plastic bottle is cut off.
- There are many small holes made in the cork.
- The filter itself is prepared from cotton wool and coal fractions inside. Roll a ball at least 4 cm in length.
Moonshine is passed through the resulting device. Before filtering, the drink must stand in a container with coal.
Selection of materials
 In Soviet times, it was widely believed that the best material for a direct-flow distiller was copper. It was easy to find and inexpensive.
However, when alcohol vapor interacts with copper, ethers and aldehydes are formed, which remain in the system. There is always vinegar in the mash. When interacting with aluminum, harmful salts are obtained - alum.
Glass has neutral qualities and does not react. However, this material has a significant drawback - fragility. Food grade stainless steel- perhaps the most reliable option:
- does not react and does not form deposits;
- reliable;
- easy to care for.
Although, in terms of thermal conductivity and ease of making coils, copper is much better. In terms of accessibility, other materials may benefit. The harm from their use is usually not significant. Therefore, a design made from various suitable materials often pays off.
Examples of simple installations
 A moonshine still of the simplest design can be made from available materials. The main thing is to follow simple rules and use your imagination.
Moonshine still from a saucepan. Even a regular five-liter saucepan is suitable for the device. It is better to use a pressure cooker as it is more airtight. In addition to it, you need to find: a 5-liter plastic bottle; copper tube: length - approximately 1 meter, diameter - 4-5 mm.
- The handle is removed from the lid. A fitting is inserted into the hole and secured from the inside with a nut. If the hole is small, you need to drill it out.
- A silicone tube will be used as a connecting tube. It is harmless and does not change the taste, so it is often used by industrial producers.
- The refrigerator will be a plastic bottle with a copper tube placed inside. The bottle is turned over and the bottom is cut off. A coil is made from a tube, about 8 cm in diameter. It comes out through a hole made in the bottle cap.
- Water is poured into the mini-fridge and mash into the pan.
- For sealing purposes, the lid of the pan is pressed with clothespins. Its edges can be covered with dough. It will harden when heated. Another clamp option is carpenter's clamps, and the seal is a cut silicone tube.
- The design can become more complicated and improved. For example, there is also a hole in the lid for a pin thermometer.
Can based distiller
 Often a large milk can (flask) is used for production. It is initially quite airtight.
The rubber gasket must be removed. The mash will absorb its smell. Instead, it will do food grade silicone gasket.
You can make it yourself from aquarium silicone:
- Apply to the edges of the lid. After complete drying - at least two more layers.
- Ordinary cellophane is placed on the neck of the can, after which the lid is closed. You need to wait a few hours.
Further, a hole is made in the lid under a tube or a long coil. The thickness of the latter is about 12 mm. As a refrigerator, you can use, for example, a specially designed plastic bucket with holes at the bottom for water to flow in and moonshine to come out.
To submit hose used connected to the water supply. Draining occurs through a hole in the top of the tube.
If done correctly, it may well compete with store-bought products. He also has clear advantages: low price and comparative safety.
Attention, TODAY only!
Despite the huge selection of moonshine stills, many still make it with their own hands. This is done for the purpose improving the quality of the distiller And saving money, since some parts may already be in the household. We will show you several paths you can take to make a full-fledged moonshine distillation apparatus. We will consider the most fast, most cheap and the most qualitative option.
It is not always profitable to manufacture all parts of the device yourself. You can buy some things, but somewhere else it’s better to save money. We will tell you the most profitable options, and you will already choose the one that is most suitable for you.
I suggest immediately making a moonshine still with so that your drink turns out cleaner and of better quality. By the way, it is the steamer that is the part that is much more profitable to make on your own rather than buy in a store.
What does a classic and high-quality distiller for moonshine consist of:

- Distillation cube (tank). This is a container from 5 to 100 liters in which the mash is heated. It is best to make it from stainless steel or copper. Enameled steel will also work, but is less preferred. Food grade aluminum only as a last resort.
- Steam line. These are tubes through which alcohol vapor moves. They can be made of stainless steel or silicone. The main thing is that they are as airtight as possible and do not absorb odors.
- Sukhoparnik. A device for purifying moonshine from harmful impurities. It is highly recommended in moonshine stills, as it definitely has an effect. Most often it is made of stainless steel, but we will use a regular small glass jar. .
- Fridge. The most complex part in the design of the distiller, which helps cool the alcohol vapor and condense it into moonshine. There are several ways to make it yourself, although it is also available for sale.

Fastest option #1
Photo of a finished moonshine still from a pan
The distillation cube is a regular one, made of stainless steel or enameled steel. The steamer and refrigerator are purchased separately and are simply inserted into a pre-drilled threaded hole.
You can make such a unit in 10 minutes, and the total cost will be about 2,500 rubles.

Ready-made apparatus from a saucepan.
Turning a pot into a moonshine still
Simply cutting a hole in the lid and inserting a steam line there will not work; you need to make the pan airtight and dense. Only after this can you connect the refrigerator and steamer.
We perform the following actions:
A coil with a steam steamer costs around 2.5 thousand rubles.
- We buy a meter of silicone hose, cut it lengthwise and stretch it over the top diameter of the pan. This will be a homemade gasket that will keep the container tightly sealed.
- We drill a hole in the lid for a steam line with a steamer and a refrigerator. You will most likely need a 12mm drill bit.
- We insert the adapter into the pan, secure it inside with a nut and gasket, and attach our steam line to the outside.
- To press the lid as tightly as possible, use paper clips: clamp the lid and pan 6–8 times along the entire diameter.
- The distiller is ready for distillation.
Try not to accelerate the mash to maximum temperatures so that it does not begin to leak through the silicone gasket. Heat gradually.
Video instructions for making
Better to see once than hear a hundred times. Sixteen minutes author of Youtube channel Spy Gates tells and shows what actions and what tools need to be performed in order to make the device with your own hands.
This is a fairly budget-friendly and good option for all novice moonshiners for whom speed is important.
Cheapest option #2
Photo of the finished machine from a milk flask (can)
Finding it is not a problem now. Quite a lot of them remain from Soviet times, and even on Avito or Yule You can easily find a suitable option.
A flask makes a really good distillation cube of decent size, which is suitable for distilling a large volume of mash. It is not so difficult to process it into a moonshine still, because the principle remains the same as with a saucepan.

A possible option for implementing a moonshine still from a flask.
How to convert a can into a moonshine still

- Using a 20 mm feather drill, we make a hole in the can lid.
- We insert a brass fitting into it, which is tightly clamped from the inside with a nut and gasket.
- If you plan to monitor the temperature, you can make another hole under.
- We put a stainless steel gas hose on the fitting, which we connect to the steam tank.
- , read the detailed instructions at the link provided or further watch a separate video.
- From the steamer we move the hose to the refrigerator, which can be made flow-through or regular. The first option is more effective and complex, but for the second you just need a large container of water (bucket).
- Let's tighten all the nuts and start making moonshine!
For moonshine it is best to use. But brass is not the worst option either, so nuts made from this material are not a problem.
Making a distiller from a can on video
One of the most detailed videos from Youtube channel OverCraft collected almost 250 thousand views. The author shows all his actions on video and makes pop-up tips that describe the diameters and names of the necessary equipment.
The video is short, but it is enough to understand the general principles of processing a can into a moonshine still.
Making a steamer with your own hands
As a bonus, we are posting a video from Antonich and Alexey Podolyak, where the author makes a steamer from an ordinary can. You can even make one using this principle (filtration is through water), if it seems to you a more useful and effective device for purifying alcohol vapor.
We believe that any classic distiller should have 1 steamer or 1 bubbler. Combining them or making several at once does not make practical sense. Just wash unnecessary equipment and increase alcohol losses.
Highest quality option #3
Photo of the finished beer keg machine
The coolest device is made from. They require serious improvement and processing, but the result is at the level of high-quality and expensive distillers.
The most popular is the 30 liter container, equipped with. This installation allows you to distill mash in any room and place where there is an electrical outlet (even on the street).

Beer keg converted into a moonshine still. In analysis.
The process of converting a beer keg into a moonshine still
The work is complex and requires skills in using a welding machine, grinder and screwdriver. The sequence of actions is as follows:

- The hole on top for the steam line of the moonshine still is widened. A regular gas hose will not work here; you need a wide stainless steel pipe with maximum tightness.
- A 2-inch hole is drilled at the bottom for a clamp that needs to be soldered. In the future, a heating element will be inserted into it, which heats the mash.
- For convenience, a tap is cut into the keg to drain the stillage, the bottom is equipped with legs for stability, and handles are cut out on top.
- You can add a thermometer to the design, which is inserted in the same way as a pan and a can.
- Let's start the race!
The whole operation takes several days of work, since in addition to converting the keg into a distillation cube, you also need a steamer and a refrigerator.
Video instructions for converting a keg into a moonshine still
Prepared a wonderful series of videos Andrey Golubenko. Slowly, at home, involving small children in the work, the author slowly improves the design and ultimately makes a fantastic distiller that does an excellent job of distilling mash of any kind.
The process is divided into several parts, in each of which the author makes one of the parts of the apparatus design. We highly recommend viewing to all moonshiners for experience.
How to install a heating element into a distillation cube
Quite a delicate task that can be solved in two ways: by welding or without her.
In the first case, simply drill a hole and weld a clamp into which we will later screw the heating element. The whole process is clearly shown in the video from the guys Steel Jet. The process takes a long time, but it is thorough.
In the second case, you need to purchase an o-ring and special ring from the online store moonshine-and-vodka.rf. This is a rather innovative method that no one has used before.
The guys carried out a lot of testing and released a unique product onto the market that solves a serious problem for moonshiners: the jaws periodically broke due to welding. Using a ring allows you to simply screw the heating element into the hole without unnecessary welding.
Other options for making a moonshine still with your own hands
Pressure cooker
The Soviet saucepan has perfect tightness, but an extremely small volume. Having filled 75% of this container, we will end up with a maximum of 1 liter of 40-degree moonshine, and in any case we will have to distill it twice to remove harmful impurities.

External view of the finished distiller from a pressure cooker.
You shouldn’t take this option seriously, but for a change you can try distilling an alcohol-containing liquid into it and see the result. Just try to clean the product as much as possible from fusel oil.
As an alternative to stainless steel tubes, you can use food-grade silicone. It is securely tightened with clamps and does not let anything through.
Multicooker
One of the most absurd ideas that could come into the mind of a moonshiner. It has excellent tightness and already has a valve for steam release. All that remains is to insert the steam hose there and you can distill the mash into moonshine.

A working moonshine still from a multicooker with 4 bubblers.
The video shows the distillation of wine and the remaining beer from the refrigerator. Several bubblers gurgle quite coolly, although such a number is not necessary, they look impressive.
As one of the users on Youtube rightly noted in the comments, the result was not ordinary moonshine, but a real hour! 🙂
Bucket
Finally the most crazy idea, this is distilling moonshine straight from a metal bucket. Tighten the seal using regular stops, drill a hole for the tubes and move on. Perhaps this is the cheapest moonshine still, which even surpasses a milk flask. 🙂

Distilling moonshine in a bucket.
It is best to use an enamel container, which will not react in any way with mash at high temperatures. Ordinary metal is not suitable for this, so take classic 12-liter buckets with enamel.
A bucket for 800 rubles will cost you much less than a stainless steel still for 5–6 thousand.
Brief conclusions
As you already understand, making a moonshine still is not so difficult. The distillation process is not that complicated, and modern distillers with high prices have only made it easier. And cleaner. Homemade distillers cannot boast of high-quality purification of alcohol vapor, although a homemade steamer solves this problem.
You're careful enough watch training videos And Don't make a mistake with the hole diameter, which you will need to drill or weld. You can leave any questions you have in the comments under the video. Some of the authors share their experiences with users almost daily.
Good luck with your work and high-quality moonshine after distillation!
Alcoholic drinks are an integral part of a festive feast. But often the intoxicating drink awaiting its buyer on store shelves is of dubious quality, poor taste or high cost. You can prepare a strong alcoholic drink at home. You just need to study the instructions on how to make a moonshine still with your own hands.
The still as the most important element
A distillation cube is a special container used to heat raw materials. When making a home unit, you can use a regular aluminum can or pressure cooker for this purpose. To ensure the tightness of these containers, it is necessary to replace standard rubber gaskets and seals with silicone ones. The former, when heated and in contact with alcohol vapor, emit an unpleasant odor, which subsequently saturates the moonshine. The gasket on the flask must be wrapped with fum. You need to overlap the tape 5-6 times.
If a pressure cooker is used to make a moonshine still, then there is no need to change the sealing materials.
In this case, the gaskets are made from food-grade raw materials that can withstand high temperatures and do not emit odors or harmful substances.
So, if you have certain skills, suitable materials and tools, you can make the container yourself. A metalsmith can make a tank or cube from stainless steel, equipped with a neck and a convenient lid, with a thread for a fitting.
Options for homemade refrigeration units
The refrigerator is the second integral component of a home device for brewing alcoholic beverages. There are 2 types of these devices - flow-through and non-flow. The first ones are compact in size. They are easy to store as they do not take up much space. Their design consists of a tube and a spiral element. Water from the tap flows through a coil built into a sealed container. This type of refrigerator model has a direct-flow system. Here the cooled tube is located in a pipe having a larger diameter. Cooled water passes between the walls. It is more difficult to make such an element, since it is characterized by significant linear parameters. To place it you will need a stand. The most important positive property of flow-through refrigerators is their high level of performance.
Non-flowing models can be made from a tank or canister. The optimal volume is 20-30 liters. A spiral tube cuts into the container. During the brewing process, the tank is filled with cold water. After heating, the water must be partially drained and then quickly topped up with cold water. To make the design convenient to use, it should be equipped with wheels. The advantage of a static refrigerator is that it can be used in places where there is no running water, for example, in a country house. In winter, the tank can be filled with snow or ice.
To use the device both in an apartment and in a private house, you can make a combined design. To do this you will need a galvanized steel bucket. You need to cut a tubular spiral into it and insert a fitting for the hose under the top. A flexible tube is attached to the bottom of the bucket.

The dry steamer is a guarantee of obtaining high-quality alcohol
This element in the design of the device is not mandatory, but it allows you to make moonshine cleaner, more aromatic and safer. The part is placed in the steam line. There may be only one dry steamer, but if you want to get the highest quality product, it is worth installing a cascade of 2-3 purifiers. This design will allow you to make moonshine with a strength of 75-80%. The drink does not have to be distilled again to improve it.
You can make a steamer from an ordinary glass jar equipped with a screw cap. For a device with a volume of 30-40 liters you will need a 3-liter bottle. It is necessary to cut into its cover the fittings necessary for supplying and discharging steam. For the outlet channel, it is advisable to adapt a hose that reaches the bottom of the can. To get an original drink, you can place natural flavors inside the steamer. In order for the steamer to be useful, it should be installed near the distillation cube. The collected liquid should be drained on time, otherwise it will fall into the coil and spoil not only the aroma, but also the taste of the drink.
The steamer is used both to catch fusel waste and to impart a pleasant aroma to the alcoholic drink. After all, the amber of herbs and berries is collected here, which, due to the sharp cooling of the steam, move to the end point.
The following can be used as flavorings:
- dried berries (raisins, rose hips, cranberries, barberries);
- dried fruits (prunes, dried apricots, dates, dried apples or pears);
- aromatic herbs (mint, lemon balm, currant leaves, cherries);
- spices (vanilla, saffron, star anise, rosemary, saffron; cardamom, nutmeg, ginger, cloves, allspice);
- citrus fruits (peels of oranges, lemons, tangerines).

Connecting units for the device
You can assemble all the elements of the device into a single system by connecting them using tubes and hoses. The steamer is located between the refrigerator and the container for distilling raw materials. You should use silicone tubes with clamps, as well as steel corrugated hoses with nuts. Rubber elements are not suitable due to their odor. PVC materials cannot be used either, as they are poorly resistant to temperature changes. A video in master class format will help to reveal the essence of the issue even better.
Making a moonshine still is quite simple, the main thing is to stock up on desire, time, materials and patience.
Moonshine stills are easy to make. The circuit of a moonshine still consists of two parts - a heated tank with mash and a coil. You can add a steamer to a homemade moonshine still and it will greatly improve the taste of the distilled moonshine. Or you don’t have to use a coil; in the article above we already gave an example of a method of making moonshine in which you can actually get by with just a saucepan.Many today prefer to buy a moonshine still on a website on the Internet or from a special company. But the cost of a purchased unit is usually high and amounts to 8-16 thousand rubles. At the same time, you can make a moonshine still with your own hands at much lower costs and cost 1-2 thousand rubles. In this article we will talk about making a simple moonshine still from a saucepan using improvised means.
To assemble a moonshine still, you will need the following tools: a hacksaw, a drill and pliers. Of course, you can use a Dremel instead of a hacksaw and drill, but this is at your discretion.
This design does not require drawings of a moonshine still, everything can be done virtually “by eye”, and the article has a sufficient number of photographs so as not to make mistakes during production.
The list of materials for manufacturing looks large, but all the components are easy to get and they are very cheap.

We will need: a large saucepan with a lid - this will be a heated tank, a piece of plastic plumbing pipe (45 mm in diameter) and 2 meters of aluminum or copper tube (the latter can be taken from an old refrigerator) - this is for making a coil.
2 fittings with hoses, a half-inch plumbing coupling and a nut for it, a dropper from a pharmacy or another flexible and thin tube, a piece of rolled aluminum (an old curtain or corner will do, you can take runners from an old children's sled), fluoroplastic tape (at a plumbing store - fum lena for pipes), a couple of anchors with nuts and tin from a beer can.
To make a steamer, you need a jar with a tightly screwed lid (suitable for store-bought gherkins or salted mushrooms).
The following adhesives will be required: a package of epoxy glue and cyanoacrylate superglue (a couple of tubes).
As you can see, a lot can be found already in the house or in the rubble of old things in the garage, and even if there is a lack of materials, you can buy all this at the flea market very inexpensively.
How to make a coil
Making a homemade moonshine still begins with winding a coil.

The moonshine still’s coil is the main thing in the entire unit! Look at this article, a lot of interesting things are described there about the coil and its installation.
To prevent the tube from being crushed during the manufacturing process, fill it with dry sand, tamp it, clamp the ends of the tube with pliers and carefully wrap it around any round object of a suitable size. The finished coil should be inserted into the plumbing pipe with a gap of approximately 0.5-1 cm.
Attention! All actions with the tube (bends for installation, etc.) must be performed only with a tube clogged with sand! Otherwise, the tube may flatten or break!

This is what the coil looks like before it is inserted into the cooling pipe.

We cut off the cooler tube 4-5 cm from the end of the coil.

We will modify the fittings for water supply and drainage.

They are glued overlapping onto the cooler, so we cut off the sides using a saw or Dremel. This is what the device looks like.
We heat the finished fittings on a gas stove or lighter and press them tightly to the plastic pipe. This will allow you to form flat areas to which the fittings will be glued.

After this, glue the fittings to the pipe using cyanoacrylic superglue. If such a connection seems unreliable to you, you can clean the area around the glued fitting, degrease it with acetone and additionally coat the outside with epoxy glue or use a heat gun. But, as practice shows, if there are no blows or attempts to deliberately break off the fitting, then it will hold perfectly even with superglue.


After this, carefully drill holes in the pipe using the fittings as guides for the drills.

Inside you get something like this hole. Burrs can be cut off with a knife or the inner surface can be sanded with sandpaper.

There are 2 fittings - for supplying and discharging running water through the coil of the moonshine still.

The end caps are cut from tin beer cans. You can use plastic caps for three-liter bottles - they are thicker and easier to adjust to the diameter of the cooling tube.

We make cutouts in the covers for the coil tubes and carefully glue them into the cooler with superglue. The main thing here is to fix and fill the gaps between the cover and the cooler. To seal cracks, you can use a hot glue gun or soda. Soda is poured along the contour, a “side” is carefully formed using superglue, and a very rigid composite is obtained.

Now it is necessary to completely seal the coil. To do this, dilute epoxy glue (you can mix it with silver or myrosphere to give a noble shade and reduce glue consumption) and fill the end of the cooler tube. All that remains is to wait for the glue to polymerize and repeat the procedure for the other side of the cooler.
Making a hotbed
It is better to make home moonshine with a steamer. A steam reflux condenser is necessary to remove fusel oils between the distillation tank and the coil. Heavier fusel oils released together with alcohol in the form of vapors settle in the steamer and the moonshine turns out more tasty. Headache during a hangover is the result of drinking fusel oils along with moonshine. Moonshine that was made on a machine with a steamer does not give you a headache!

A hole is cut in the lid of the jar for the coupling.

We clamp the inserted coupling with a nut. This must be done carefully, so that you do not then have to use a rubber gasket for the coupling to ensure sealing. Drinking moonshine with a rubbery taste is not very pleasant, so be careful and be careful again!

We try on and bend the tube from the coil to the steamer, and take the rest of the tube to the pan.

Now we clean the surface of the tubes with sandpaper, wind them together with threads and insert them into the steam container. We seal the space between the tubes and the coupling from the inside using cotton wool and fill the outside with epoxy.
After the epoxy has “set”, remove the cotton wool and check the tightness. The steam steamer should not “suck” air!

If everything is fine, we proceed to the manufacture of the distillation tank.
Distillation tank of a homemade moonshine still
We make a heated container - a distillation tank - from a large saucepan.

To do this, drill a hole along the diameter of the tube in the sidewall, 4 cm from the top. We put the tube inside and bend it so that there is 4-5 mm between the lid and the edge of the copper tube. In this case, the tube will only collect sublimation vapor and will not “choke” if the mash boils.

We seal the tube with the pan using the usual sealing procedure with epoxy glue.
Now you need to ensure the lid of the moonshine still is sealed.

To do this, we make a holder from anchors and an aluminum profile.

The ear of the anchor heats up and extends. An isolette is wound around the handles of the pan or a piece of PVC tube is put on (cut up). This will allow you to more “softly” regulate the force of pressing the lid onto the pan.

In the places where the lid is pressed, pieces of bottle cap are glued to the holder; they will also cushion and protect the lid of the pan from scratches.
Homemade moonshine still
This is what a homemade moonshine still looks like assembled.

In this case, a furniture aluminum profile is used as a holder. The cuttings were taken from a kitchen manufacturing site. If you don’t have the opportunity to get aluminum, you can use a piece of stick from a hockey stick or a handle from a shovel. The latter, of course, is too massive, but cheap and can be easily bought at the “Everything for the Dacha” store.

All that remains is to ensure that the lid fits tightly to the pan. Here fluoroplastic fum tape from the hardware store comes to our aid.
When preparing moonshine at home, wrap 6-7 layers of this tape around the edge of the pan and, covering it with a lid, attach the structure using anchors.
All that remains is to perform a test run of the homemade moonshine still - to do this, fill the pan halfway with water, seal it and place it on the stove. Hot steam will go all the way and clean the system. The same thing needs to be done every time after you have made the next batch of moonshine and are going to put the device away for storage.

When producing moonshine, a hose from a dropper is attached to the outlet of the coil and connected to the receiving container. Hoses are put on the cooler sockets, cold water is supplied to the lower one, and water is discharged from the upper one to the sink. It is better to place the coil at an angle to the surface and place it at a distance of 20-30 cm (or more) from the pan. The photo shows the unit intended for transportation. At the place of use, the tubes will be carefully bent and the steamer will take its place on the straight line between the pan and the coil.
