Hello, dear readers of the culinary blog! Today we will look at the recipe for the original Whoopie Pie cake with sour cream. How often is the main gastronomic highlight of any holiday a beautiful cake?
Yes, almost always. After all, everyone wants to surprise guests with an unusual, tasty and delicious dessert. Are you also planning a celebration, but you don’t know which dessert to choose? Then this article will help you make a win-win choice.
The “Whoopie Pie” cake is very beautiful and delicious, it will become a real decoration for any holiday! This recipe is step-by-step, so don't be afraid to miss something during the cooking process.
Whoopie Pies are the most popular American cakes; they consist of two biscuit halves and a cream layer. Americans are delighted with them! So why don't we try to cook them? However, in our version, these cakes will serve as decoration for the main dish - the cake.
Components:
For the cakes:
1. Wheat flour - 350 grams
2. Cocoa powder - 100 grams
3. Butter - 250 grams
4. Sugar - 210 grams
5. Vanilla sugar - 10 grams
6. Chicken eggs - 2 pieces
7. Espresso coffee - 130 grams
8. Milk - 130 grams
9. Lemon juice - 10 grams
10. Baking powder for dough - 8 grams
11. Soda - 4 grams
12. Salt - 2 grams
For cream:
1. Sour cream - 600 grams
2. Powdered sugar - 150 grams
3. Vanilla sugar - 10 grams
For the chocolate fudge:
1. Dark chocolate - 80-100 grams
2. Heavy cream - 80-100 grams
3. Butter - 10 grams.
Cooking method:
1. Sift the required amount into a deep bowl. Then add baking powder, baking soda and salt to it. Mix all ingredients thoroughly; it is better to use a regular whisk for this. You should get a homogeneous mixture of a grayish-brown hue.

2. Take milk and pour lemon juice into it, mix.

To decorate a cake, you can use all kinds of ingredients, not just crumbs and the cakes themselves. Berries (raspberries, currants), parts of fruits (for example, strawberries), nuts, mint leaves and much more look beautiful on this dessert. Play with contrast; bright colors (red, green, yellow) stand out beautifully on the dark chocolate surface.
Don't be afraid to experiment! In this case, you have a huge space for flight of fancy.
Dear readers, please comment on the recipe and send your versions! Subscribe to blog news and share with friends, cook and try new culinary masterpieces together! See you again!
I regretted that I had not tried these traditional American cakes before. They cook very quickly, and you fall in love with them from the first bite. Soft chocolate biscuits combined with whipped cream are just the BOMB. I am happy to share the recipe and highly recommend trying it.
Let's prepare the ingredients for making Whoopie Pie and get started.
Remove the butter from the refrigerator in advance. Measure out the powdered sugar and milk. In a bowl, mix cocoa, flour, baking powder and vanilla. Mix the mixture well.
Grind the butter with powdered sugar until soft and fluffy.

Beat in the egg and mix thoroughly.

Stir in dry ingredients and milk little by little. First some flour, then milk, more flour and again milk. Stir each time until smooth. If the egg was large, it is possible that 10-20 ml less milk will be needed.

Stir until smooth. The dough should be medium thick and should not drip off the spoon.

Using a spoon or pastry bag, pour the dough into round cakes, not too large, they will increase in size.

Bake in a preheated oven, temperature - 180 degrees, 10-12 minutes.

While the biscuits are cooling, you need to prepare the cream. Whip cold cream until stiff. Add powdered sugar and beat quickly.

Spread the cream on one cake, cover with another, and the Whoopie Pie is ready.

The cake, in my opinion, does not require decoration.

You can lightly sprinkle with powdered sugar.

Bon appetit.
Dense, textured after baking, the cakes promise a chocolate taste familiar from childhood, and the delicate creamy layer beckons in contrast with dark cookies.
It’s no joke, several American states jealously defend the right to be called the homeland of this delicacy. Oh, not in vain!
National treasure
Massachusetts, New Hampshire, Pennsylvania and Maine claimed that Whoopie Pie was invented on their territory. A real regional war! The residents of the last two states have the most serious arguments. Patriotic Pennsylvanians recall that a local candy factory made Whoopie Pies back in the 1920s. True, the official name is “ Whoopie pie" It came into use only in 1928. And this gives the natives of Maine a formal advantage: according to them, Whoopie Pie has been baked in the city of Lewiston since 1925.The amusing confrontation resulted in Maine legislators designating Whoopie Pie as the “official treat of the State of Maine.” A little funny, very touching, but, in essence, this is an excellent illustration of a simple idea: in America they not only value their regional identity, but also really love Whoopie Pie.
“Hey, hey, pie!”
At the same time, no one doubts that the German Amish brought the cookie recipe to the States. The Amish are a kind of Protestant Old Believers who live a simple life and honor the traditions of their ancestors. Most of their communities moved to North America back in the 18th and 19th centuries.According to legend, Amish men, tired from hard work, unwrapped a package of food and, finding a Whoopie Pie there, joyfully cried out: “Whoo! Pie! Over time, this is how the cookies came to be called.

Therefore, if you are suddenly puzzled by translating the name of a delicacy into Russian, you will have to choose between the funny names “Whoa, pie!”, “Wow, cake!” and “Hey, hey, pie!” In order to experience such emotions, you just need a Whoopie Pie recipe.
The second, more common name is translated unambiguously: “Black Moon.”
What, what are our cookies made of?
“Uh, so cake, pie, brownie or cookie?” If your head is spinning from the merry carousel of terms, it’s no surprise. Whoopie Pie is also notable for the fact that its “racial identity” is extremely difficult to determine.In appearance - a cookie or cake similar to the titanic size of Choco-Pie. The second part of the name hints that this was intended as a pie. And eyewitnesses who were lucky enough to try the “Black Moon” in its historical homeland testify that sometimes one cake can feed two adults of immodest size - and eat the cake.
So, you can act according to the situation. Let's call a smaller whoopie pie a cookie or a cake. If you baked something king-size, it would be a pie or a cake.

However, rearranging the letters will not change the composition. And it has little variety in the classic “Black Moon”. The original recipe calls for chocolate chip cookies and buttercream frosting. Over time, modifications with gingerbread and pumpkin cookies have become popular, and it is not forbidden to experiment with the filling.
And, of course, I really want to try this.
Friends! “Whoopie Pie” is an absolutely extraordinary cake recipe with a rich chocolate flavor and the most delicate cream! To say it’s delicious is an understatement, it’s incredibly delicious! Very chocolate and creamy cake, simply chic! It’s not cheap, I’ll say right away, but the cake is mega delicious and very filling! Below I’ll tell you more about the features of the recipe for this cake, but for now let’s move on to the recipe. Also below, as always, is a VIDEO RECIPE for such a cake.
RECIPE: (baked two cakes in a d20 cm mold)
180 g butter
350 ml of milk (kefir, yogurt, milk with coffee)
80 g excellent cocoa
250 g sugar
2 tsp. vanilla sugar (1 sachet)
2 tsp. baking powder
a pinch of salt
CREAM:
300 ml cream 33%
700 g full-fat sour cream (400 g weighed sour cream)
200 g powdered sugar
Cream No. 2:
300 g cream 33%
400 g mascarpone or cream cheese
200 g powdered sugar
Cream No. 3:
600 g cream 33%
200 g powdered sugar
How to cook Whoopie Pie Cake:
Cake adapted from American Whoopie Pie cookies. I very carefully studied recipes for whoopie pie and cookies and cake, and in particular also on the vastness of American YouTube, in order to know how the Americans themselves prepare their famous whoopie pie cookies, and I realized that there is no single classic recipe, but what I noticed was this then, there is kefir or yogurt everywhere in the recipe, there is much less butter than in our recipes, and there is absolutely no coffee, which is added to our recipes. I think that with such a large amount of cocoa, coffee is completely unnecessary, but it’s up to you whether to add coffee or not, as some other bloggers do, I didn’t add it. I baked this cake twice, both with milk and kefir - I didn’t feel the difference, my friends tasted it, were completely delighted and demanded the recipe.
1.Prepare the dry ingredients: sift the flour and cocoa, add baking powder and salt.
2. Beat soft butter for a couple of minutes, then add eggs, sugar and vanilla sugar, beat again for 3-4 minutes.
3.Now we combine all the components in this way: in 3-4 steps, add milk (kefir) and dry ingredients to the butter in turn. That is, they added some of the milk and stirred with a mixer, then some of the dry ingredients and stirred again. And so on until all the ingredients (dry and milk) are gone. This way there will be no lumps in the dough and it will be more airy. The dough turns out quite thick - this is the norm.
4. All dough must be divided into equal parts using a scale and baked in two ways:
1) pour the dough onto the parchment into the drawn circle; you can bake two circles at the same time if the size of your oven allows. And then, while still warm, trim the edges along some kind of bowl or lid so that all the circles are even and identical. You need 3-4 of these cakes. Bake at 180 degrees for 10-13 minutes.
2)bake two identical cake layers, and then cut each one in half lengthwise (I like this better). Bake at 180 for 45-50 minutes. I baked in a mold 20 cm in diameter. But in this case, you may have to cut off the top of the cakes if it rises. But to prevent this from happening, do not forget to turn the raw dough in the mold along its axis. Cover the baking pan with parchment and do not grease it with anything.
Do not soak the cakes under any circumstances! Otherwise they will get wet and fall apart.
- Now let’s prepare the cream, I have provided 3 cream recipes to choose from. I prepared sour cream. But at the same time I weighed the sour cream in gauze for 7 hours.
Sour cream:
You need to take 700 g of 20% fat sour cream, weighed out - the yield is 400 g of mascarpone.
The cream, utensils and whisks should be very cold; place them in the freezer for 15-20 minutes. This is a must!
1) beat the cream for a couple of minutes at low speed, then add powdered sugar and beat until strong peaks form, do not beat, otherwise the cutoff will come out.
2) now add sour cream, lightly beat again and that’s it - the incredibly delicious delicate cream is ready! Place it in any pastry bag.
6.Form the cake.
We squeeze the cream beautifully out of a bag with a nozzle (not necessarily as beautiful as mine) onto each cake in a thick layer, the top is more beautiful. I also sprinkled cocoa on top, but, to be honest, I didn’t like it, it’s better not to sprinkle it)
The cakes are quite quickly soaked in the cream I served, and after 2-3 hours the cake can be cut. Half of the cream has already been absorbed by this time, so the Whoopie Pie cake turns out tender, soft and not dry.
I apologize for the photo quality
You can also decorate the top of the cake with chocolate icing instead of cream.
Whoopie Pie Cake (Whoopie pie) with cream and sour cream is ready!
Happy tea drinking and culinary success!
I also offer an amazing recipe - not a pie, but a fairy tale!
And another masterpiece - be sure to cook!
And now the promised video of the cake:
And one more cake:
Hi all. Finally, I got to this cake. It drives you crazy with its uncovered cake layers, unusually placed cream in the form of droplets and chocolate flowing down its sides. It's all about him - Whoopie Pie.
This dessert came to us from America, or rather, there it is often served in the form of cookies, but why not make it in the form of a cake?
Recently there has been a boom in this sweetness in Kazakhstan; if you search for Instagram #wupipai, almost 80% of the photos are of cakes prepared in Astana. I don’t understand this, we urgently need to raise the rating in Russia too)
The cake is quite easy and simple to make. Of course, a little more complicated than a regular sponge cake. We prepare it by baking the cakes one at a time, according to the type. On the other hand, there is no need to bother with leveling, so for everyone who still suffers from uneven barrels, this is a great chance for a beautifully decorated dessert. And there are only 4 cakes, not 8-10.
It is better to cook with a layer of raspberries, because raspberries unusually highlight the taste of chocolate cakes and sweet cream with their subtle sour note.
You can choose several options for the cream; here, creamy curd cream is ideal, but I cook with. Recipes for all creams are available via links, click on them and you will go to the full description (I will soon add one cream and post a link to it). Choose according to your taste and wallet. For a given amount of ingredients, the dough should contain about 1 kg of cream. Therefore, in those creams where the amount of ingredients is 500 grams, we make a double portion.
So, how to make a Whoopie Pie cake at home, recipe with photos step by step.
Ingredients for the crust:
- 160 grams dark chocolate
- 80 grams butter
- 160 grams of sugar
- 5 eggs (1 grade)
- 200 grams of flour
- 20 grams cocoa
- 20 grams baking powder
- a pinch of salt
Preparation:
According to the recipe, we need the butter at room temperature, so we take it out in advance. You can add 72% to the dough, it is not necessary to take 82.5%.
Chocolate, ideally good, not like mine) Callebaut is good, Irka is generally professional, it is sold in specialized stores for confectioners, I’ll be honest, the difference is colossal. In this case, I have Russian dark.
Let's break our chocolate into pieces and put it in a water bath with butter.
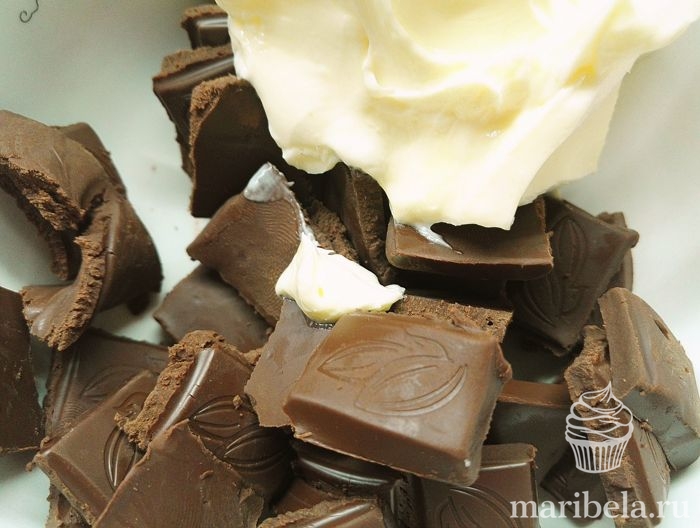
Constantly stirring with a silicone spatula, bring the mixture to a homogeneous state.

Remove the chocolate emulsion from the bath and cool.

Beat the eggs with a mixer with sugar and a pinch of salt until they increase in volume and turn white. It takes me about 7 minutes.

A white mass with dense foam should form, as in the photo.

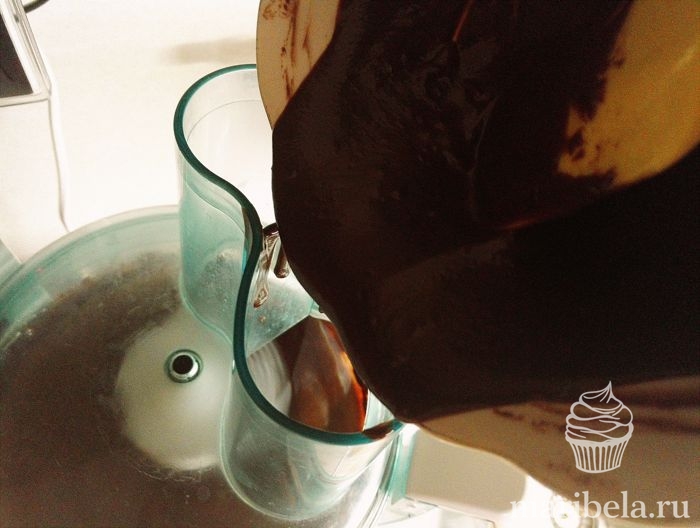
Continuously whisking, pour in the chocolate emulsion. The mass will settle a little, don't worry. Beat like this for 2-3 minutes.
At this time, sift the dry ingredients - flour, cocoa, baking powder. Cocoa is also ideally good alkalized cocoa (for example Cocoa Barry). I used the Golden Label for lack of anything better. You can’t achieve either a bright taste or a beautiful black color with it. But, if there is no opportunity, then take it.

Mix everything thoroughly with a whisk.

Mix the bulk ingredients into the rest of the mixture using a mixer at low speed, or using a whisk.
However, I want to immediately note that the mass must be stirred well, otherwise the cakes may rise unevenly due to poorly mixed baking powder.

Leave the dough for 10 minutes, during which time our baking powder will work.

Turn on the oven at 180º. Prepare baking paper or a silicone mat. I baked this way and that way. I didn't notice any difference. The paper should be good, siliconized; with it there will be no problems with the cakes coming off. Freken Bock will help you.
On paper, draw a contour by tracing with a pencil or pen along the edge of the plate (in my case, this is a sliding ring). The diameter varies from 20 to 23 cm. I made it at 22.5 cm. The cake turned out to be about 6 cm high. If you like taller cakes, you can easily make it at 20 in diameter, then you will get not 4 cakes, but 5-6.

Using a spoon, spread our dough into this outlined circle (do not forget to turn the paper over to the other side so as not to eat the cakes with ink later).

We try to spread the dough as evenly as possible. If possible, it is better to transfer the dough into a cooking bag and pipe the dough in a circle, this way you will definitely get a perfectly smooth surface of the cakes.
Place in the preheated oven to bake for 8-12 minutes. With my diameter, 10 minutes was enough for me. Check the readiness with your finger; the cake should not be pressed when pressed. Be careful not to overbake, otherwise the shortcakes will become dry. See those bubbles? It was I who mixed the dough poorly, I was afraid to stir for a long time with the mixer and forgot to stir with a whisk) So let’s stir, comrades, let’s stir)

While the first cake is baking, lay out the second circle. We ended up with approximately 870 grams of dough. I divided it into 4 parts on the scale so that the cakes were the same size. That is, we put approximately 220 grams of dough on 1 cake. Unfortunately, I won’t tell you how many spoons it is, because I forget to count it every time.
The finished cake can be removed from the parchment immediately, or you can wait a little until it cools. I liked the second option even more, since the cakes are very soft and tender, be careful, they may break!
Wrap the cakes in film and put them in the refrigerator for several hours, or better yet overnight, to redistribute moisture.
Assembling the cake.
I’m not writing anything specifically about the cream here, choose the one that suits you. All the creams that I described above are ideal for this cake.
Place the first cake layer on the base (tray). By the way, we don’t dry the cake on a wire rack, do you see the marks? Well, this is the first cake that I removed while hot, so it’s better to just wait until the cake has cooled completely and then remove it from the paper and wrap it in film. The cake layers are not as sticky as Dairy Girl's. I put 2 cake layers at a time into a bag, without interlacing them with paper. Nothing stuck together.

Using a piping bag, place the cream on top in the form of droplets along the edge of the cake. I had a round nozzle with a diameter of 8 mm, but it turned out to be very small. It’s better to take 12-15 mm, or just cut off a corner of the bag and plant it without any attachment at all. By the way, instead of a bag, any thick bag with a zip fastener will do.

I simply filled the middle with cream, squeezing it out in a circle.

Then I leveled the entire surface with a spatula.

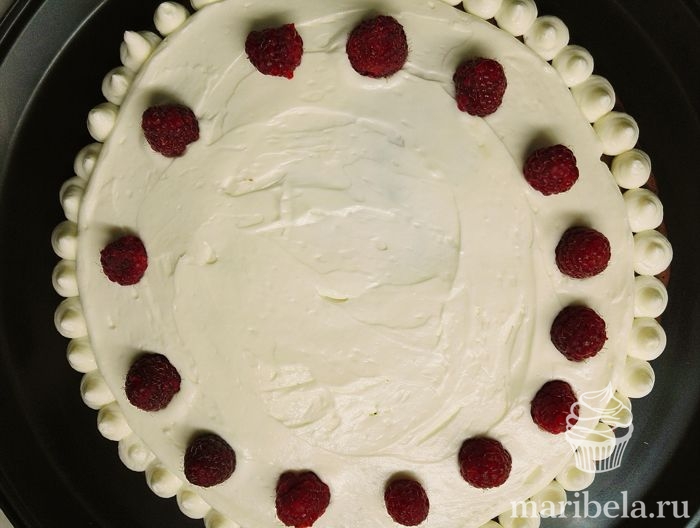
This is what the cakes look like when assembled.

If you want a perfectly even edge on the cakes, then trim them using a ring. I wanted exactly this slightly careless look of the cake. Homey and cozy.
Pour ganache over the top of the cake, the recipe is at the link -.

I additionally decorated the cake with a pile of berries, raspberries and blackberries.

Here's what the cake looks like from the side.

And here it is in cross-section.
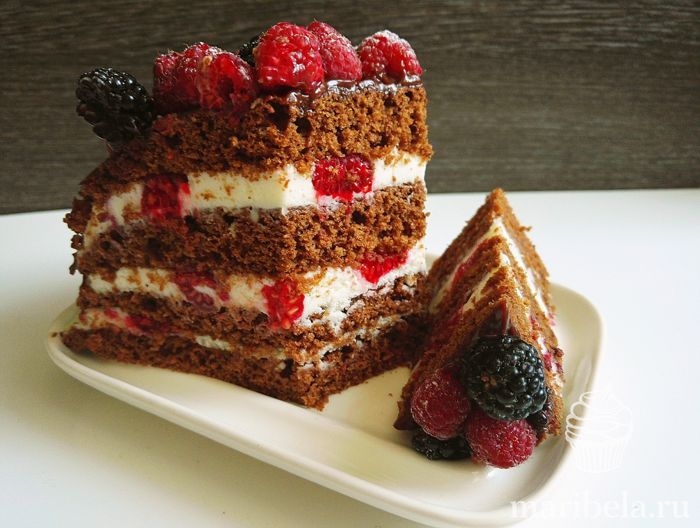
I'm not lying, the cake is very tasty. Instead of raspberries, you can add cherries to the filling; if you don’t have fresh ones, then boil frozen ones with sugar, as in, and carefully squeeze out excess liquid.
Be sure to prepare this cake, it will definitely surprise you.
The weight of the finished cake was 1800 grams, without the berry slide.
Bon appetit.
