Who loved chemistry laboratory work at school? It was interesting, after all, to mix something with something and get a new substance. True, it didn’t always work out as described in the textbook, but no one suffered because of this, right? The main thing is that something happens, and we see it right in front of us.
If you're not a chemist in real life and don't deal with much more complex experiments every day at work, then these experiments that you can do at home will definitely amuse you, at least.
Lava lamp
For the experience you need:
— Transparent bottle or vase
— Water
- Sunflower oil
- Food coloring
— Several effervescent tablets “Suprastin”
Mix water with food coloring and add sunflower oil. There is no need to stir, and you won’t be able to. When a clear line between water and oil is visible, throw a couple of Suprastin tablets into the container. We look at the lava flows.
Since the density of oil is lower than that of water, it remains on the surface, with the effervescent tablet creating bubbles that carry water to the surface.
Elephant toothpaste
For the experience you need:
- Bottle
— Small cup
— Water
— Dish detergent or liquid soap
- Hydrogen peroxide
— Fast-acting nutritional yeast
- Food coloring
Mix liquid soap, hydrogen peroxide and food coloring in a bottle. In a separate cup, dilute the yeast with water and pour the resulting mixture into the bottle. We look at the eruption.
Yeast produces oxygen, which reacts with hydrogen and is pushed out. The soap suds create a dense mass that erupts from the bottle.
Hot Ice
For the experience you need:
— Capacity for heating
— Transparent glass cup
- Plate
– 200 g baking soda
— 200 ml of acetic acid or 150 ml of its concentrate
— Crystallized salt
Mix acetic acid and baking soda in a saucepan and wait until the mixture stops sizzling. Turn on the stove and evaporate excess moisture until an oily film appears on the surface. Pour the resulting solution into a clean container and cool to room temperature. Then add a crystal of soda and watch how the water “freezes” and the container becomes hot.
Heated and mixed, vinegar and soda form sodium acetate, which when melted becomes an aqueous solution of sodium acetate. When salt is added to it, it begins to crystallize and generate heat.
Rainbow in milk
For the experience you need:
- Milk
- Plate
— Liquid food coloring in several colors
— Cotton swab
— Detergent
Pour milk into a plate, drip dyes in several places. Soak a cotton swab in detergent and place it in a plate with milk. Let's look at the rainbow.
The liquid part contains a suspension of fat droplets, which, in contact with the detergent, split and rush from the inserted stick in all directions. A regular circle is formed due to surface tension.
Smoke without fire
For the experience you need:
— Hydroperite
— Analgin
— Mortar and pestle (can be replaced with a ceramic cup and spoon)
It is better to do the experiment in a well-ventilated area.
Grind the hydroperite tablets to powder, do the same with analgin. Mix the resulting powders, wait a little, see what happens.
During the reaction, hydrogen sulfide, water and oxygen are formed. This leads to partial hydrolysis with the elimination of methylamine, which interacts with hydrogen sulfide, the suspension of its small crystals resembling smoke.
Pharaoh snake
For the experience you need:
- Calcium gluconate
- Dry fuel
— Matches or lighter
Place several tablets of calcium gluconate on dry fuel and set it on fire. We look at the snakes.
Calcium gluconate decomposes when heated, which leads to an increase in the volume of the mixture.
Non-Newtonian fluid
For the experience you need:
— Mixing bowl
- 200 g corn starch
- 400 ml water
Gradually add water to the starch and stir. Try to make the mixture homogeneous. Now try to roll a ball from the resulting mass and hold it.
The so-called non-Newtonian fluid behaves like a solid when interacting quickly, and like a liquid when interacting slowly.
Children are always trying to learn something new every day and they always have a lot of questions. They can explain certain phenomena, or they can clearly show how this or that thing, this or that phenomenon works. In these experiments, children will not only learn something new, but also learn how to create different crafts with which they can then play.
1. Experiments for children: lemon volcano
You will need:
– 2 lemons (for 1 volcano)
- baking soda
– food coloring or watercolor paints
- dishwashing liquid
– wooden stick or spoon (if desired)
- tray.

1. Cut off the bottom of the lemon so it can be placed on a flat surface.
2. On the back side, cut out a piece of lemon as shown in the image.
* You can cut off half a lemon and make an open volcano.

3. Take the second lemon, cut it in half and squeeze the juice into a cup. This will be the reserved lemon juice.
4. Place the first lemon (with the cut out part) on the tray and use a spoon to “remember” the lemon inside to squeeze out some of the juice. It is important that the juice is inside the lemon.
5. Add food coloring or watercolor inside the lemon, but do not stir.

6. Pour dish soap inside the lemon.
7. Add a full spoon of baking soda to the lemon. The reaction will begin. You can use a stick or spoon to stir everything inside the lemon - the volcano will begin to foam.

8. To make the reaction last longer, you can gradually add more soda, dyes, soap and reserve lemon juice.
2. Home experiments for children: electric eels made from chewing worms

You will need:
– 2 glasses
– small capacity
– 4-6 gummy worms
– 3 tablespoons baking soda
– 1/2 spoon of vinegar
– 1 cup of water
– scissors, kitchen or stationery knife.
1. Using scissors or a knife, cut lengthwise (precisely lengthwise - it won't be easy, but be patient) each worm into 4 (or more) pieces.
* The smaller the piece, the better.
*If the scissors do not cut properly, try washing them with soap and water.

2. Mix water and baking soda in a glass.
3. Add pieces of worms to the solution of water and soda and stir.
4. Leave the worms in the solution for 10-15 minutes.
5. Using a fork, transfer the worm pieces to a small plate.
6. Pour half a spoon of vinegar into an empty glass and start putting worms into it one by one.

* The experiment can be repeated if you wash the worms with plain water. After a few attempts, your worms will begin to dissolve, and then you will have to cut a new batch.
3. Experiments and experiments: a rainbow on paper or how light is reflected on a flat surface

You will need:
– bowl of water
– clear nail polish
- small pieces of black paper.
1. Add 1-2 drops of clear nail polish to a bowl of water. Watch how the varnish spreads through the water.
2. Quickly (after 10 seconds) dip a piece of black paper into the bowl. Take it out and let it dry on a paper towel.

3. After the paper has dried (this happens quickly) start turning the paper and look at the rainbow that appears on it.
* To better see a rainbow on paper, look at it under the sun's rays.


4. Experiments at home: rain cloud in a jar

As small drops of water accumulate in a cloud, they become heavier and heavier. Eventually they will reach such a weight that they can no longer remain in the air and will begin to fall to the ground - this is how rain appears.
This phenomenon can be shown to children using simple materials.
You will need:
- shaving foam
- food coloring.
1. Fill the jar with water.
2. Apply shaving foam on top - it will be a cloud.
3. Have your child start dripping food coloring onto the “cloud” until it starts to “rain” - drops of food coloring begin to fall to the bottom of the jar.
During the experiment, explain this phenomenon to your child.

You will need:
– warm water
- sunflower oil
– 4 food colors
1. Fill the jar 3/4 full with warm water.

2. Take a bowl and stir 3-4 tablespoons of oil and a few drops of food coloring in it. In this example, 1 drop of each of the 4 dyes was used - red, yellow, blue and green.

3. Using a fork, stir the coloring and oil.

4. Carefully pour the mixture into a jar of warm water.

5. Watch what happens - the food coloring will begin to slowly fall through the oil into the water, after which each drop will begin to disperse and mix with the other drops.
* Food coloring dissolves in water, but not in oil, because... The density of oil is less than water (that’s why it “floats” on water). The dye droplet is heavier than the oil, so it will begin to sink until it reaches the water, where it will begin to disperse and look like a small fireworks display.
6. Interesting experiments: in a circle in which the colors merge
You will need:
– a wheel cut out of paper, painted in rainbow colors
– elastic band or thick thread
– cardboard
- glue stick
- scissors
– skewer or screwdriver (to make holes in the paper wheel).

1. Select and print the two templates you want to use.

2. Take a piece of cardboard and use a glue stick to glue one template to the cardboard.
3. Cut out the glued circle from cardboard.
4. Glue the second template to the back of the cardboard circle.
5. Use a skewer or screwdriver to make two holes in the circle.

6. Thread the thread through the holes and tie the ends into a knot.
Now you can spin your top and watch how the colors merge on the circles.


7. Experiments for children at home: jellyfish in a jar

You will need:
– a small transparent plastic bag
– transparent plastic bottle
- food coloring
- scissors.

1. Place the plastic bag on a flat surface and smooth it out.
2. Cut off the bottom and handles of the bag.
3. Cut the bag lengthwise on the right and left so that you have two sheets of polyethylene. You will need one sheet.
4. Find the center of the plastic sheet and fold it like a ball to make a jellyfish head. Tie a thread in the area of the “neck” of the jellyfish, but not too tightly - you need to leave a small hole through which to pour water into the jellyfish’s head.
5. There is a head, now let's move on to the tentacles. Make cuts in the sheet - from the bottom to the head. You need approximately 8-10 tentacles.
6. Cut each tentacle into 3-4 smaller pieces.

7. Pour some water into the jellyfish's head, leaving room for air so the jellyfish can "float" in the bottle.
8. Fill a bottle with water and put your jellyfish in it.

9. Add a couple drops of blue or green food coloring.
* Close the lid tightly to prevent water from spilling out.
* Let the children turn the bottle over and watch the jellyfish swim in it.
8. Chemical experiments: magic crystals in a glass

You will need:
– glass glass or bowl
– plastic bowl
– 1 cup Epsom salts (magnesium sulfate) – used in bath salts
– 1 cup hot water
- food coloring.
1. Place Epsom salts in a bowl and add hot water. You can add a couple of drops of food coloring to the bowl.
2. Stir the contents of the bowl for 1-2 minutes. Most of the salt granules should dissolve.

3. Pour the solution into a glass or glass and place it in the freezer for 10-15 minutes. Don't worry, the solution is not so hot that the glass will crack.
2How to interest a child in learning new substances and properties of various objects and liquids? You can set up an impromptu chemical laboratory at home and conduct simple chemical experiments for children at home.
The transformations will be original and appropriate in honor of some festive event or in the most ordinary conditions to familiarize the child with the properties of different materials. Here are some simple tricks that are easy to do at home.
Chemical experiments using ink
Take a small container of water, preferably one with transparent walls.
Dissolve a drop of ink or ink in it - the water will turn blue.
Add one pre-crushed activated carbon tablet to the solution.
Then shake the container well and you will see that it will gradually become light, without a tint of paint. Coal powder has an absorbent property, and the water returns to its original color.
https://galaset.ru/holidays/contests/tests.htmlTrying to create clouds at home
 Take a tall jar and pour some hot water into it (about 3 cm). Prepare ice cubes in the freezer and place them on a flat baking sheet that you place on top of the jar.
The hot air in the jar will cool, forming water vapor. The condensate molecules will begin to gather together in the form of a cloud. This transformation demonstrates the origin of clouds in nature when warm air cools. Why is it raining?
Drops of water on the ground heat up and rise upward. There they cool and meet each other to form clouds. Then the clouds also combine into heavy formations and fall to the ground as precipitation. Watch a video of chemical experiments for children at home.
How your hands feel at different water temperatures
You will need three deep bowls of water - cold, hot and room temperature.
The child should touch cold water with one hand and hot water with the other.
After a couple of minutes, both hands are placed in a vessel with water at room temperature. How does water feel to him? Is there a difference in perception temperature?
Water can be absorbed and stain the plant.
 This beautiful transformation will require a live plant or flower stem.
Place it in a glass of water colored in any bright color (red, blue, yellow).
Gradually you will notice that the plant takes on the same color.
This happens because the stem absorbs water and takes on its color. In the language of chemical phenomena, such a process is usually called osmosis or one-way diffusion.
You can make your own fire extinguisher at home
 Necessary actions:
- Let's take a candle.
- It is necessary to light it and place it in the jar so that it stands straight and the flame does not reach its edges.
- Carefully place a teaspoon of baking powder into the jar.
- Then pour a little vinegar into it.
Next, we look at the transformation - the white baking powder will hiss, forming foam, and the candle will go out. This interaction of two substances produces carbon dioxide. It sinks to the bottom of the jar because it is heavy compared to other atmospheric gases.
The fire does not receive oxygen and goes out. This is the principle behind the fire extinguisher. They all contain carbon dioxide, which extinguishes the flames of fire.
What else you should definitely read:
Oranges have the ability to float on water
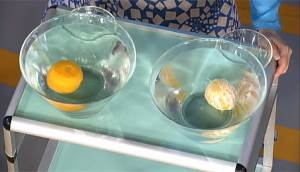 If you put an orange in a bowl of water, it will not sink. Clean it and dip it in water again - you will see it at the bottom. How did this happen?
The orange peel has air bubbles that keep it floating on the water, almost like an air mattress.
Testing eggs for their ability to float on water
 We use jars of water again. Place a couple of tablespoons of salt in one of them and stir until dissolved. Dip an egg into each jar. In salt water it will be on the surface, and in normal water it will sink to the bottom.
In high school, people start studying chemistry no earlier than the 8th grade; children perceive this science as too difficult. But you can prepare a student for the subject in a very simple and non-boring way - by organizing a chemistry experiment at home. Such mini-experiments will help you look at science from a different perspective, and showing “chemical tricks” at a children’s party will significantly increase the degree of fun.
Fireproof banknote
To perform an incredibly impressive but simple trick, you will need:
- bill;
- aqueous-alcohol solution with an alcohol content of about 50%;
- salt;
- tweezers or tweezers.
A pinch of salt must be added to the solution. Next, a bill is placed into the solution using tweezers. For those who are conducting such an experiment in chemistry for the first time, it is better to take a banknote of a lower denomination!
After the money is thoroughly wet, you should pick it up again with tweezers and lightly shake off the excess liquid from the paper. Now you can set it on fire! The fire will pass through the entire bill, but not a single edge will even turn brown. This happens because the alcohol contained in the solution burns. In turn, the water with which the paper is saturated does not have time to evaporate.
Crystal eggs
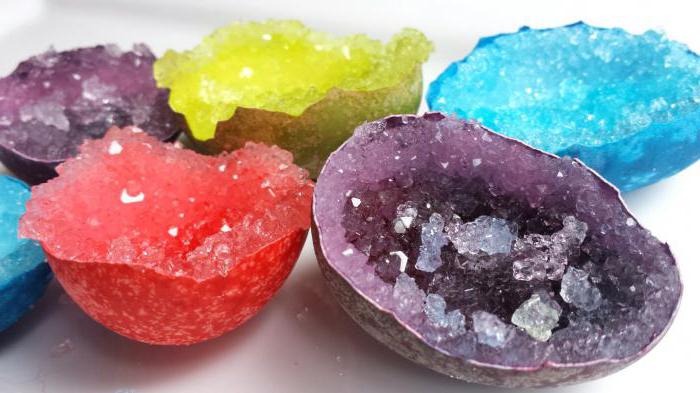
Growing crystals is one of the popular hobbies that entertaining chemistry offers. Experiments with crystallization are most often carried out on sugar, but sugar crystals no longer surprise anyone. We offer a new and unusual sight - crystals grown on eggs!
Crystal eggs can be obtained using:
- alum (sold in pharmacies);
- PVA glue;
- dyes.
The crystals on the eggs will grow very quickly, in just a day. It is necessary to first wash the shell and dry it thoroughly. After which the eggs are smeared with glue and sprinkled with alum. Now they need to lie down for several hours to dry again.
Next, the dye must be dissolved in two glasses of plain water. You can choose the amount of dye yourself; in this case, only the intensity of the color of the crystals depends on it. The eggs are placed in the dye for a day or a day. The longer the egg sits in the solution, the larger the crystals grow. It is worth taking out the finished crystal eggs carefully - they are quite fragile.
Balloon on a bottle

How can you inflate a balloon without helium without any physical effort? To do this, you can use regular baking soda and vinegar, which are in every mother’s kitchen cupboard. To conduct this experiment in chemistry, you will need:
- balloon;
- bottle;
- 3-4 teaspoons of soda;
- table vinegar.
The soda is poured directly into the ball using a funnel or spoon. After which it is put on a bottle with a small amount of vinegar. As soon as the soda from the balloon begins to spill into the bottle, it begins to swell, as if from helium. This happens because vinegar reacts with baking soda, releasing carbon dioxide. The balloon is inflated thanks to the gas in a few seconds, just catch it!
Multi-colored layers in a bottle

The following chemistry experiment will clearly explain to your child the concept of liquid density. For this you will need:
- a quarter cup of sunflower oil;
- a quarter glass of water, tinted in any bright color;
- a quarter cup of sugar syrup (to make the trick more effective, you should also add coloring to it).
The child can predict in advance what will happen when all these liquids are mixed. He will like the result - the syrup will settle down as the densest one, the water will be located in the middle, and the oil will remain on top. You can experiment with colors and liquids, creating unimaginable compositions. For example, by adding different amounts of sugar to syrup, you can get several liquids of different densities.
Laboratory experiments in chemistry can be anything but boring. These eye-catching yet simple tricks will help encourage your child to study science and will simply provide some entertainment on a rainy day.
Conducting chemical experiments at home is very exciting. You can feel like a little experimenter, a little pioneer, a little magician.
Here the pink and transparent solutions are mixed, the result is green. A cloud flew into a bottle on the windowsill. When heated, a mysterious message appears on a blank sheet of paper, and snakes crawl out of the burning sand. You say this is impossible and it couldn’t have happened without magic? But all these phenomena are based on chemical laws. And to implement them you will need “reagents” that everyone has at home, or they can be purchased at a regular pharmacy.
Buy chemical experiments for children
Now in the section for schoolchildren you can see kits for young chemists. This set contains materials for conducting 3-5 experiments. It's interesting, it's exciting and spectacular. In addition, a child who personally performs an experiment and examines the result will find it easier to understand what the teacher is talking about in a chemistry lesson. The only negative is that such sets are not cheap. But many experiments can be carried out by looking for reagents at home.

Chemical experiments for children at home: “Cloud in a bottle”
Pour 1 tbsp into a transparent plastic bottle. l. alcohol (can be replaced with water, but the reaction will be less active). Twist the bottle so that the alcohol spreads along the walls. Start pumping air into the bottle (20 pump presses is enough). Remove the pump, the bottle becomes cold and a cloud appears in it.
Explanation.

Water molecules, evaporating (alcohol evaporates faster), float in the air. In the experiment, “water” evaporated from the walls. As the pressure in the bottle increases, the molecules collide and compress. With a sharp drop in pressure, the air temperature drops sharply. This causes the “water” molecules to stick together or condense in the air into small droplets called clouds.
Chemical experiments for children video
Chemical experiments for children games: “Spy”
Who in childhood did not dream of having a pen with invisible ink, when what was written appears only with special influence, and a stranger sees only a blank sheet? Such ink can be produced in at least 2 ways.
Method 1. Dip a brush in milk (or soda solution) and start writing a message on white paper. After the milk dries, the sheet will become clean again. But if you iron it, the image will be visible on it.
Explanation.

The ink begins to develop when exposed to heat. The burning temperature of milk is much lower than that of paper. And when the milk “burns,” the paper remains white.
Method 2. Instead of milk, use lemon juice or thick rice water. And the developer is water with a few drops of iodine.

Chemical experiments for children at home “Ball from an egg”
Place a raw egg (preferably with a brown shell) in a glass jar and fill it with vinegar. After a few hours, the shell will begin to “bubble.” After 7-8 hours, the shell will dissolve and the egg will turn white. Leave the egg in the solution for a week.

After 7 days, remove the egg from the solution. The vinegar remained clear and the egg looked like a rubber ball. If you go into a dark room with an egg and shine a flashlight on it, it will begin to reflect the light. And if you bring the light source closer, the egg will be illuminated right through.
Explanation.

The main component of eggshells is calcium carbonate. Vinegar dissolves calcium. This process is called decalcification. The shell first becomes soft, and after a while disappears.
Chemical experiments for children at home video
Chemical experiments at home for children “Volcanic eruption”
Remove Mentos from the package. Place a bottle half filled with cola on the floor. Quickly pour Mentos into the bottle and run away, otherwise it will fill with foam.
Explanation.

The rough surface of the candy is where carbon dioxide is released. The reaction is enhanced by Asparam (a sweetener in cola), which reduces the surface tension of water, and therefore facilitates the release of CO2, sodium benzoate, caffeine; gelatin, gum arabic in dragees.
Think about it next time, maybe you shouldn’t drink delicious cola so as not to provoke a similar reaction in your stomach?
Chemical experiments for children animation: “Crawling Snakes”
The biblical account says that Moses, arguing with Pharaoh, could not convince him and threw his staff on the ground, turning it into a snake. Scientists have now concluded that it was not a snake, but a chemical reaction.
Sulfanilamide snake.
Secure the streptocide tablet to a wire and heat it over an open fire. Snakes will begin to emerge from the medicine. If you pick one of them up with tweezers, the snake will be long.
Explanation.

Any sulfanilamide tablet (sulgin, etazol, sulfadimethoxine, sulfadimezin, biseptol, phthalazole) is suitable for the experiment. When the drug is heated, rapid oxidation occurs with the release of gaseous substances (hydrogen sulfide and water vapor). The gas swells the mass and forms a “snake”.
"Sweet" viper.
Pour 100 g into a plate. sifted sand and soak it in 95% alcohol. Form a slide with a “crater” in the middle. Mix 1 teaspoon of powdered sugar and ¼ teaspoon of baking soda and pour into a hole in the sand.
Light the alcohol (it takes a few minutes to burn). Black balls will begin to appear on the surface, and black liquid will accumulate below. When the alcohol burns out, the mixture will turn black and a black snake will begin to crawl out of it, wriggling.
Explanation.
When soda decomposes and alcohol burns, carbon dioxide (CO2) and water vapor are released. Gases swell the mass, causing it to crawl. The snake's body consists of small particles of coal mixed with sodium carbonate (Na2CO3), which is formed when sugar burns).
