The word “carving” comes from the English carving, which means “cutting”. Carving refers to different types of carving - for example, wood, stone or bone. The carving we are interested in uses fresh vegetables and fruits as material. This art, combining cooking and sculpture, is also called culinary carving.

Thailand is considered the birthplace of carving as the art of curly cutting vegetables and fruits - it was there that this skill originated about two thousand years ago. There is a legend according to which the table for a royal meal was first decorated with skillfully cut fruits. Today, carving is a frequent element of festive feasts: figured decorations made of fruits and vegetables add festiveness and originality to dishes, at the same time being both a decoration and a treat. Experienced craftsmen create real sculptural masterpieces from ordinary watermelons, apples, cucumbers and pumpkins - but you don’t need an art education to master the basics of carving. For their work, professionals use large sets of various knives and other devices, but for beginners to comprehend this art, a small set of convenient tools may be enough.

Photo: youtube.com/Fruity Freshy Juicy


What tools are needed?

Here is a set of basic carving tools that professional craftsmen use. The main working tool is the so-called Thai knife (a small knife with a sharp blade shaped like a sickle). Next to the left of it are carving knives, they are V-shaped, oval or round. A device similar to an ice cream scoop is a noisette. Plus - you use a regular small knife (in the photo below), scissors to cut leaves, for example, lettuce, and devices similar to vegetable peelers.

All these are special professional tools. If you become seriously interested in carving, you might want to purchase a set like this. For beginners, you can limit yourself to a small sharp knife, a scalpel, scissors and a device for peeling vegetables and fruits.
How to choose vegetables and fruits?

Photo: youtube.com/Mutita EdibleArt
You should carefully choose vegetables and fruits for carving, because the result of your work and how long this work will look beautiful and fresh will depend on their quality (the latter is important for a feast lasting several hours).

Choose firm, ripe fruits and vegetables of the correct shape;
The peel should not be damaged;
Peel vegetables and fruits, if necessary, immediately before work;
Before working, soak some vegetables (beets, carrots) well for 15 minutes in cold water;
To prevent peeled and sliced apples, pears and eggplants from browning, sprinkle them with lemon juice or soak them for 15 minutes in water with salt and lemon juice before working;
Ready-made figures of vegetables and fruits can be stored in cold water before serving;
It’s good to sprinkle the figurines on the table with ice water from time to time, this will keep them longer.
Master classes: video
Cucumber lilies: master class
Carrot or cucumber bell: master class
Orange flower: master class
Cucumber rose: master class
Carved apple: master class
Zucchini and tomato flower: master class
The world of modern cooking is full of innovation. In the era of accessibility of various cuisines of the world, it becomes quite difficult to surprise sophisticated gourmets. But what if, in addition to the taste of food, you could amaze with its amazing appearance?! You can surprise, create edible masterpieces, and give the usual forms of products unimaginable shapes with the help of carving vegetables and fruits.
History of carving
It's no secret that everything ingenious is simple. This is how one can characterize the amazing art of carving, which arose many thousands of years ago in the vastness of the eastern lands of Asia.
Carving owes its appearance to attempts to somehow diversify the meager diet, which has always been in short supply among the poor residents of East Asia. However, in contrast, they had an abundance of intelligence and ingenuity, which allowed carving to be born. There is one legend according to which one day a rich gentleman came to visit a poor family. He demanded to set the table, but the hostess had nothing in stock except a few fruits and vegetables. Fearing the master's anger, the hostess decided to deceive him. She created strange birds and animals from fruits and vegetables, which amazed the rich gentleman so much that he did not dare try these creations - they were so beautiful. Since then, all residents of the country, as well as nearby ones, began to decorate their tables, creating incredible compositions from simple products.
Modern carving of vegetables and fruits is still one of the most interesting arts in Asian countries. However, it is worth noting that his techniques have made significant progress. If previously there was not even a good knife in service, today the field of possibilities is expanding, thanks to modern tools. However, many masters adhere to the classics - they try to follow ancient methods, avoiding newfangled devices.
Is it possible to do carving at home?
The answer to this question is of course yes! Not only possible, but absolutely necessary! This art will allow you to incredibly diversify your long-familiar home-cooked food. It is generally accepted in the world that carving is a matter of creativity, and has no special relationship to the world of food as such. However, we dare to resist such speculation. Thanks to carving, food can be not only tasty and healthy, but also beautiful. An example is the classic dish - mashed potatoes with cutlets. Speaking of composition, it’s quite difficult to add flavor to this dish. The inability to create shapes, as well as the consistency unsuitable for design, keep the dish within certain limits. However, it can be added brightness and novelty by decorating it with vegetables, which take on their new forms using the carving technique. Having learned all the subtleties of art, you will be surprised by all the facets that will open before you.
Modern types of carving
Nowadays, the current carving of vegetables and fruits is usually divided into several directions. These include:
- Chinese
- Japanese
- Thai
- European
1) Chinese carving is an amazing world where food is transformed using stencils. Although in Chinese carving it is also customary to create compositions using a knife, the stencil still takes the place of the classics.
The difference between this direction is the choice in favor of vegetables. The only exceptions are watermelon and melon. The explanation is very logical - the art of stencil carving requires a larger area than other subtypes. In addition, the creation of stencil carving implies maximum surface rigidity, which most fruits cannot boast of.
2) Japanese carving from vegetables and fruits - a real immersion in history. Having absorbed the best traditions of their brother (China and its carving techniques), the Japanese decided to introduce a feature. She began the traditional carving of hieroglyphs, as well as the creation of complex paintings based on martial art. The apple and watermelon have become classic objects for Japanese technology.

3) European type of carving– a combination of the traditions of the East with the classics of the North. This type stands out in a special direction, since Europe, unlike Asian countries, is much richer in terms of products. European style techniques are distinguished by their brevity and focus on geometry. The flight of oriental fantasy in this genre is not so pronounced. The emphasis is on ease of further use.

4) Thai carving of vegetables and fruits– the quintessence of this art. It is the Thai version that has gained wide popularity around the world. The reasons for this phenomenon are simple - the Thais create the most complex compositions. In their work they strive for perfection, since for them carving vegetables and fruits is not just an art, but a real lifestyle.
It should be noted that most famous schools and even carving academies focus their attention on the Thai version.
There are several reasons for this:
- in the Thai version there are many techniques that are available to beginners;
- there are no restrictions on art - the creator can turn off the control of fantasy and create his own masterpieces;
- combinatoriality, which is expressed in the possibility of combining different techniques;
- no need to purchase a wide range of equipment to create compositions.

Based on this, for the purposes of our lesson, it would be wise to focus on the Thai method.
Tools for creating masterpieces
Now it is necessary to cover in more detail the basic tools that you will need to master the art of carving. There are a huge number of variations among them, but the main ones are:

Additional elements that you may need as you improve your practice include:

However, this list is far from complete. The popularity of carving has led to constant developments in the field, often resulting in new tools.
The basis of mastery, or the secrets of professionals
In order for your first experience to be as productive as possible, it is worth paying attention to the developments of famous carving masters.
The main postulates that will allow you to successfully begin to improve in your chosen field include the following points:

The main thing in carving is practice. Over time, you will be able to learn how to correctly calculate the force of pressure on the knife, as well as the angle of its direction.
Additionally, masters note that imagination plays a huge role in carving. Even if something didn’t work out for you, look at your creation from a different angle - perhaps your small flaw or small mistake allowed the birth of a new technique.
From theory to practice: carving for beginners
Now that the basics of this art have become clear to you, it’s time to try out the acquired knowledge in practice. In order to achieve the best result, you should gradually increase the complexity of the work. Through such gradation, you will develop skills that will make any element available to you for production in the future.
First of all, we choose the object of creation. Experts advise starting with the following candidates:
- cucumber;
- carrot;
- apple
They have earned such trust due to their qualities - their dense consistency allows you to obtain the necessary skill with minimal loss of quality.
So, let's see what masterpieces a beginner in the carving theme can make.
1. Cucumber flower

You need to take one thick, long cucumber. We cut the middle into halves (you need 2-3 pieces), and we will use the edge with the “tail” to add color to the composition and create a flower.

We make six cuts in the flower part, not reaching two cm to the tail (use a long knife).

We cut the resulting blank along the edges to create the outlines of the petals, as in the photo (use a Thai knife).

Remove the core of the cucumber (if you don’t have a special knife, you can carefully do it with a spoon). Next, we make the cloves with a Thai knife.

Now use a Thai knife to carefully separate the skin from the pulp. To top it off, make small triangular windows at the base.

Place the workpiece in ice water - this way you will be able to straighten the future petals.

Make a round core from the cucumber pulp, which must be decorated with an ornament and placed inside the flower.

We cut the cucumber without reaching the base, as shown in the photo (7 layers each).

We divide the plates into 7 pieces.

We make bends of each even plate (in one direction);

Let's put everything together and enjoy the creation of our hands!

2. Carrot cloves
It is necessary to cut the carrots according to the proportions shown in the photo.

On the long part, using a Thai knife, you need to cut grooves. Their number can be unlimited, but you shouldn’t make them too small.

Next, cut the resulting part with grooves so that you get thin flowers.

The remaining part needs to be corrected - cut its edges so that it takes a cone-shaped shape.

On the wide side, using a Thai knife, you need to create a kind of mesh.

Create pockets for the finished petals using shallow longitudinal cuts.

Place the petal blanks in the cut pockets.

The cloves are ready.

For beauty, you can decorate the core with dried cloves or something else.
3. Apple flower

Arm yourself with a hard apple and a Thai knife.

Cut 1/4 off the side where the apple has its tail.

Carefully, without reaching the end, separate the peel with a thin layer of pulp from the core. It is also necessary to make 13 cuts - they will serve as blanks for the petals.

Using the marks, make triangular cuts, creating petals on the apple.

Now you need to repeat 13 marks and cut the petals from the apple pulp in the same way.
Important! The petals of the second level should be between the petals of the first level.

The procedure should be repeated with another row of pulp.

Next, create the last row of petals. You should remove the seeds from the middle and fill it with something of your choice. Something brighter would look good.

Thus, carving vegetables and fruits is an amazing activity. It preserves the traditions of the ancient East, while simultaneously combining them with new technologies. Allows you to turn food into works of art that give us not only satiation with food, but also aesthetic pleasure.
By trying your hand at carving, you will be able to diversify your homemade food, as well as surprise your family and guests with your extraordinary approach to creating dishes.
Composition “Fruits on a plate” using the quilling technique for children from 7 years old. Master class with photos
Shilkina Tatyana Anatolyevna, teacher at the Meshchovsky Social Rehabilitation Center for Minors, Meshchovsk, Kaluga Region.Description: This master class is intended for children from 7 years old, additional education teachers, teachers, parents, people who love to do handicrafts.
Purpose: interior decoration, gift, work for a creative competition.
Target: making a composition using the quilling technique.
Tasks:
- introduce various elements of quilling technique;
- teach children to create a composition from completed parts;
- develop an eye, perseverance, imagination, fantasy;
- cultivate accuracy when performing work.
Materials and tools required for work: colored office paper, toothpick, scissors, disposable paper plate, PVA glue, glue stick, ruler, pencil.

Rules for working with scissors:
1. Store scissors in a specific place - in a stand or case.
2. Place the scissors with the blades closed away from the person working; when passing, hold them by the closed blades.
3. Do not leave scissors with blades open.
4. Use well-sharpened scissors.
5. Monitor the movement and position of the blades during operation.
6. Use scissors as intended.
Progress:
1. Let's make strawberries.To do this, cut strips 5 mm wide and 15 cm long from red office paper, screw them onto a toothpick, loosen them a little and secure the end with a glue stick.

Using the template, we will begin to glue the resulting red rolls together, forming a berry.
Glue 3 strips 30 cm long into one long strip and stick it on the berry.

Cut out leaves from green paper and paste them onto the berry.

Let's make the required number of berries. In this case - 3 pieces.

2. Let's make kiwi slices.
To do this, we need green strips 5 mm wide and 30 cm long. Screw them onto a toothpick and form a drop shape. We make a tight roll from a white strip and loosen it a little and flatten it - this is the middle of the kiwi.
We glue brown strips (4 pieces) into one long strip.

We collect a slice of kiwi.


3. Let's make orange slices.
For this we need stripes of white, yellow and orange.
Glue the yellow and white strips into one, wind the strip onto a toothpick so that the yellow one remains in the middle, and form a free spiral.

We form the shape of the parts - a triangle.

We collect an orange slice and glue the triangular pieces together. Then we paste over the resulting blank with an orange stripe (it consists of 3 strips of 30 cm each).


We make the required number of slices.

4. Assembling the composition “Fruits on a plate.”
We put our fruits on a plate. And we admire it!!!


Sample

Thank you for your attention!
Using the quilling technique, ordinary objects are depicted. There are many photos and videos about this needlework on the Internet. such a plan. Fruit and vegetable crafts are popular among beginners. This is a universal option for those who want to make unusual things with their own hands.

Simple objects using the quilling technique look attractive.

For almost all items, standard rolling of paper strips was used. Anyone can do this kind of quilling work, even a child.
Fruits are often depicted in cross-section. This allows you to preserve the naturalness of the craft and gives it the necessary naturalness. By following the tutorial, you will make your own variation on the fruit theme.
Make cut-away oranges, kiwis and strawberries. This combination of colors, vaguely reminiscent of a traffic light, will be bright and pleasing to the eye.

To work you will need:
- strips of paper red, orange, white, brown and green;
- PVA glue;
- twisting tool;
- stencil;
- scissors.
For orange slices, use a standard teardrop shape. Having made the required number of elements, wrap white stripes around them. Glue the parts together in a circle. Don't forget to make the peel from an orange piece of paper.
To get kiwi fruit, also use the teardrop shape. For the core, a white strip twisted into an oval is suitable. Additionally, use miniature black rolls to imitate grains. After gluing all the parts, wrap the circle with a brown stripe. This will be the kiwi peel.
To make strawberries, roll into small, tight rolls. Glue them in the shape of a strawberry, and wrap a strip of the same color around the finished berry. Cut out a tail from green paper. You will get this fruit salad.
A bowl of fruit
To make a fruit arrangement meaningful, you need to make a beautiful quilling vase. To create a simple vase, we use the technique that you learned at the beginning of the lesson, that is, rolls and drop-shaped parts are made.  Make the required number of elements, from which you will then make the bottom. Use medium-sized, tight rolls. Having glued them tightly together in the shape of a circle, dry the workpiece. The diameter of the bottom of the vase should be from 10 to 15 cm.
The glue has dried, and you need to start making the sides. Glue the parts and dry the layers in stages. Alternate simple rolls with teardrop-shaped elements to create a beautiful design.  The vase looks in any interior, complements and decorates it.
Fruit basket
A quilling basket is suitable for fruits. It is easy to do and looks original.
Necessary materials:
- quilling strips;
- awl or special tool;
- scissors;
- glue.
Sequence of work:
Start by creating the basket details. These are tight and loosely twisted rolls. Make the required number of parts and start assembling.  To make the bottom of the basket, alternate dense parts with loose parts layer by layer. Continue working on the side areas of the basket. Let the workpiece dry, then make a handle using tight rolls.
Fruit magnets using quilling technique
Paper quilling magnets are very popular. Keeping with your chosen theme, make them in the shape of fruits, such as apples.
Prepare materials and tools:
- quilling paper green, yellow, red (depending on the selected apple variety);
- awl or quilling tool;
- glue;
- scissors;
- cardboard;
- a magnet to which the craft is glued.
Step-by-step instruction:
Cut out apples of the required size from cardboard. Make them medium so that the magnet can support the weight of the craft. Choose colors and shapes that suit the interior.
Twist elements in the form of a drop for quilling fruit. A large apple will require large blanks. Sometimes needlewomen use round elements, but drops look more elegant.
 Make the required number of blanks, then make the same green parts for the leaves.
Take a cardboard shape and glue the elements of an apple and a leaf to it. Make a branch of green or brown rolls.  Let the finished craft dry. After this, apply a special gel or glitter to it. The final step is to attach the magnet to the product. Use hot glue for this purpose.
Video tutorials: Making fruits and vegetables using quilling technique
Sketches of fruits for quilling


Word "Carving" entered our speech thanks to the English word “ carving", which literally translates as “cutting.” Later in the culinary art Carving began to be called the artistic cutting of vegetables and fruits. We will not delve into the history of the origin of Carving, but rather understand its very basics, watch many master classes, learn the secrets of professionals and be inspired by the masterpieces of the Masters. If you knew just a little bit about Carving of vegetables and fruits, then after reading this detailed article by Krestik you will know almost everything about it!
Fruits and vegetables for carving
Vegetables and fruits that are most suitable for curly cutting:
- carrot;
- potato;
- cucumber;
- radish;
- radish;
- ginger;
- melon;
- watermelon;
- pumpkin;
- zucchini;
- apple;
- quince;
- pear;
- kiwi;
- mango;
- avocado;
- banana;
- orange and other citrus fruits.
For cutting, it is better to choose fruits and vegetables with a flat and smooth surface, because they are easier to work with. A minimal amount of pulp and seeds will also make the cutting process easier.
It is better to choose fruits that are as hard as possible or even unripe. Do not use overripe fruits, otherwise the finished product will not hold its shape well. Citrus fruits with thick peel are preferable.
Straight cucumbers and carrots are more suitable, plum-shaped tomatoes, spherical radishes and beets.

Choose the brightest vegetables and fruits so that the patterns on the peel look more impressive against the contrasting background of the pulp.


Core remover apples or pears and creating recesses in patterns:
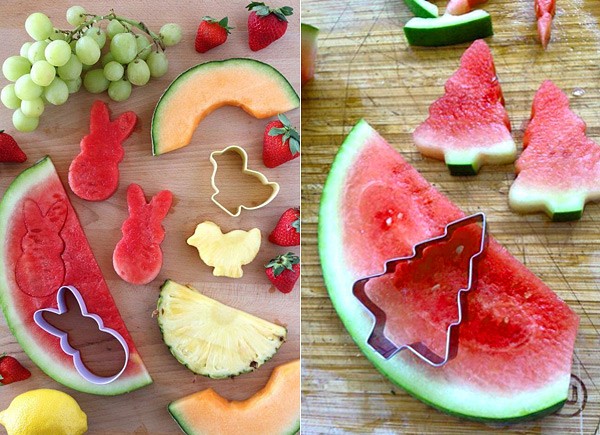
Die cutting- molds with a pointed edge, thanks to which it is convenient to squeeze out the outline of the image on the surface of vegetables or fruits (just apply it to the fruit and press). Figured elements made using die cutting can serve as decorations for a dish or become parts of a complex composition.
Curly cookie cutters Perfect for carving vegetables and fruits:
Knife "Girol" for removing the thinnest layer from cheese and other soft products, it can also be used in Carving to create:
An analogue to this knife can be multifunctional spiral tool Slicers with stainless steel knife:
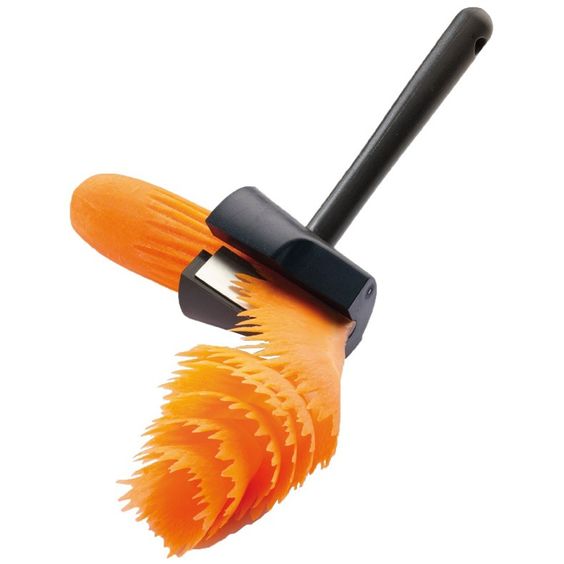
Photo from www.gearbest.com
Toothpicks indispensable for fastening vegetable and fruit preparations.
Kebab skewers find even greater application:

Skewers make spiral cutting easier
Perfect for mini kebabs

To make curls from lemon zest you will also need skewers.
Alternative to special tools
Don't be discouraged if you don't currently have all of the above Carving tools at hand. Resourceful people have already come up with an excellent alternative!
- spicy scalpel;
- tools for ;
- worn down over time kitchen knives;
- tin can lids(bent in half, they will replace oval knives, bent to the end - triangular);
- tea spoon and an ice cream scoop is a great replacement for a noisette spoon;
- for peeling vegetables, they will allow you to cut long strips that can be twisted in the shape of roses.

Egg slicers And apple slicers may also be useful:
How to choose the right tools
- Knife blades must be free of burrs and jagged edges.
- The best blades are those made of high-strength stainless steel - they will not deform or oxidize during operation.
- Quality tools have an ergonomic handle that provides comfort and safety when cutting.
- Handles made from modern materials, such as polyamide, are durable and meet all hygienic requirements. They are resistant to juice, fat, detergents, and do not absorb moisture or foreign odors.
- Be careful with metal handles, they are durable but slippery in your hand.
- Wooden handles absorb odors and moisture, and cracks form in them quite quickly.

Carving Basics for Beginners
You should start mastering the art of carving with the simplest figures.
Fruit carving
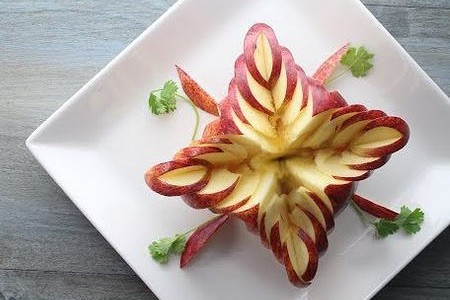
Carving on apples
If you think that you only need to cut out masterpieces and only on whole fruits, then you are wrong! Even a small piece of apple decorated with a simple checkerboard pattern already looks quite interesting!

How to make the simplest patterns (including “chess”) is shown in the video obento4kids:
By spending a little more time, you will give a completely different flavor to familiar dishes!
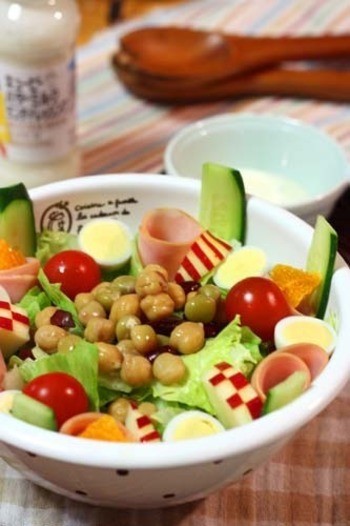
Photo from the site kinarino.jp
Do you want to surprise your guests? Cut the apple into thin slices!

The method of curly carving a swan from an apple, known to many, is shown by Ekaterina Vozhova:
And you, using the same method, make a basket or:


Carving on bananas is quite difficult, because... The peel is soft, and the flesh darkens quickly. However, bananas are used as a basis for carving.

Author — Stephan Brusche
Bananas are more convenient to use for table setting. You can make dolphins - improvised vases from bananas, as in the channel video ItalyPaul:
And here the peacock is made from a banana, and its tail is sliced fruit and berries:
Carving on oranges and other citrus fruits
Carving on citrus fruits is quite popular, especially under.

How to do pomanders- natural flavors shows Elena Perova:
Channel Fruity Freshy Juicy shows how to make a rose from an orange and leaves from an apple:
The orange cat will provide a great mood at any time of the year!

For original ways to cut lemons, watch this video:
It’s a little more difficult to make an edible lemon basket:
And for dessert - Carving on lemon peel!

Variations on a theme:

Carving on vegetables
Carving on peppers
Both hot and bell peppers are suitable mainly for:

Channel FRUITCARVING.PL will teach you how to cut Anthurium from bell pepper:
Carving on carrots is very, very interesting! See for yourself, you can make at least corn, at least:


The simpler options are flowers and leaves:
Carving on potatoes
Potatoes can not only be used as a beautiful decoration for the table, but also delicious!
It was previously mentioned that finished products can be steamed, deep-fried and baked in the oven.
For example, if instead of regular potato sticks you fry or bake potato roses, you will get this beautiful dish:

Photo from lublyou.com
How to cut potato roses
For each rose, use 1 medium or 1/2 large potato.
- Peel the skin thinly, cut off one end of the potato in five slices so that the bottom looks like a pentagon and the top remains round.
- Use a thin and sharp knife and start cutting off the thin petal, gradually moving closer to the base, but not reaching it. Make 5 of these petals (one on each side of the pentagon).
- Remove some of the potato pulp from the entire circumference under the first row of petals, forming a base for cutting out the second row.
- Cut out the second row of petals, alternating them with the first row. Again, remove the pulp all over the potatoes under the new row.
- Repeat until you reach the middle.
- Store the finished potato roses in a bowl of cold water to prevent them from drying out.
- Before baking, quickly dry the roses with a paper towel, place in a greased pan, sprinkle with salt, add rosemary or your favorite seasoning, and bake until soft and golden.
Potato Carving is also notable for the fact that it can be done on paper or fabric.

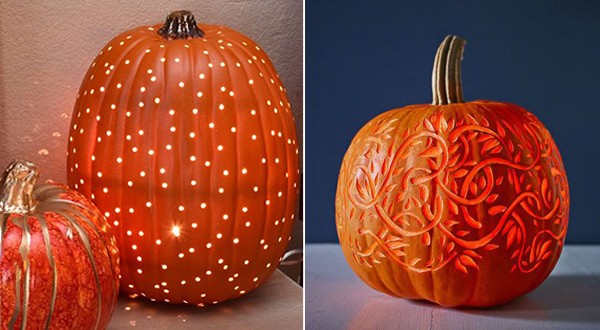
However, pumpkins can be completely harmless, even if they are lanterns...
The above examples of cutting vegetables and fruits are quite enough to beautifully serve the most ordinary dish, the main thing is to try to do it yourself. For more inspiration, look at examples of exquisitely set tables and dishes decorated using the carving technique.


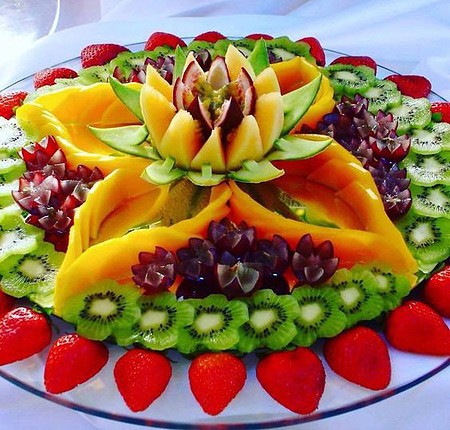


Bouquets of vegetables and fruits
In addition to table decoration, carvings of vegetables and fruits can be used in composing.

Fruits are cut and put on skewers for kebab
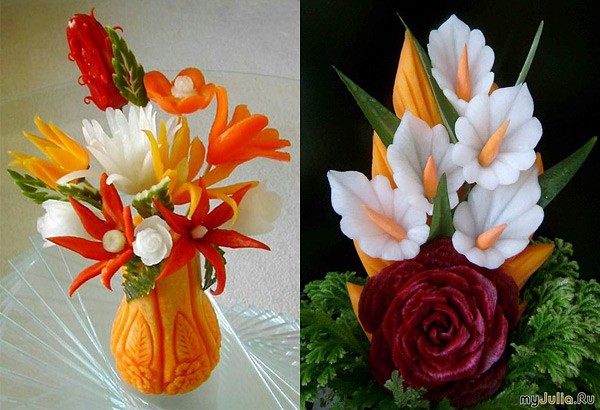
Flowers from vegetables are collected in exquisite bouquets
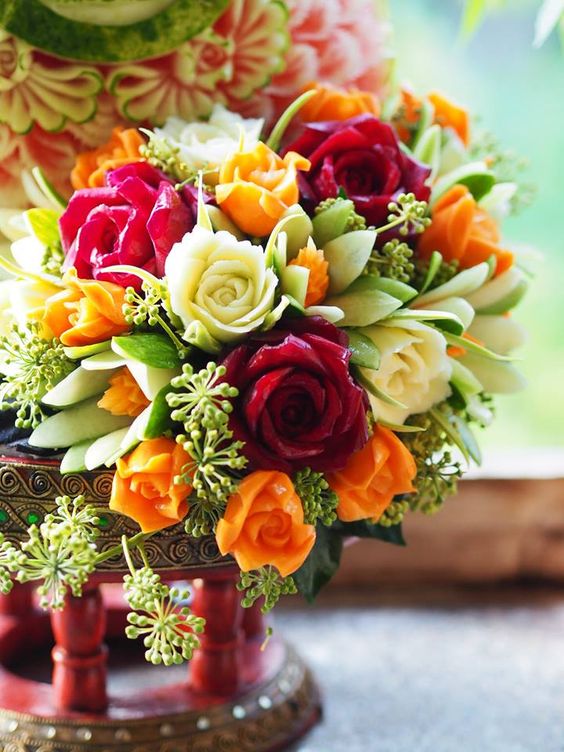
Luxurious decoration for the holiday table!

Photo from http://www.templeofthai.com
You can collect bouquets directly from flowers, vegetables and fruits. Most often, whole fruits are used in these, but to give the bouquet a certain “zest,” some fruits are cut in half or partially peeled:
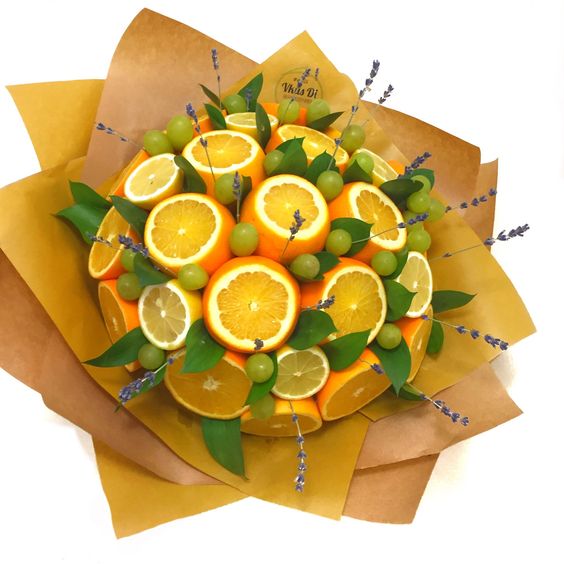
Photo from the site vkusdi.ru
You can use Carving elements when making bouquets, for example, by assembling a rose from dried apricots, as well as by very carefully peeling a pomegranate, or even by cutting out simple patterns on it:


Bouquets of vegetables are also very interesting if, in addition to greens and selected vegetables, some of them, for example, bitter radish, are carved:

Photo from the site vk.com/o_horosho
And be sure to watch error analysis when making bouquets of vegetables and fruits from the channel Flower Chef:
Interior decor
Vases for fresh flowers
Please note that citrus circles are placed in a separate container with water (larger), and the bouquet itself is placed in a narrower vase or transparent glass

It will be difficult for a child to make even the simplest patterns and cuts, so use with an awl And paper templates. The picture is superimposed on a fruit or vegetable, holes are made with an awl along the entire contour (this can be done by the child himself under the supervision of an adult), which are then cut out with a sharp knife (and this is best done by an adult). 

. "Cross" has collected for you the simplest options for crafts using Carving elements. They are so cute that you definitely want to repeat them!

Penguin and Pear Parrots


Snail (www.handmadecharlotte.com) and Killer Whale from Cucumber


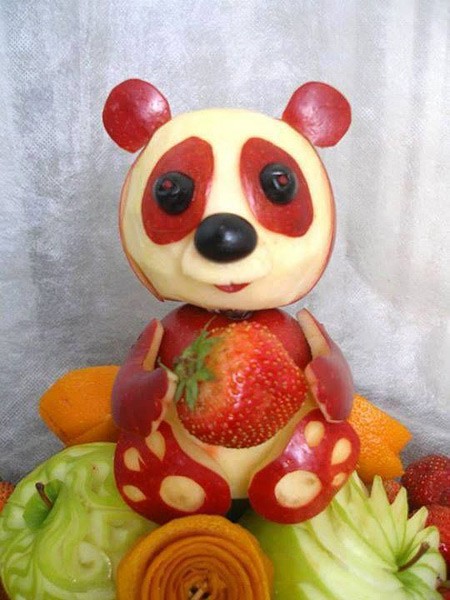
If your child doesn’t really like fresh vegetables and fruits, use your imagination and Carving!
It's safest to give children cutters rather than sharp knives!


Banana is a perishable product, so it’s not suitable for crafts, but you can surprise and delight your baby for breakfast or an afternoon snack!

Masterpieces of the masters of carving
Finally, so that you completely and irrevocably fall in love with Carving, we will tell you about two Masters of their craft.
Marilyn Sunderland (USA), an artist by training, was engaged in traditional painting until she found her true calling in Carving. Namely, in the artistic carving of pumpkins.

Marilyn lets each pumpkin dry for about 6 months before she begins carving.
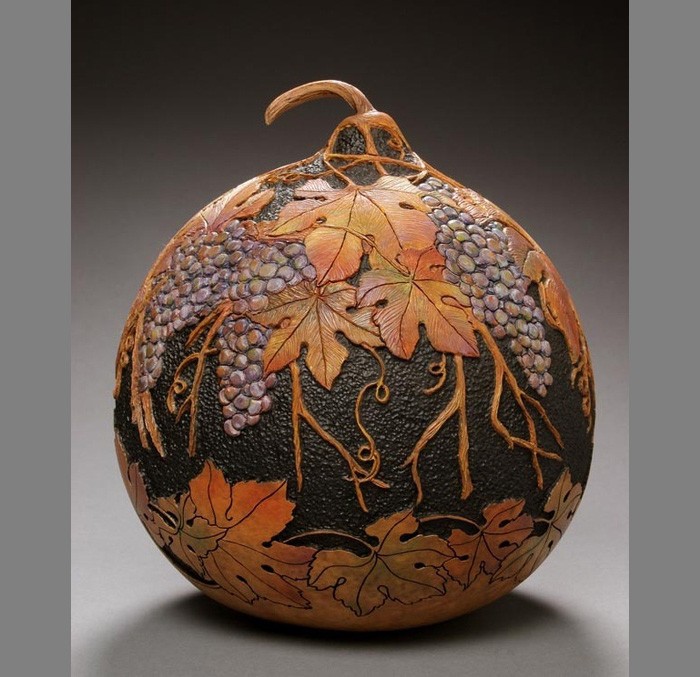

Her works are very popular among private collectors; they are also bought by exhibitions and art galleries.

Daniel started carving at the age of 7. The first material for creativity was ordinary soap, later he tried his hand at Carving and it turned out great!

Now Daniel Baressi is a recognized carving master at the international level.


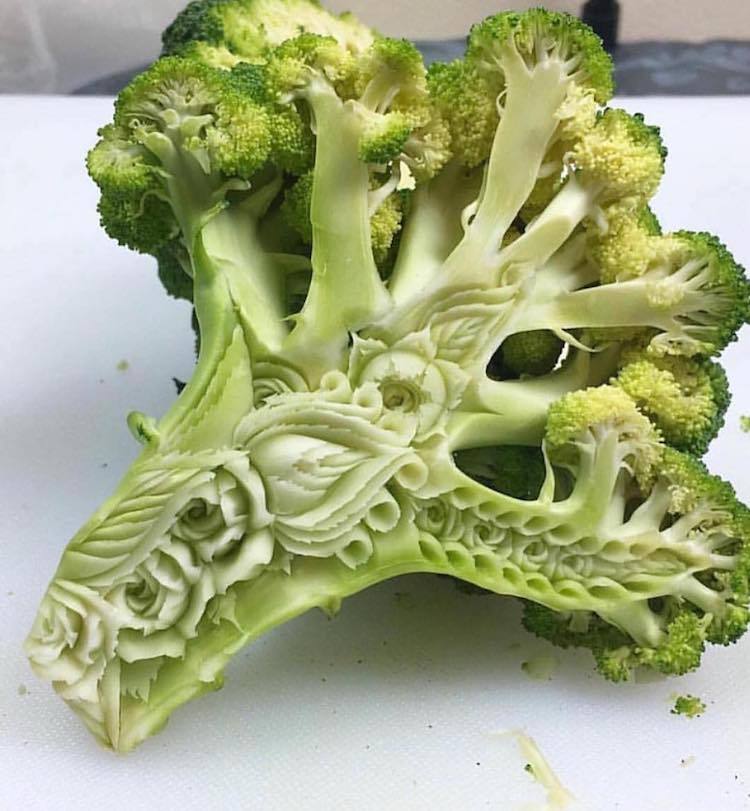
As Daniel himself says, he forgets about everything in the world when he starts carving. His works are so beautiful because he creates them with his heart.
Categories