Nowadays, many housewives not only strive to cook tasty and interesting dish, but also submit it to original form, decorated with elegant curls and fancy cuts.
Summer is the time to experiment by decorating dishes with vegetables.
Table decorations from vegetables are easy to make yourself; you don’t need anything special except a vegetable peeler (or a sharp knife) and a little effort.
Floral elements are the most popular and simplest decoration. They can be made from numerous vegetables. So, ordinary roses are made from radishes, cucumbers, carrots, radishes, or daikon, which is very convenient for culinary crafts.
And today there is a master class from Yeva64 for the production of these wonderful, incredibly beautiful masterpieces of art - an edible blooming garden on the table.
We will use as starting material:
- salted or pickled cucumber,
- fresh cucumber,
- fresh carrots,
- long white radish.
In addition to vegetables, we will also need a vegetable peeler to cut sooooo small strips. Without her - nothing!
I take small vegetables, not large and not very long! Because I only use each strip for ONE petal! It's much easier...
For reference: One rose takes about 10-12 stripes (which is about half a small cucumber or carrot).
Rosette of salted or pickled cucumber 
You can simply cut the cucumbers into slices and place them in a plate on the holiday table. But it won’t create a special mood or emotions. Another thing is to cut an exquisite flower from a cucumber.
 |
We begin to plan our cucumber into strips. Moreover, we don’t need the very first strip (skin). |
 |
We reach approximately the middle of the cucumber (it’s not worth it to the very middle, (it’s not worth it to the very middle, the central stripes usually fall apart in half, you’ll feel it yourself...), |
 |
Then we turn it over and start planing from the opposite side. |
 |
Here's how many stripes I got from one small cucumber. (We won’t need the remaining block; in the photo it’s next to the vegetable peeler...) As you can see, trying especially hard to get perfectly even and beautiful stripes is completely unnecessary!!! Moreover, don’t try to get beautiful ends! They will not be visible because they will be located at the bottom of the rose. What you plan, you plan! Of course, we discard very narrow strips, the rest will do! Even with one beautiful edge or shaggy ends... |
 |
Let's do middle of the rose: We take one strip (preferably narrow or short) and twist it into a tube, slightly into a spiral. |
 |
It doesn't have to be too tight! |
 |
Now let's do it first petal: Let's take another strip |
 |
we put one edge of it behind our tube, a little lower, bend it AWAY FROM OURSELVES, lower the other end down to the base of the rose, and wrap it around as best we can, but lower... |
 |
It looks like a loop. The first petal is ready! |
 |
We apply the next strip to the base of the first petal, also bend it AWAY from ourselves, and wrap the end around... |
 |
The second petal is ready! |
 |
Some tips: - Since the strips are very thin and wet, they “stick together” perfectly! There is no need to make any effort to keep our structure in the “assembled” state! 6 petals have already been collected... |
 |
Don't try to get any perfect shapes and symmetry! The more “loose” and “anarchic” you assemble your rose, the more natural it will look in the end! Making the 7th petal... |
 |
The only thing is, try to apply each strip to the rose so (in that place) that the petals are shifted. Sometimes with a little, sometimes with a lot, even opposite to the previous one... There are already 9 petals... |
 |
If your strips are too long, you can trim off the excess from the end along the way so that the bottom of the rose does not turn out to be too voluminous! There are already all 11 petals... |
 |
And also, apply the stripes slightly at an angle (up) so that the petals lie beautifully... The rose is ready!!! Look, it holds up perfectly without any toothpicks! |
 |
Now we make a couple of leaves. Cut off the tip of another small cucumber diagonally, at a large angle! |
 |
Let's divide this ponytail in half... |
 |
And two leaves for the rose are ready! |
 |
What a beauty! |
You can decorate the salad...
Fresh cucumber rose
To make a rose from fresh cucumber, you need to cut it into long strips, leaving the skin and not taking the central, core part, since it is the most fragile.
We twist the first strip into a tube or spiral, and place the rest one by one around them: so that each “petal” is located slightly lower than the previous one.
To do this, we apply the strip to the base of the piece going in front of it, make a fold away from us and wrap it around the already formed part.
Cucumber is sticky, so there is no particular need to attach the petals very tightly - on the contrary, the looser the slices can be attached, the more natural the rose will look. To make the product look elegant, the strips should be applied slightly obliquely, imitating the placement of petals in ordinary flowers. You can make rose leaves from fresh parsley or pieces of cucumber peel. 
In general, everything is the same! So, without any special details, just a photo shoot...
By the way, my cucumber was far from being the freshest, the strips turned out to be quite shaggy... However, the end result was no worse!
We plan our cucumber on both sides into stripes; we don’t need a central block.
 |
 |
We twist the middle of the rose and the first petal...
 |
 |
 |
 |
Second petal... 
 |
 |
 |
 |
 |
 |
 |
 |
Video tips
Fresh carrot rose
Working with carrots is more difficult than with cucumbers: they are a bit tough, and there may be more shaggy petals than on a cucumber. If there are a lot of them, you will need to trim them with scissors. It is better to secure the finished carrot rose with a toothpick. And to give it original shades it is tinted beet juice and then lubricate vegetable oil: this way the carrot rose will not become weathered quickly.

Making a rose out of carrots is a little more difficult, since they are a little tougher and not so obedient...
Therefore, the carrot rose should still be secured with a toothpick at the end of the process..
And there are a lot of “shaggy things” at the bottom, since the ends of the strips are difficult to wrap around the base. So what? They can be easily cut with scissors...
 |
And yet, carrots, especially if they are plump, can be planed not from two opposite sides, but from all four! Like this... |
 |
We collect... |
 |
... carefully attaching the petals... |
 |
...in sequence. |
 |
We fix... |
 |
Cutting... |
 |
Ready! |
 |
 |
 |
- The carrot rose can be slightly TINTED with beetroot juice (just brush it with a piece of beetroot). What a gorgeous “color” it turned out... |
 |
It is very advisable to GREASE carrot roses with vegetable oil (lightly, gently and carefully, using a soft brush), since they become chapped very quickly! But cucumber roses are more moist, so they hold up perfectly! |
 |
- If you do not decorate the salad right away, then the roses (any kind!) need to be STORE in a tightly closed container or under film... But no more than 2-3 hours! |
 |
But if you need to make roses in 1-2 days, then you can grease them with a thin layer of gelatin solution! This will give the roses shine, glue them together, and also allow them to be preserved in their original form! I almost never do this, because screwing a couple of roses takes 3-5 minutes! |
Video hint
Radish rose

The radish rose turns out very beautiful and white!
And, besides, it can be easily tinted - in any color! Better in yellow, pink or red..
 |
You need to take a slightly oblong radish so that its length is enough for the petals! |
 |
Cleaning... |
 |
And, as usual, we begin to plan thin and not very wide strips. And so that the stripes are not too wide, we plan the radish along the entire circumference, and do not skid in one place... |
 |
We wrap one strip into a tube - this is the center. |
 |
Well, further according to the instructions.... |
 |
You get gorgeous roses!!! Very beautiful, white, delicate... |
 |
Radish roses, like carrot roses, need to be secured with a pair of toothpicks, and also lightly greased with vegetable oil (so as not to weather)... |
I dashed off three roses... And this is why:
Radish roses can be easily tinted - in any color! I don't like food coloring, I prefer carrot or beet juice! Therefore, the roses I get are yellow, pink or red...
Depending on the intensity of the coloring, you can get different shades of yellow and red... From soft cream to apricot, from soft pink to dark brown...
Today I will show you the coloring process beet juice.
I used juice from a freshly opened jar of beets (borscht preparation), but you can squeeze a piece of fresh beets in a juicer, or grate some beets on a fine grater and squeeze through cheesecloth...
If you don't really need saturated color, the juice can be diluted a little with some water...
 |
Let's paint one rose RED. You can leave it in the juice for a couple of minutes, or half an hour, or much longer! Depending on what color you need... I had it “take a bath” for about half an hour (while I was making the rest of the roses) and it turned out a rich red color... |
 |
Then take the rose out of the juice and carefully place it on a napkin for a couple of minutes so that all excess moisture drips off. |
 |
Let's turn it over... and admire it! Also grease lightly with vegetable oil... And the rose is ready! |
 |
Let's paint the second rose PINK, but not all of it, but in melange style - with strokes... You can do this with a silicone brush or a napkin soaked in juice (like me). Using light, gentle, stroking movements, we touch the outer protruding parts of the petals. |
 |
We are touched... Lubricate with vegetable oil... We leave the third rose in its original form - WHITE... |
Now we are building a festive composition... 
And... we immediately swoon from this beauty.........
Yes, and one more thing...
I can say that the roses were perfectly preserved even after 7 hours!!! (although they were just standing on the table in the kitchen) - they were practically not weathered, the colors did not fade... well, they were just a little muuuuuuuuuuuuuuuuuu with...
Why am I talking?. And why? Roses will adequately withstand any multi-hour feast!!!
And so that the roses retain their appearance for one or two days, they are lightly lubricated with a gelatin solution. This would be appropriate for a wedding or big celebration.
As you can see, making table decorations from vegetables with your own hands is not so difficult; just a few steps separate the transformation of an ordinary vegetable into a flower of extraordinary beauty!

The main thing is to do all the work carefully, show a little diligence, a little patience, and then beautiful roses will bloom on your table, which will completely transform any dish and lift everyone’s appetite and mood!
Transform dishes for a holiday or everyday table into an artistic picture. Let bright flowers bloom on their surface. If you know how to make a flower out of vegetables, it will not be difficult at all. Then you can quickly turn an ordinary carrot into a lily, an onion into a chrysanthemum, and a tomato into a rose.
The tomato becomes a rose
You can start with the most simple jewelry, talking about how to make a scarlet rose from a tomato. Take a tomato and, using a sharp knife, cut a thin strip of it in a spiral 1 cm wide, starting from the top.
After this, take the resulting curl, twist it in the shape of a rose and place it on the salad. You can make not just one such flower from vegetables, but several. Then the dish will bloom with scarlet roses. If you have yellow, black, white tomatoes, cut out roses from them; such variegated flowers look great on the table.
The pulp can be used in salad or using it to take another photo will help with this.
More ideas that a tomato will help implement
Cut as many tomato slices as you want to make fun little flowers. You can also use whole fruits with peel. Place spinach leaves in a semicircle on a plate or small salad. Place a tomato slice in the middle. The flower will be mischievous - with eyes and a mouth. Make eyes from two small circles of cucumber, and pupils from an olive cut in half.
Form your mouth from a semicircular piece of carrot, and sweet corn lay out in the form of teeth. The flower stem can be a branch of celery, parsley or dill. You can put the same flower next to it on the plate. Serve the salad to your child: even if he didn’t like it before, he will eat it with pleasure.
If you want to make a vegetable flower in 30 seconds, use a small, sharp knife. Stick it into the center of the tomato and make a zigzag cut in a circle. Separate the two halves, place each on a lettuce leaf - and the exotic red lily is ready!
Blooming carrot rose
This vegetable also gives limitless scope for imagination. To create flowers from vegetables with your own hands (in particular, from carrots), take quite large root vegetable. Clean it, if the crown has a slightly greenish core, cut off this part. Below it, cut a piece that will be 6-8 cm in diameter, and the height of this piece will be 5 cm.
If you have special knives for carving, take one called Thai. If not, take a regular small one with a thin tip. Turn the workpiece with the thick end towards you. To round a sharp corner, cut a thin ring at the top edge. It won't be needed. Next, cut out a semicircular petal on the base. Using a knife, remove some of the pulp from under it. This will make the petal look more distinct.
In the same way, cut out 3 more petals nearby at the same level. In this case, each subsequent element should extend beyond the previous one by approximately 5 mm. Hold the knife at 45 degrees. Cut the petals of the second row so that they are staggered relative to the first. Now hold the knife in a more vertical position.
Before completing the third row, cut off the pulp in the form of a ring from the edge of the workpiece and remove it. Using this technology, perform 8-9 rows. Turn the rose over and admire its splendor.
Simpler options for orange vegetable decorations

You can make flowers from carrots and more the easy way. If you want orange daisies floating in the soup, place the peeled carrots vertically. Cut 4 strips symmetrically from top to bottom. Lay the workpiece horizontally and chop it into thin circles. Each one will look like a flower. If you wish, you can make its petals rounded. A child will also eat soup with such decoration with pleasure. You can place carrot daisies along the edge of the plate, put a second dish in it, which both the child and even the adult will greet with a bang.

Make a rose out of this vegetable as well. To do this, cut the shavings from it in a spiral. Then, just like with the tomato, arrange it in the form of a rose. To make the shavings more pliable, you can immerse them in warm, slightly salted water for 15 minutes.
Beetroot charm: decorating dishes
The photo will help you understand how to cut directly on the beets. To do this, first wash, dry the fruit and peel the peel.
Next, start making the core. To do this, insert the thin sharp tip of the knife into the middle part of the fruit 2 cm. Draw a circle with a diameter of 1.5 cm around this place. Step back 2 cm beyond this ring, use the tip of the knife to draw a circle with a diameter of 1.7 mm. Using the same point, remove the resulting 2 mm wide ring. Step back another 5mm outwards, draw a circle and remove the 2mm rings.
The middle is ready, it’s time to make the next flower from vegetables, in particular its petals. From the outer circle outward, draw a petal with a knife, then the next one. Complete the entire first row in this manner. Poke the point of the knife 2 cm and carefully cut the outline of all the semicircular petals. Then cut out 2 veins on each of them.

Step back 1 cm from the edges of the petals, draw a circle, cut out the flesh at this place with a 5 mm indentation. Then the petals will become more distinct. In a checkerboard pattern, cut out the second row of petals, which are 1.5-2 times larger than the first. Also mark the veins on them.
Finally, cut off the beet pulp along the edge, and the vegetable flower is ready.
Celery will give room for creative imagination
A real masterpiece can be made in in a matter of minutes Usually its stems are eaten, and a small piece near the root zone is thrown away. And in vain, make a fabulous flower out of it. Dissolve according to instructions food coloring favorite color. Holding the root part, dip a cut of celery into the paint. Turn it over, put it on a plate, let it dry and you can decorate the holiday table.

If you don't have celery, the bottom part will do. Chinese cabbage. If you do not plan to use this flower later, you can dip it in ink or paint and make an original stamp on the invitation envelope. After the paint has dried, give or forward the invitation to those you want to invite to visit. They will never guess what kind of print it is. And when they come, they will see original flowers made from vegetables; you can make a whole composition out of them with your own hands.
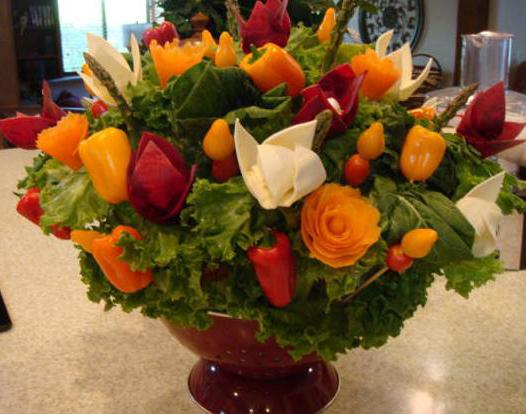
Festive bouquet: first touches
Guests will be even more enchanted if the center of the festive table is dazzling with a colorful bouquet. When they look closely, they will realize that instead of buds there are flowers made from carrots, peppers, tomatoes, white cabbage, and the role of greens is played by lettuce leaves.
Start by preparing a vase of a suitable diameter; it should not be narrow and transparent. In the center, place a piece of white foam rubber of the same diameter as the vase, but it should not reach 7 cm from its edges.
Take wooden skewers. Put carrot roses on some of them. To do this, you just need to pierce the flower with reverse side the end of the skewer. Attach sweet in the same way bell pepper cone- and barrel-shaped.
We continue to create a miracle bouquet
How to make the rest graceful edible decorations, will tell you quick master class. Flowers from vegetables (tomatoes, cabbage) are not difficult to create.
Thread 2 small red and yellow (drop-shaped) tomatoes onto skewers. Take a leaf of white cabbage and cut out a star with not very thin rays. Fold 2-3 corners so that they meet each other halfway. Pin them together with a skewer at this point. The remaining 2-3 corners will be positioned freely, like blossoming petals.
In the same way you can make from
As you make each flower, insert the free end of the skewer into the sponge. Moisten it with cool water to prevent the greens from wilting. Drape the gap between the skewers with basil sprigs and lettuce leaves. You can use parsley, dill, whatever you have on hand.
Cucumber to the rescue
When covering the question of how to make a flower from vegetables, we can also mention the cucumber. In addition to the common method - spiral chips, there are many others.
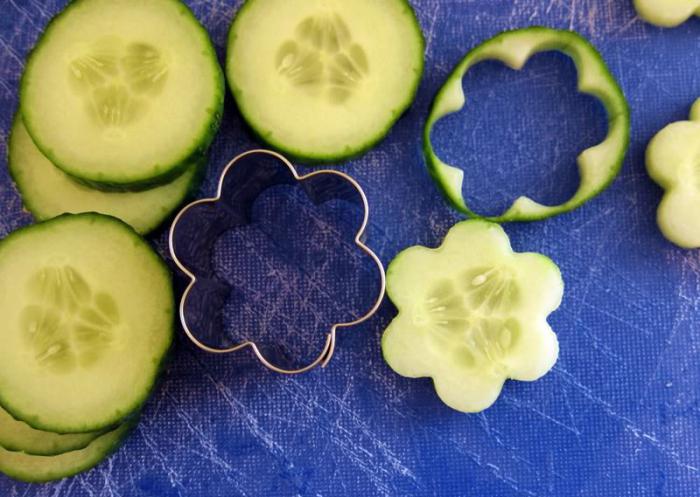
Chop the cucumber into 7mm thick slices. If you have small flower cookie cutters, place them on the cookie cutters, press and cut out. You can do this with a knife.
If you don’t have extra time, cut the cucumber into thin slices and place them in the shape of a flower on a plate or finished dish.
Flowers made from vegetables and fruits will decorate any table or room, and will help turn even a weekday into a festive one!
Of course, carving masters are capable of creating real works of art, but we will cut modest roses from ordinary carrots and onions. It’s better to take pink onions to make them look more beautiful. We will need a regular thin knife and a special, shaped one (you can buy one at a hardware store).
Let's focus on decorating salads, dreaming about how to lose 10 kg in a week - this will distract our thoughts from eating these same salads. The carrots must first be boiled.
1. Using a special knife, make cuts on the onion. For this purpose, you need to take a flat onion. Along the cut line, separate the onion into two parts.

2. We divide each half of the onion into shaped components. They come in different sizes.

3. Using a regular knife, remove a long thin strip from the boiled carrots in a circle. We try to make the strip as long as possible.

4. Wrap the strip into a roll.

5. It turns out to be some kind of flower.
6. Place the carrot strip, rolled into a roll, into the onion base. The result was a kind of flower.

7. To enhance the similarity, place a piece of olive or prune in the middle of the flower.

Carrot often included in salads - remember everyone’s favorite vinaigrette. But even if the recipe doesn’t require carrots, nothing will stop you from making interesting decorations for a dish made from this vegetable.
You can decorate dishes with both raw and boiled carrots. Be sure to practice cutting out flowers and figures in advance so that on the eve New Year's holiday or other celebration, you could make them quickly without wasting precious minutes learning the basics.
Carrot lily

1. Take a piece of carrot (preferably raw) 6-7 cm long, give it the shape of a cone: cut it off on five sides to approximately get the desired shape.
2. Carefully cut thin petals on each side, without cutting to the base.
3. Using kitchen scissors, give the petals a slightly rounded or pointed shape on top.
4. We continue to make the petals, turning the flower as we cut it so that they become staggered.
5. We cut off all the new petals on top, giving them the chosen shape, triangular or round.
6. And at the end, remove the very center of the lily so that the flower is open. You can lightly sprinkle grated yolk inside, as if it were stamens.
Be careful when transferring the decoration to the plate.
 Boiled carrot flowers
In addition to carrots, you will need radishes or cranberries, mint leaves and parsley.
1. Take a peeled carrot cylinder 5-8 cm long.
2. Cut triangular grooves along the entire length of the carrot at a short distance from each other. 
3. Cut the carrots into thin slices.
4. If you are using radishes, thinly remove the skin and cut out the flower cores.
5. Collect flowers by placing pieces of radish or cranberries on carrot slices. Decorate with parsley or mint leaves. 
(Based on materials from the magazine " We cook beautifully and tasty«)
Homemade mayonnaise recipe
The recipe for mayonnaise at home is not at all complicated. However, when...
Cheese at home, how to make hard cheese
Everyone has heard that cheese is very healthy and hearty product, but that's about...
How to bake bread in the oven. Recipes: wheat with sesame (photo), hop-based...
Fresh, fragrant bread Everyone loves it with a crispy crust! Warm bread maybe...
How to cook beef brawn in a slow cooker, recipe with photo
if you love deli meats, and even cooked at home...
How to quickly peel and cook raw mussels, photo
If you decide to relax and spend your vacation on the Black Sea coast and...
