New Year- a wonderful time and the most best time in order to enjoy communication with family and children. Kids love New Year's crafts and homemade Christmas tree decorations. Fiddling with dough is also one of children's favorite pastimes. By combining both, you can decorate the Christmas tree with wonderful unique toys.
In this article:

You will need:
- 1 part fine table salt;
- 1 part white table flour;
- 1/3 part potato starch;
- water for kneading.
All dry ingredients need to be mixed in a bowl and knead the mass, gradually pouring water. The mass should have a pleasant consistency - not stick to your hands, and not be too tight (do not break or crumble).


After salty dough done, decide when you will paint the products. You can paint the mass immediately, or you can paint the toys after baking.


How to dry New Year's crafts?
A few words about drying. To make the dough hard, you can simply wait a few days, or bake it in the oven. You need to preheat the oven to maximum temperature, then place the salted crafts laid out on a baking sheet. Then you need to turn off the oven and do not open it until it has cooled completely. Can be baked for very low heat(like crackers), but then you have to make sure they don’t burn. Another little secret- To prevent the figures from sticking, cover the baking sheet with a baking sleeve.

Of course, not all salt dough crafts can be dried in the oven. For example, those decorated with beads or beads should be dried naturally.
How to paint the finished product?
There are several ways to make products multi-colored. Dry cosmetic pigments and water-soluble food coloring, which are used to make soap, are best suited for this. self made. If they are not available, then you can use Gouache or watercolor paints.

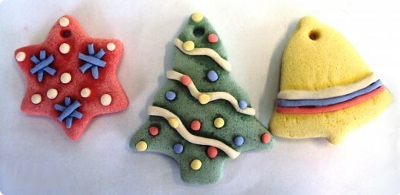
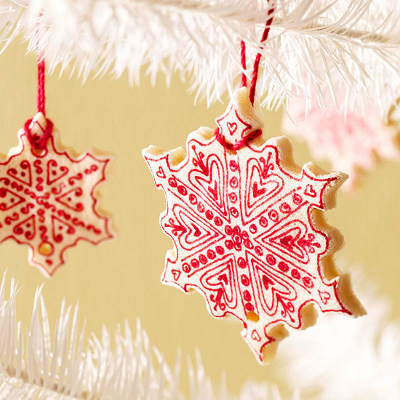
After the salt dough is colored, you need to carefully roll it out with a rolling pin and cut out the desired shapes using molds. Dough products look very interesting different colors(like on a picture). Delivers to kids great pleasure engage in this kind of mixing.

Another way is to make crafts from white dough, and then decorate them - there are many ways. Kids will do this with gouache, older children can draw beautiful patterns with felt-tip pens or a gel pen.


Acrylic paints are a great decoration! If you use silver paint to decorate crafts, they will look like! Paints with shiny pigments look very good!


Decor ideas
In addition to coloring, there are many ways to decorate future toys. Just do this before you dry them. For example, cut out different holes with a straw.

Or make prints and imprints with stamps or some kind of figures.


Decorate with beads, beads or sparkles!

Dough crafts decorated with cosmetic glitter look very festive! Need something dry ready product Cover with PVA glue and then cover with glitter. You can buy them at any nail fashion store, they cost from 60 to 120 rubles.

Salt dough is a popular and affordable material for children's creativity and making their own crafts. Just like from plasticine, you can sculpt any product from salt dough. difficulty level, so children of any age can make crafts from salt dough.
The recipe for making salted play dough is very simple; the ingredients for it can be found in every home.
Salt dough recipe. How to make salt dough
You will need:
Flour - 2 cups
- salt - 1 glass
- water - 250 gr.
You need regular wheat flour, without raising agents, dyes or other additives. Salt - "Extra". The water is ordinary cold.
How to make salt dough: mix flour and salt, add water, knead the dough. The degree of readiness of the salt dough can only be determined by hand. If the dough crumbles, add water. If, on the contrary, it stretches too well and sticks to your hands, then there is too much water, and you need to add a little flour. Roll into a ball and make several indentations in it with your finger. If the dough does not spread and holds its shape, it is ready. It is recommended to add vegetable oil during the kneading process. Now the dough will not stick to your hands, dry out quickly and become crusty while working. However, it should be remembered that the best is the enemy of the good! If there is a lot of oil, the dough will get dirty, and final drying can take a very long time. For our recipe, a couple of tablespoons is enough.
Well, the dough is ready, now you can proceed directly to the process of modeling salt dough.
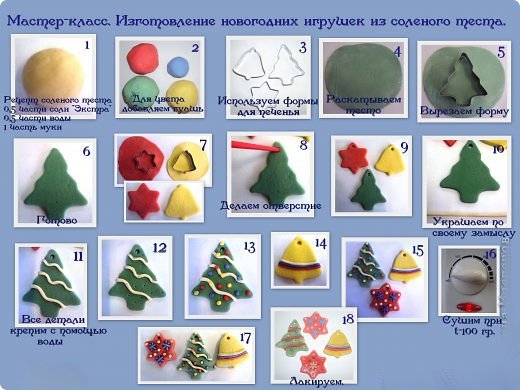
In this article we will tell you how to make New Year's crafts and Christmas tree decorations from salt dough. We tried to select crafts made from salt dough that, on the one hand, are easy to make, and on the other hand, the end result is beautiful.
Salty dough. Crafts made from salt dough
To make Christmas tree decorations from salt dough, you will need shaped cookie cutters. With their help, even a child can cut out figures from a rolled out sheet of dough.
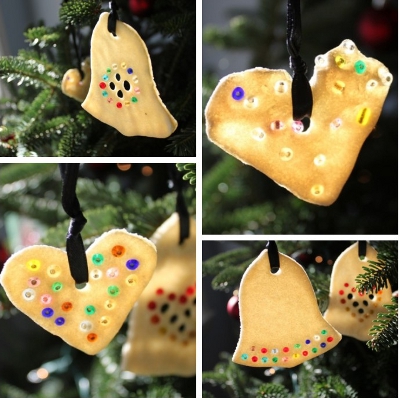
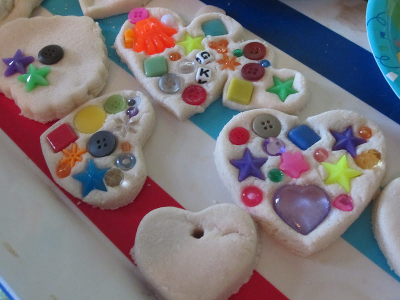
The resulting salt dough figures can be left as is, but it’s even better to decorate them. For example, like this.
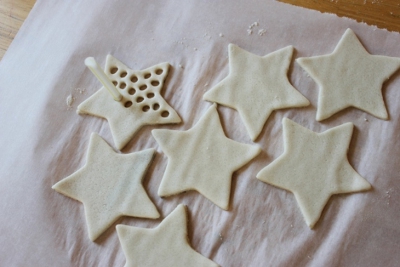
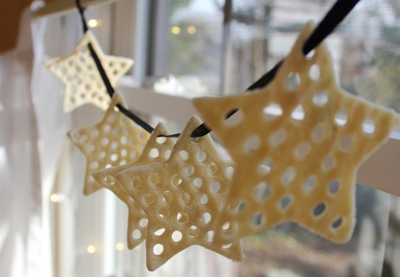
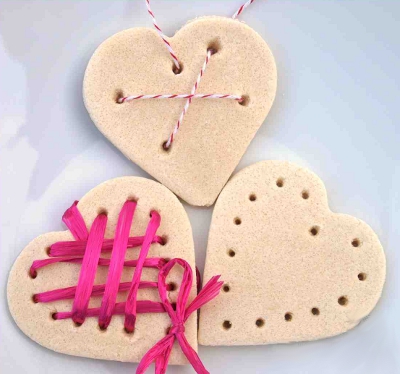
You can use a cocktail tube to make many holes in the dough and then you will get openwork figures.
Or decorate crafts made from salt dough with beads. Just keep in mind that if you use beads made of plastic, etc., then you cannot dry the finished salt dough products in the oven, otherwise the beads may melt.


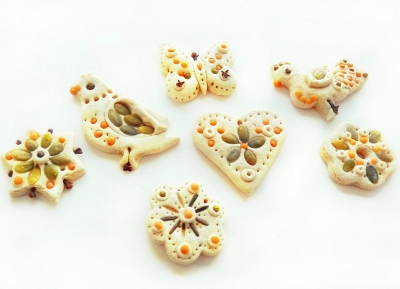
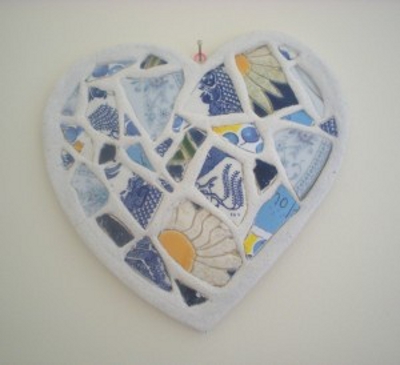
Instead of beads for decoration New Year's crafts salt dough can be used different cereals, shells, buttons and even broken dishes.
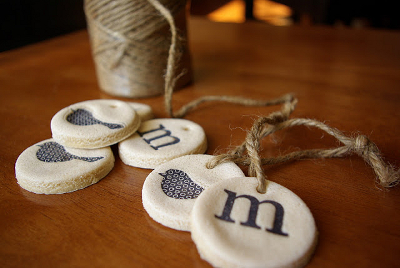
Give festive look Christmas tree decorations made from salt dough can be made using beautiful ribbons and threads.
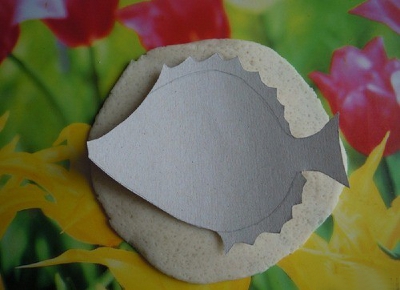
Note: if you do not have a suitable mold, you can cut out a stencil from cardboard and use it to cut the salt dough for the craft.
Modeling from salt dough. Salt dough photo
Finished, already dried salt dough products can be decorated with sparkles by applying them to a layer of glue.


Crafts made from salt dough. Salt dough master class
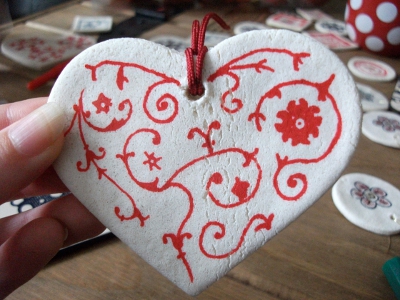
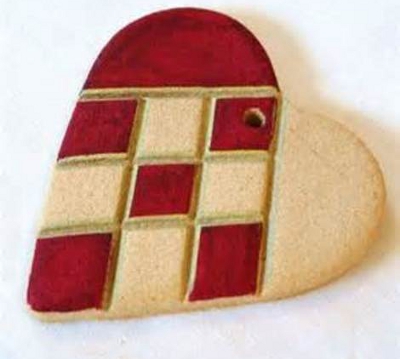
Christmas decorations made from salt dough, painted using colored permanent markers, look beautiful.

Products made from salt dough. Salt dough modeling
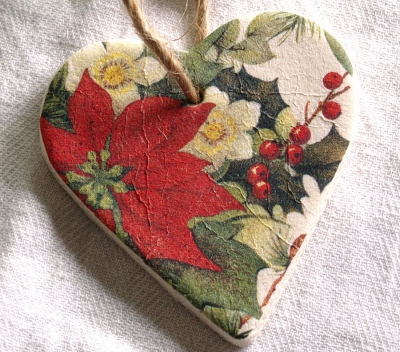
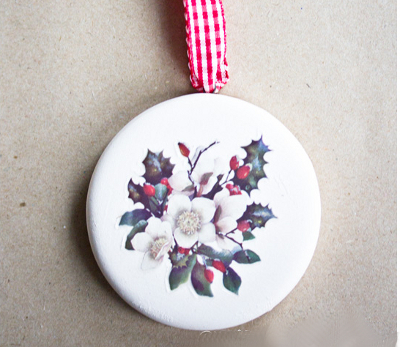
You can decorate New Year's crafts from salt dough in decoupage technique, having pasted over beautiful pictures or transfer stickers. For decoupage, you can use pictures cut out from New Year's napkins. For New Year's decoupage, regular PVA glue diluted with water in a 1:1 ratio is suitable. Cut out pictures or patterns from New Year's napkins, separate the top layer and paste it onto the finished salt dough craft. Apply another layer of glue on top.
Salt dough figures. Crafts made from salt dough
Here are some more examples of decorating salt dough figures.


Christmas decorations from salt dough. Salt dough modeling
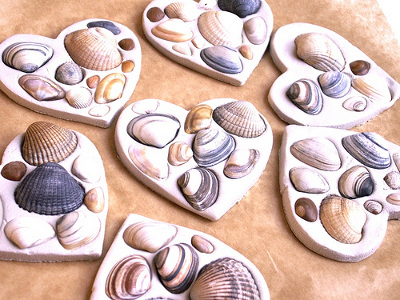
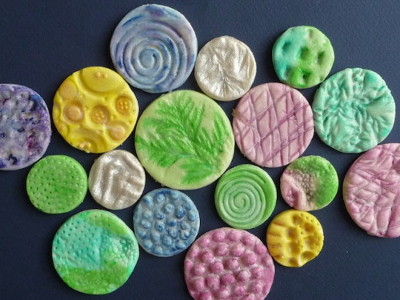
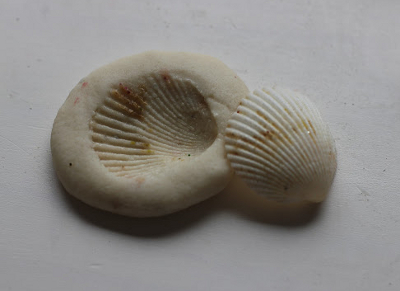
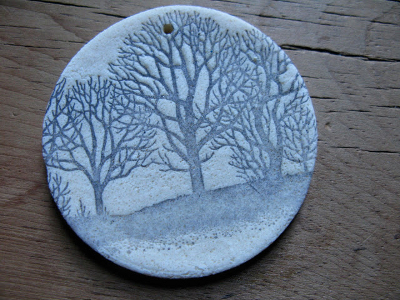
Simple and original way To decorate products made from salt dough is to make prints on them. Prints can be made from all sorts of objects with interesting textures that you can find around your home.
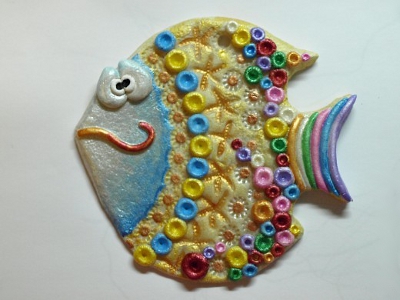
The salt dough craft “Fish” in the photo below was made using various textured items that the author of the craft found at home. For a detailed master class on making this original craft from salt dough, see the link
For making Christmas tree decorations with your own hands from salted dough will do Also natural material: twigs, shells, leaves with thick veins.


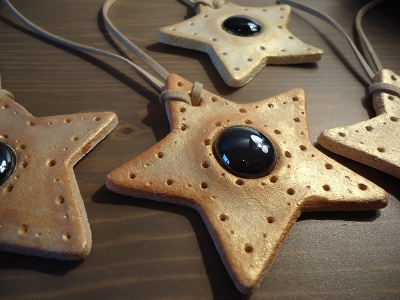
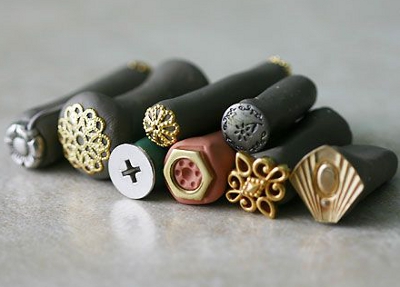
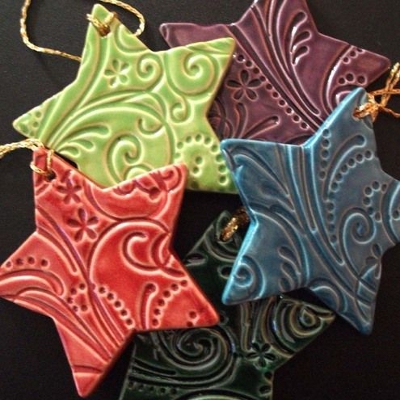
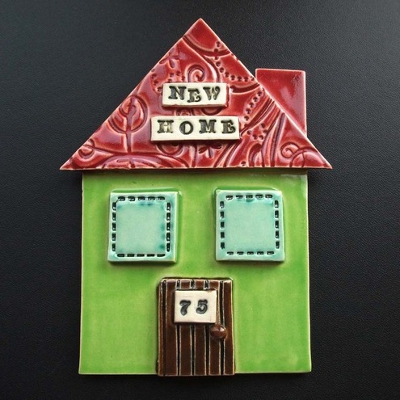
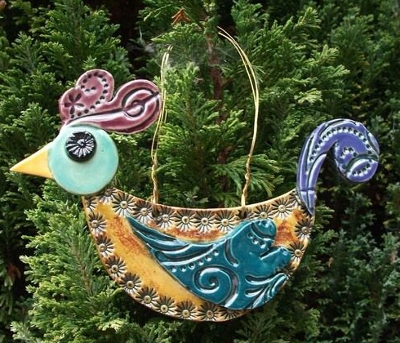
When making New Year's crafts from salt dough with your children, you can use purchased stamps to children's creativity. The ink is suitable for both black and colored.
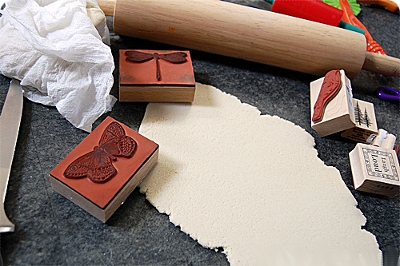
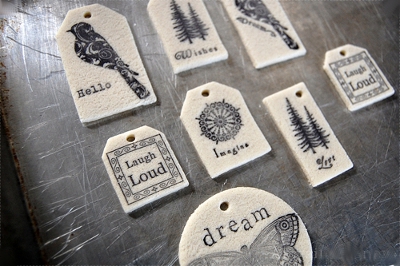
The DIY Christmas tree decorations stars, house and cockerel in the photo below are also made from salt dough using patterned stamps.
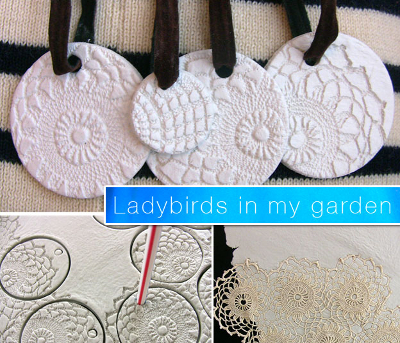
The website Ladybirds in my garden suggests making New Year's decorations from salt dough. Using textile or paper lace, openwork prints are created on salt dough, from which figures are then cut out using shaped molds or a simple glass. Christmas tree decorations made from salt dough with prints of children's hands or feet look touching. On back side
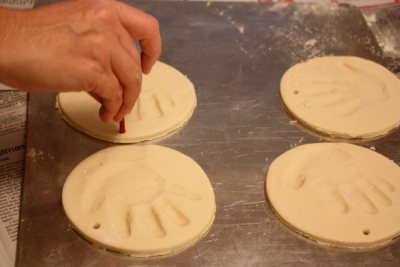
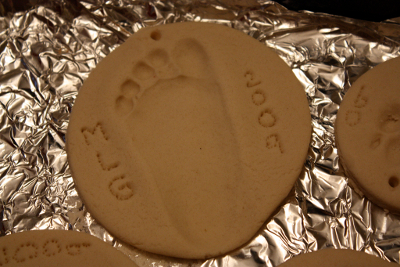
salt dough crafts indicate the date the imprint was made.

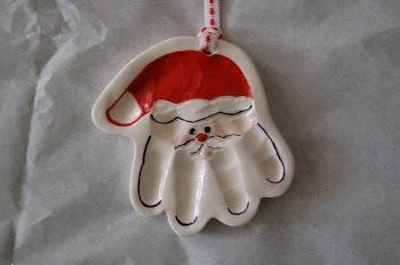
From fingerprints and palm prints on salt dough you can make these memorable Christmas tree decorations with your own hands: a New Year tree and Santa Claus.
Crafts made from salt dough. Salt dough figurines
Concluding our review article on the topic “New Year’s crafts from salt dough”, here are a few more interesting New Year’s crafts that can be made from both salt dough and plasticine.
1. New Year's mosaic made of beads and bugles
To make this original New Year's decoration, you will need:
Plasticine or salt dough
- plastic covers
- beads, beads

- gold paint (optional)
Paint the lids with gold paint, then fill them with plasticine or salt dough, and lay a mosaic of beads and bugles on top.
Even kids can make such New Year's crafts.
2. DIY craft for the New Year “New Year’s candles”
- To make this New Year's craft you will need: from a toilet paper roll
- corrugated paper in red, yellow and orange flowers
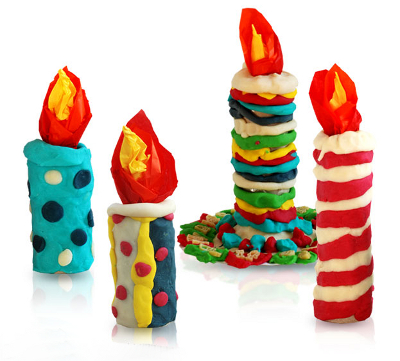
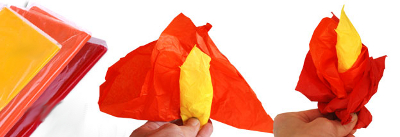
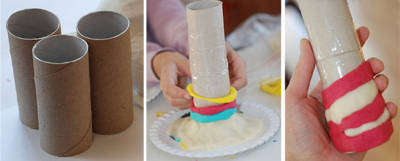
Make rings from plasticine or salt dough of different colors, then put them on a cardboard roll. From corrugated paper make a flame, insert it inside the candle.
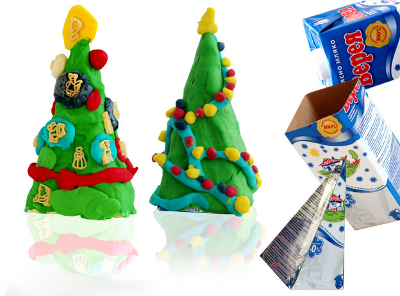
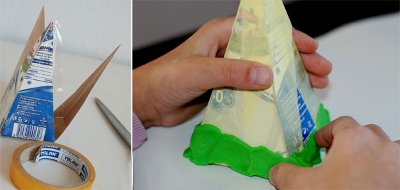
3. New Year's craft for children "Christmas tree"
From cardboard packaging You can make a cute Christmas tree from milk, kefir or juice and plasticine (salt dough). For a master class on making this craft from salt dough, see the photo below.

See also articles on our website:
4. New Year's compositions made of plasticine
Posted on the Country of Masters website interesting master class on creating New Year's compositions from plasticine by cutting. Check out the Christmas tree below. It is assembled from individual branches, cut from one plasticine blank, and then decorated with Christmas tree decorations made of plasticine, made using the same technique.

Images of burning candles will help decorate the New Year's composition.

The Country of Masters will teach you how to make original twisted candles from plasticine.

This composition is complemented by a chrysanthemum flower and a small driftwood made of plasticine.
For anyone interested in crafts made from plasticine for the New Year, we also recommend Roni Oren’s book “Secrets of Plasticine. New Year.”
My kids really love watching “fixies”. And after watching the series about “Plasticine”, they came to the kitchen with a question:
- Mom, can we make plasticine? To do this, you only need one glass of flour, half a glass of salt and half a glass of water. That's what they said on the fixies.
I could not refuse such a creative endeavor and the process was in full swing. It was before the New Year, so the theme of the toys was New Year's.
Christmas tree, New Year's toys made from salt dough - children's master class:
 1. First of all, the children kneaded the dough themselves. Mix all ingredients in a bowl. We took the proportions exactly as the fixers said:
- 1 cup flour
- 0.5 cups salt
- 0.5 glasses of water
 2. Then they rolled out the dough into a flat cake.
 3. While the children were rolling out the dough, I prepared a paper stencil in the shape of a Christmas tree for them. They very carefully traced and cut out this stencil using stacks.
 4. In the process of making Christmas tree decorations from salt dough, I remembered about cookie cutters. The children really liked this idea, and they quickly made different figures from the dough: bells, Christmas trees, cones, stars, etc.
It’s easy to work with molds and the result is always pleasing, so in this version this activity is suitable even for children from 3-4 years old.
 5. We also tried to make colored salt dough by adding watercolor paint to it. To do this, simply dripped a little water into the paint, stirred it with a brush and poured the colored water into the dough. This was also mentioned in the cartoon.
 6. All the figures were left to dry overnight near the radiator.
 7. And in the morning, the children, not having had time to fully wake up, were already rushing to their New Year's dough toys to decorate them. Painted with simple watercolors. I also found some rhinestones in my stash - they made great decorations for the Christmas tree decorations.
To make the paint dry faster, the eldest son turned on the fan and directed the air flow onto the painted toys. They were painted on both sides.
 8. When the paint had dried, the children had fun decorating the Christmas tree themselves with their New Year's toys made from salt dough.

 9. It turned out very beautiful. And the manufacturing process was pleasant and joyful. This year our Christmas tree is especially beautiful, because almost all the toys on it are made by ourselves.
And I wish you pleasant creativity with your children.
Subtleties in making New Year's Christmas tree decorations from salt dough:
1. It is better to use finely ground salt for the dough so that there are no salt grains on the finished figures.
2. Make Christmas tree toys from salt dough with your children, preferably on a large table, where there will be nothing superfluous. After finishing the figurine, it is better to immediately place it on a large flat dish or a piece of thick cardboard to make it easier to transfer to a drying place. For example, on a window or next to a battery. If you dry it in the oven, then the figures should be immediately placed on a surface covered with foil.
3. New Year's toys made from dough can be whole, or made from several components. The parts are held together well if they are slightly moistened with a wet brush.
4. To make holes in toys, you can use pasta of the required diameter, pen caps, cocktail straws and any other available materials.
5. You can color salt dough food coloring, gouache, watercolor, acrylic, glitter (shiny paints).
7. To dry salted Christmas tree decorations, you can:
- just at room temperature(but it may take 2-4 days).
— near the battery (1 night for flat figures)
- in the oven at 50 degrees. (few hours)
New Year decoration can be made not only from dough, but also, etc.
Master class with step by step photos“New Year's gifts” using the salt dough modeling technique.
Author: Daria Galanova, 9 years old student of the municipal budgetary institution of pre-school and youth education, association “Salty Fantasies”, MillerovoTeacher: Tatyana Nikolaevna Nazarova, teacher additional education MBU DO DDiU Millerovo

The master class is very simple in terms of complexity, perhaps it will be useful for kindergarten teachers of older and older children. preparatory groups. In this case, you can cut out snowmen and mittens from the dough in advance. Dry them, and during the lesson ask the children to make the rest of the molds. The master class will also be interesting
for everyone who loves to sculpt salt dough. Make gifts for friends and loved ones. As well as additional education teachers, primary school teachers, teachers of extended day groups.
Purpose: New Year gifts.
Target: creating New Year's gifts using the salt dough modeling technique.
Tasks:
Educational: master the technique of making gifts from salt dough;
Educational: develop accuracy in modeling and artistic thinking;
Educational: encourage the desire to give new Year gifts made with my own hands;

Required material:
Paper napkin, glass, glass of water, “Extra” salt, flour premium, cut out for dough “snowman” 10.5 x 6 cm, photo frame, colored paper, floral mesh “snow”, “small mitten” 5 x 2.5 cm cocktail tube, ballpoint pen without paste, rolling pin, simple pencil.
Salt dough recipe:
Combine 1 cup flour and 0.5 cup salt. Stir, make a well. Gradually pour in 1 glass of cold water in a thin stream. Knead it tight elastic dough. Store the dough in a cellophane bag.
Recipe for "snow"
In a small saucepan, combine 2 tablespoons water and 1 teaspoon potato starch. Stir and place on low heat. Stir constantly while doing this. As soon as the mixture becomes transparent, remove it from the stove and immediately add 1 cup of Extra Salt. First, use a spoon, and once the mixture has cooled slightly, you can stir with your hands. The snow is ready. Place it in a plastic bag and seal tightly. It is important that no air enters the bag.
Progress:

Roll out the dough to a thickness of 5-7 mm. Use a cookie cutter to cut out the “snowman” and place on a paper napkin.

Mark the eyes with a pencil, push the mouth with a stack. Use a stack to make a mark for yourself where you will glue the snowman’s hat.

Form a flat cake from a small lump of dough. Cut it in half. Moisten the snowman's head with water and glue on the hat. We glue all the elements of the composition together cold water. Roll up a small, thin flagellum and glue it to the hat. We are making a fur hat. Form a ball from a small lump and glue a bell.

Form a very small carrot and glue a nose on the snowman.

Roll up a thin rope and glue a scarf on the snowman.

From small, identical lumps, form two lumps similar to beans and glue the legs.

Using a ballpoint pen without paste, press the buttons down the center of the snowman.

Form a gift box from a lump the size of a large plum and glue it onto the snowman’s hand. It turns out that the snowman is holding a gift in his hands. Glue the gift tightly so that after the craft dries, it does not fall off.
The snowman is ready, let's start sculpting the mittens.

Roll out the dough to a thickness of 3-4 mm. Cut out two small mittens.

Stack the cuffs on the mittens. Use a cocktail straw to make holes.

Make a very small snowman on one of the mittens.

Glue the Christmas tree and toy balls onto the second mitten.
We made the mittens so quickly.
Place the snowman and mittens on a sunny windowsill. Crafts dry in air for about 5-7 days. Although the mittens will certainly dry in a couple of days, since they are not as bulky as a snowman.
The crafts are dry. Paint them with paints and cover them with glossy varnish.
We glue the snowman into a frame and decorate it with glitter. Spread a layer of PVA glue under the legs of the snowman, put “snow”. Compact it lightly. Once the glue dries, the “snow” will stick firmly. This “snow” can be stored for a couple of days in a plastic bag.
The snowman is ready.
Thread the ribbon into the mittens. Decorate with glitter
Gifts for the New Year are ready.


Happy New Year!
