Description
Dry salting of lard is the simplest and most common, and also the most delicious, method of preparing lard with your own hands at home for future use. Recipes for salting lard always remain relevant and are passed down from generation to generation, changing slightly in accordance with the realities of the time.
The simplest and most delicious is salting lard with the addition of garlic, ground black pepper and herbs. Lard salted in this way is an excellent preparation for smoking, since the lard remains dry, is salted evenly and strictly to the norm - dry salted lard does not absorb excess salt.
Lard prepared at home by dry salting always turns out tasty and very tender, and it can be made in a jar, in a saucepan, in a deep bowl, or in a bag - the product does not require any special conditions. After salting, lard retains its taste for a long time, and can be stored either in the freezer or refrigerator, or rolled up for the winter in sterile bottles or jars on the shelves of a pantry or basement.
Lard is perfect for preparing simple and nutritious snacks: it can be served cut into slices or strips with homemade borscht, or it can be ground with garlic and fresh herbs, and used in the form of a kind of paste with baked potatoes. It's so delicious you'll just lick your fingers!
It has long been noticed that everything prepared with your own hands with love turns out thousands of times tastier. Without effort and a lot of experience, using the proposed detailed recipe for making salted lard and step-by-step photographs, you will learn how to salt real village lard, the taste of which will not leave anyone indifferent, and the aroma will spread far beyond the kitchen, and no one will be able to sneak to the refrigerator.
Ingredients
Dry salting of lard - recipe
Let's start salting lard at home. First, let's prepare the dishes in which we will salt the lard. This can be an ordinary enamel pan, always without chips, or a stainless steel pan. The container should be deep enough so that the amount of lard occupies no more than 2/3 of its volume. Measure out the amount of salt indicated in the recipe. Please note that high-quality salting of lard using the dry method can only be achieved by using ordinary coarsely ground kitchen salt, and in no case iodized salt. Wash the pan in warm water and soda, then rinse thoroughly and leave to dry, turning it upside down. We will also rinse and rinse the bottle and the plate that fits easily into the pan - they will act as a weight. Let's fill a bottle with clean cold water and start preparing the garlic. In order to easily clean it, we’ll resort to a little trick: put the whole heads in a deep bowl and fill with cold water. After fifteen minutes, add salt to the water, divide the heads into cloves, and, using a sharp knife with a short blade, peel the garlic without much effort and the peels sticking to your hands and the knife. Cut the peeled garlic cloves into slices two to three millimeters thick, such as those shown in the photo. Let's prepare the bay leaf: rinse it in running water and dry it, spreading it in one layer on a napkin.

Fresh lard that has not been frozen is suitable for salting. The best option would be a piece of so-called village lard, the skin of which is tarred with straw and easily comes away from it when pulled and is quite thin. Experienced chefs choose lard for pickling based on smell. Choose the thickness of the lard at your discretion, but keep in mind that lard, the thickness of which is about five centimeters, is best suited for dry salting, and it is very good if it has streaks of meat along the top of the piece, and not inside it - such lard It will definitely be softer. The best pieces for pickling are those taken from the back and back of the carcass. The pieces of fat on a pig's belly are always tougher and have a non-uniform structure - such fat stretches behind the knife when cut. It is not recommended to wash lard before dry salting. The optimal solution in preparing the product for salting is to scrape it with a knife and then wipe it with a clean and dry cotton napkin.

Let's cut a piece of lard into strips, the width of which is equal to the height, such that when subsequently cutting, the plates of the finished lard have a shape close to a square - this is not a whim, this is an important condition that facilitates the uniform salting of lard at home with dry salting, and the key to obtaining the best result . After this, we will make cuts across these strips, as shown in the photo. Place a handful of salt on a clean, dry cutting board and then spread it out a little. Roll a piece of lard over the salt and sprinkle a little more into the cuts. You will get blanks as in the photo.

In each cut of the prepared pieces of lard, put one bay leaf and several slices of chopped garlic.

On the bottom of a dry and clean pan we place bay leaf, garlic slices and ground black pepper, as well as chopped dry dill, but the last component is optional.

Place lard on top of the improvised spice bed, pressing the lard strips together as tightly as possible. The best way to lay lard for salting using the dry method is to lay out the pieces on the skin. Be sure to put chopped garlic and bay leaf on top of the tightly laid strips, and then sprinkle generously with ground black pepper and dry dill. We must repeat this operation for each layer until the lard prepared for salting is completely laid. After laying the final layer of lard, place a plate or a suitable-sized lid on top of it, or, best of all, a wooden blank such as a round cutting board. The load will be a 3-liter jar of water, which has already warmed up a little, so before installation, be sure to wipe off the condensation that appears on the surface of the bottle.

Leave the pan with lard in this position for several days. On the second day, turn all the pieces of lard on their side, on the third - skin side up, on the fourth - on the other side. It is impossible to say specifically how long it takes to salt lard using the dry method (salting) - it all depends on the thickness of the pieces of lard, but on average, five days is enough. During the salting process, you will see that the lard will turn pink and the garlic slices will turn light green. This is not an anomaly - this is a normal process, the end of which, that is, the complete readiness of the most delicious home-made dry-salted lard, will be the acquisition of snow-white color by the pieces.

It is recommended to freeze the finished lard in the freezer, well packed in parchment paper, but be sure to scrape off excess salt before placing it in it. There is an opinion that salt and the freezer are incompatible, and the equipment breaks down faster. Who knows, but it's better not to risk it. Ready lard can be successfully prepared for future use by sealing the pieces, freed from bay leaves and garlic, but with remaining salt, into cooled, clean, sterile jars with a lid for long-term storage. Lard can be consumed immediately after salting; this product is best combined with bread made from rye flour, generously greased with adjika or freshly prepared homemade mustard.

1. Prepare a piece of salsa for salting.
2. Mix salt and spices in a bowl. There are special kits specifically for salting lard, but if you don’t have such kits in your bins, then you can get by with ground pepper (take a simple black one and a pinch of allspice, don’t forget about the red one), and coriander. For color you can add turmeric and paprika. 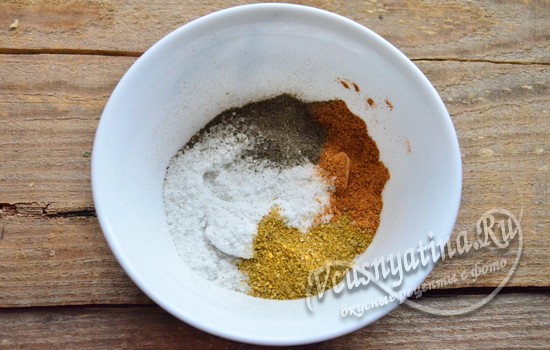
3. Place lard on cling film or cellophane. Spread the piece thoroughly on all sides with salt and spices. You do not over-salt the lard; it will absorb as much salt as needed. 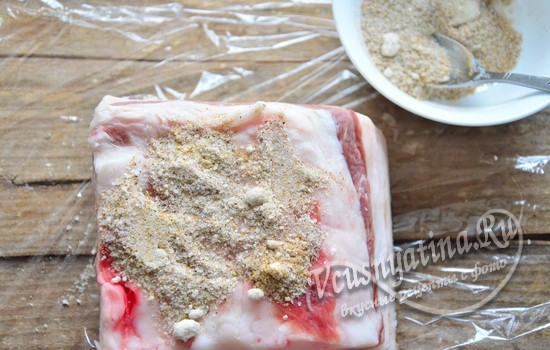
4. To make the lard salt better and faster, use a thin long knife to make punctures in it. Rub the salt and spices so that it gets into these cuts. 
5. We don’t need banks here. Wrap the lard in cling film. Place it in a warm place, but not near a radiator or heater. Let the salsa “rest” for a day in the room, and then hide it in a secluded, cool place. 
6. Salted lard according to this recipe can be tasted after 3-4 days. But, as mentioned above, the longer it sits, the tastier it becomes, imbued with the aroma of spices. 
7. Before cutting the lard for lunch, take a piece and clean it with a knife to remove excess salt and spices. You can even wash the piece, then dry it and cut it into thin slices. You can store lard in spices in the freezer. Even frozen, it slices perfectly and thaws almost instantly.
There are dozens of recipes for how to deliciously salt lard at home: dry, in brine, in a jar, etc. Perhaps the simplest option is dry salting, when the pieces are generously sprinkled with salt, pepper and other spices. Garlic is usually used as the main flavoring agent, which is rubbed, stuffed, or simply layered to give the lard a special aroma and piquant taste.
Which lard to choose for dry salting?
For dry salting, take thick lard, as they say “4 fingers long,” that is, 5 centimeters thick. A thin one is not suitable, as it will take in much more salt than needed and may turn out too salty and not as tasty as you would like.
At your discretion, you can salt a piece with layers of meat or a clean piece without a slot (as in my recipe with photo). But there is one important point here. Both types will be salted wonderfully, but lard without streaks can be stored in the refrigerator for much longer, up to 1 month. But if the piece contains layers of meat, then after salting it will have to be eaten much faster, in about 5-7 days. Or you can increase the shelf life if you send the already salted lard to the freezer - there the strategic reserve can be safely stored “until required”, up to 1 year.
Salt-spices-garlic
So, a simple recipe for salting lard includes salt, spices and a few cloves of garlic. If you don't like any of the spices, feel free to cross it off the list. As for garlic, with the salting method described below, its taste will not be strongly felt, only a slight aroma will remain.
It is no coincidence that I suggest layering garlic cloves in a container (rather than grating lard or stuffing it with garlic). And all because this way it can be stored longer, because in the freezer it will not go rancid, the taste of spices will remain, without the unpleasant “rot” aroma.
BUT. If you still like garlic to play first fiddle, you can enhance its presence by grinding it through a press (paradoxically, for a brighter aroma of garlic you need to take half as much of it, that is, only 2-3 cloves!) and Rub the pieces on all sides until coated in spices. Then the lard will actually turn out more spicy, but I don’t recommend storing it for a long time; it’s better to prepare a small portion and eat it as soon as possible.
Recipe Ingredients
- raw lard 500-700 g
- non-iodized salt 4 tbsp. l.
- ground black pepper 1 tbsp. l.
- red pepper 0.5 tsp.
- ground paprika 1 tsp.
- cumin 1 tsp.
- rosemary 0.5 tsp.
- garlic 5-6 teeth.
- bay leaf 2 pcs.
How to dry-salt lard with garlic

The finished salted lard remains to be cut into thin slices and you can take a sample! Before slicing, I recommend carefully scraping the salt from the surface, leaving the garlic. This is such an appetizing appetizer - lard with spices is spicy and very aromatic, ideal with black bread and pickled cucumber. Store it wrapped in paper in the refrigerator or freezer.
Lard is considered the simplest and most authentic topping for a sandwich, as well as a snack for strong alcohol. Some say that thin slices of lard, generously seasoned with pepper, go well even with beer. You can check this statement after you try our techniques for preparing dry-salted lard.
Recipe for dry salting lard with garlic
Nowadays, salting lard is as easy as shelling pears, and all thanks to the fact that universal spice mixtures have appeared on the markets, designed specifically for preparing salted lard. We intend to use them in the following recipe.
Actually, you don’t have to remember any proportions or specific recipes. Take a piece of lard, defrost it, if necessary, rinse it and dry it very thoroughly. Prepare the head of garlic by peeling the cloves and pureeing them in a mortar. Take a mixture of pickling spices and combine with garlic paste. Rub the pieces of lard with the resulting paste and place them in any enamel bowl, covering the bottom with the last layer of coarse salt. The surface of the pieces of lard is also sprinkled with salt, and the amount can be approximate; the lard will still not take on excess. How long to salt lard using the dry method depends on the thickness of the pieces, but on average, 3-5 days will be enough for good salting. Some people prefer to salt lard for 2 weeks at a time, in which case a lot of excess moisture comes out of the piece and the product turns out more dense.
Dry salting of lard in a jar
If you prepare pickled greens for the winter, you can also use them to make lard. The same rule applies here: put in more, the fat won’t take on too much.
After preparing the lard, divide it into 10 cm pieces. Grind the garlic cloves into a paste and mix the resulting paste with the pickled herbs. Pour salt into the bottom of the jar and begin laying out pieces of lard in layers, additionally sprinkling a small amount of salt on each of them. There is no need to compact anything; let the lard lie more or less freely. Now place the jar in the refrigerator and wait about 5 days. After removing excess salt from a piece, the product can be eaten immediately, or can be frozen by wrapping it in parchment.
Dry salting of lard with spices
If you don’t buy universal spice mixtures, you can make them yourself, and vary the composition of the spices to suit your taste.
Ingredients:
- lard - 1 kg;
- salt - 220 g;
- laurel leaves - 5 pcs.;
- black pepper (peas) - 1 teaspoon;
- garlic cloves - 6 pcs.;
- - 4 buds.
Preparation
First, a piece of lard is prepared according to the usual procedure: peeled, washed, dried and cut into squares. A deep but small cut is made in each piece and stuffed with thin slices of garlic. The bottom of the selected dish is covered with parchment and half of the lard is placed on it, skin side down. Next, rub the pieces of lard with salt on top and sides, and then sprinkle everything with freshly ground pepper and cloves. We distribute the laurel leaves on top. Cover everything with the remaining half of the lard grated with salt, placing it skin side up.  Wrap everything in parchment and leave the lard to salt in the cool place for 2-3 weeks.
How to salt lard correctly and quickly using the dry method?
Let’s say you were planning to cook, but realized that you don’t have tasty salted lard on hand, in which case you will need an express salting recipe in 5-6 hours. For it, thin pieces of lard are rubbed with garlic paste, freshly ground pepper and fine salt (not iodized). Wrap the salted pieces in film or put them in a bag, and then leave them at room temperature. After 5-6 hours, the lard can be cooled and tasted.
