I already wrote once that regular sponge cake I don’t like it at all where it contains only flour, sugar and eggs. It reminds me of scrambled eggs, with its bright aroma. Therefore, I was constantly looking for other options for myself. And if with chocolate biscuit I decided almost immediately (more precisely, I have 3 options in my favorites, each is good in its own way - this is, and all the links are active, click on the desired line and you will be taken to the page with the recipe). Things were worse with regular vanilla, and it seemed that good recipe-, but there you need to carefully separate the whites from the yolks, beat it all separately, and then mix it very carefully. In general, this is an option that you need to tinker with, and for beginners it may not work (although the result is also good, be sure to try it, maybe you will like it more).
This same recipe for beginners is just a godsend! It will save you not only time, but also your nerves) There is no need to separate the yolks from the whites, the eggs are beaten whole, and you don’t have to wash a mountain of dishes, since everything can be done in two containers.
So how to make it simple vanilla sponge cake for a cake at home, a recipe with photos step by step.
Ingredients for a 18-20 cm pan:
- 4 first grade eggs (I have 3 large ones here)
- 180 gr. Sahara
- 170 gr. flour
- vanilla sugar packet
- 1 tsp baking powder
- 3 tbsp. vegetable oil (any odorless oil will do)
- 3 tbsp. boiling water
Preparation:
All ingredients should be at room temperature. Place the eggs in the mixer bowl and beat at high speed for 5 minutes. The mass will noticeably increase in volume and lighten.

Then, without stopping whisking, add sugar in 3 additions, each time taking a break of a minute so that the previous portion has time to dissolve.

After all the sugar has been added, beat for another 5 minutes. The mass should increase well in volume and hold its shape well.
While the eggs are beating, mix the flour and baking powder.

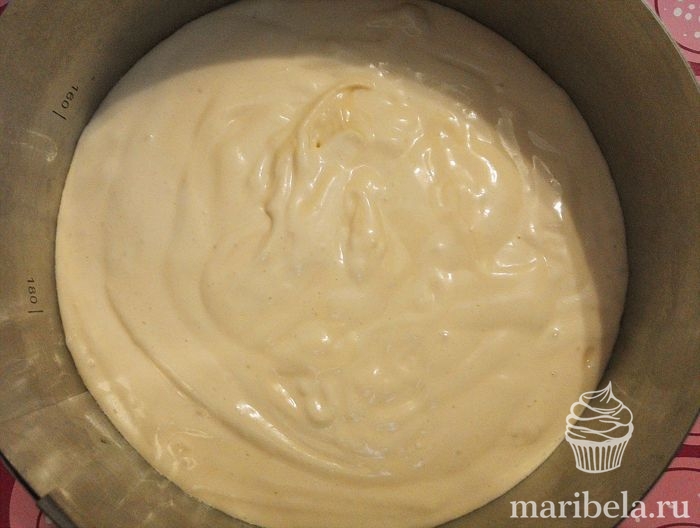
Sift the flour into the beaten egg mass and mix with a silicone spatula using gentle folding movements, trying to preserve all the fluffiness of the eggs. At this stage the dough is thick, don’t worry, that’s how it should be.


Pour into the prepared form. I have a split ring, I lined the bottom with foil and pressed it tightly so that the dough does not run away. I don't lubricate the sides with anything. If you don't have a ring, line the bottom of the pan with baking paper.
We send our mold to a preheated oven and bake at 180º for 30-40 minutes. From 20 minutes you can check the readiness, all ovens are different, use a dry match as a guide! It usually takes me about 37 minutes.

Ready-made sponge cake without removing it from the mold, turn it upside down, placing 2-3 cans for support. In this state it should hang for 10-15 minutes, thanks to this it will not settle.

After 15 minutes, the biscuit can be removed from the mold. My advice is to immediately wrap it in film and put it in the refrigerator without waiting for it to cool completely. This way, all the liquid will remain inside the biscuit and it will become much juicier. The cake should reach the desired consistency in the refrigerator, this takes 6-8 hours, but it is better to leave it there overnight.

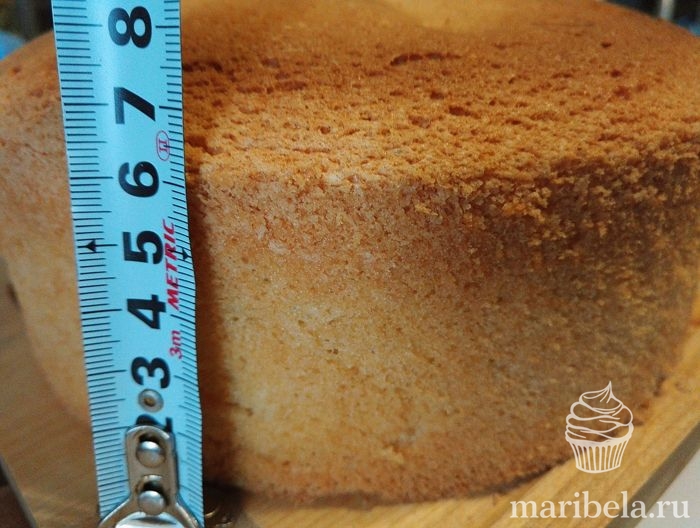
After this time, we take it out and cut it into the number of cakes we need. I ended up cutting it into 4 pieces. Look how soft and porous it is inside.

This is such a tall handsome man obtained from this recipe. From just 4 eggs (in my case 3), the cake was almost 7 cm high and 19 cm in volume.
And this is what it looked like in the cake. Due to the presence of oil and boiling water in the composition, this biscuit requires a minimum of impregnation. It produces a thin crust that doesn’t need to be trimmed.

This cake had “3 milk” impregnation (recipes are active via links) and bananas in a layer (in next time I would replace it with for fuller taste). The cake turned out to be very tender and light, the vanilla sponge cake itself is weightless, and in addition with such a light cream (without butter) the cake is simply heaven for those who are tired of fatty, oily desserts.
If you want to bake a sponge cake in a mold of a different size, then in this article I wrote in detail how to count all the ingredients -.
Enjoy your meal.
Well, what could be easier than baking a simple sponge cake? Probably, many of you will not agree with me, because only an experienced housewife can prepare a fluffy sponge cake. And partly you will be right. There are many nuances and subtleties in preparing classic baked goods, which will be discussed in this article.
I baked my first “sponge cake” at the age of 12, and what I took out of the oven looked more like an omelette than the cake crust I had imagined. In those distant times there was no Internet, cooking shows or magazines with colorful step by step recipes. There was only my mother's notebook with a list of ingredients and a short description of the process. And then no one really knew how to cook it, not my mother’s friends, not my friends, and especially my grandmother, who is only my friend with yeast dough.
Recipe verified down to the gram and clear proportions
But over twenty years, I finally learned how to bake a real biscuit, thanks to a series of experiments and personal experience. And it is this recipe that I always give to my friends and relatives, and I will also pass it on to my still little daughter.

Friends, there will be a lot of text below, so please be patient, and I promise you that your first sponge cake will turn out fluffy, airy, and incredibly tasty. As you can see in the photo, the cake can be cut into three parts.
List of ingredients
- 5 eggs
- 1 cup of sugar
- 1 cup flour
- 1 pinch of salt
Additionally:
- vegetable oil for greasing the mold
- baking dish with a diameter of 28-26 cm.
- glass 250 ml.
Cooking instructions
Prepare two comfortable and deep bowls in which it will be convenient to beat with a mixer. Make sure that there are no drops of water in the bowl in which you will beat the whites; the bowl should not only be dry, but also fat-free. Even a drop of fat will spoil the biscuit. Therefore, make sure in advance that the bowl for proteins is dry and fat-free.
Now the most exciting part of the process: we need to separate the whites from the yolks. Carefully separate the whites from the yolks, and make sure that not even a small drop of yolk gets into the whites. As I wrote earlier, fat from the yolk, even in small quantities, will interfere with whipping the whites. If you do not have experience in separating yolks from whites, then it is best to do this over a separate plate. If you spoil one protein, the overall protein mass will not be affected.
Now add half the sugar to the yolks.

Beat the yolks with sugar with a mixer until the sugar is completely dissolved and set aside.

Cold proteins are the key to successful baking
One of the most important rules preparing a sponge cake - the whites must be cold, otherwise they simply will not beat. If you did not have time to cool the eggs in advance, then place the bowl with the separated whites in the freezer for 10-15 minutes, where they will quickly cool. Add a pinch of salt to the chilled whites.

Beat the egg whites and salt with a mixer high speed into a lush foam. At this stage it already becomes clear whether the biscuit will turn out or not. If the whites are whipped into a beautiful foamy head, then everything is fine, we can move on. Gradually add the remaining sugar to the whipped whites and continue beating the whites until the sugar is completely dissolved.


No sudden movements!
Gradually add the whites to the yolks beaten with sugar. This must be done very carefully so that the biscuit mass does not shrink, at the lowest speed of the mixer, but it is better to stir clockwise with a spoon to be sure.

We do the same with flour, which needs to be sifted in advance. Add flour to biscuit dough one tablespoon at a time, and mix gently at the lowest speed of the mixer, or with a spoon.

"French Shirt"
Next, let's prepare the biscuit pan. We don’t need surprises, so we even grease the pan with a non-stick coating vegetable oil using a brush or your hands and sprinkle with flour. Excess flour needs to be shaken off. By the way, I only recently learned that this method of processing a mold before baking is called a “French shirt.”

Pour the biscuit dough into the mold and bake in a preheated oven.

How to bake in the oven
If you are cooking for the first time, you will probably ask me at what temperature to bake a biscuit in the oven? I answer: in the case of biscuit dough extremes are not needed, the golden mean is 170-180 degrees. Bake for 30-40 minutes. The grille position is in the middle. Do not forget that you cannot open the oven for the first 25 minutes, otherwise the biscuit will not rise.
Check the readiness of the baked goods with a wooden toothpick or skewer. If the toothpick is dry and the biscuit is browned on top, then the baking is ready. You cannot immediately remove the pan from the oven, because it may fall. Turn off the oven, open the door halfway, and leave until the oven cools.

Remove from the oven, remove from the pan and transfer to a plate. After cooling, the finished biscuit falls a little, and the surface wrinkles, but still remains fluffy and airy.

Well, that’s all friends, I hope I didn’t confuse you too much. As you can see, there is nothing complicated in preparing a classic sponge cake. The main thing is to follow all the above recommendations, and you will certainly succeed.
In what oven should I bake the biscuits? Both electric and gas ovens are suitable for baking. In an electric baking oven, turn on top and bottom heat without convection. The grille position is in the middle. For gas oven, turn on only the bottom heating, the position of the grill is also in the middle and without convection.
Which oven should I put the biscuits in? To get a guaranteed result - perfect sponge cake, the form with the dough must be placed in a preheated oven. But more than once I put the form with the dough in cold oven, and the biscuit rose perfectly. Therefore, if you are at a crossroads about putting a biscuit in a hot or cold oven, it is better to choose a hot one.
Why doesn't the sponge cake rise in the oven?
The oven seal is broken. This feature is typical for old Soviet ovens. Over time, the rubber seals dry out, allowing foreign air to enter the oven while the cake is baking. If you have a modern gas or electric oven, then there is nothing to worry about.
Do not open the oven with a biscuit for the first 25 minutes. The biscuit will settle in the oven if you open the oven door early. Set an alarm clock for yourself, or watch through the glass as the dough rises in the mold and the top browns.
Added too much flour. Flour should be added to the dough not by eye, but according to the recipe. There are very simple proportion for the sponge cake: 1 tablespoon of flour for 1 egg. In my recipe, this proportion is maintained: 5 tablespoons of flour are placed in a 250 gram glass. This proportion will be useful if you want, for example, to bake a sponge cake for 7 or 9 eggs. The same proportion applies to the sugar in the recipe.
Didn't sift the flour. If you are baking a biscuit for the first time, then you should not ignore this stage. Be sure to sift the flour to enrich the dough with oxygen, because classic baking It is prepared without soda and baking powder, so oxygen comes in handy here.
Using domestic eggs. The yolks in homemade eggs are always higher in fat than in store-bought eggs, so for best result, I always bake with eggs from the store.
Classic sponge cake recipe
4.8 (95.56%) 18 votesIf you liked the recipe, put stars ⭐⭐⭐⭐⭐, share on social networks or write a comment with a photo report of the dish you prepared. Your reviews are the best reward for me 💖💖💖!
The dessert will definitely turn out right the first time if you strictly follow the proportions of the ingredients and step by step actions simple recipes very tasty sponge cake.
Sponge cake - a simple classic recipe
Based on biscuit prepared traditional way, you can prepare a wide variety of cakes.

Ingredients:
- 4 eggs (as fresh as possible);
- 120 g granulated sugar;
- 100 g quality flour;
- 20 g corn starch.
Cooking method.
- The yolks are separated from the whites. This is easy to do: you need to carefully split the shell in half over a cup and pour the contents from one half to the other several times. The white will drain into the container, and the yolk will remain in the shell.
- Beat the yolks with 80 g of sugar until the mass thickens.
- In a separate bowl, foam the whites with a mixer, add the remaining sugar and beat further for a minute. The mass will be dense and shiny.
- Combine the protein and yolk compositions.
- Sift the flour and combine it with starch. You can do without this ingredient, but the starch will take away excess moisture from the baked goods, making the sponge cake more tender and fluffy.
- Add flour to beaten eggs, mix for 5 seconds, moving from the edge of the cup to the middle of the dough.
- Check the readiness of the dough with your hands: if there are lumps, knead them with your fingers.
- Preheat the oven to 200° C. Cover a mold (it’s better to take a springform pan) with parchment or sprinkle with flour. Pour the dough so that it is evenly distributed along the bottom.
- The biscuit is baked for 25 minutes. Its readiness is checked by appearance and, piercing with a toothpick: there should be no sticky dough on it.
- The baked biscuit is left unplugged open oven for 12–15 minutes. Then it is taken out and left to cool.
- To make the biscuit easier to cut, you can wrap it cling film and put in the refrigerator for 40 minutes.
- The cooled sponge cake is cut lengthwise into 3-4 layers using a wide knife.
For simple classic cake Oil cream will do.
Ingredients for the cream:
- 400 g butter with a fat content of 82.5%;
- 400 g condensed milk;
- 40 g powdered sugar;
- 1 g vanillin.
Recipe.
- The oil is softened under normal conditions.
- Add powdered sugar and vanillin, which will smooth out the taste of the oil.
- Beat all ingredients with a mixer until a dense white mass is obtained.
- Pour in condensed milk and beat again.
- The resulting cream is coated with all the cakes.
Helpful advice: a layered cake prepared according to any recipe must be left in the refrigerator to soak for 4–5 hours.
With custard
Thanks to the cream, this cake recipe will be especially light and very tasty. The biscuit for it is prepared in the classic way.

Required composition for cream and impregnation:
- 1 egg;
- 0.5 l of milk;
- 125 g sugar;
- 40 g flour;
- 100 g butter;
- 200 ml water;
- 20 ml lemon juice.
Actions.
- Grind the egg, 100 g of sugar and flour.
- Place everything in a saucepan, add milk and stir to break up the lumps.
- The pan is placed on low heat, the contents are constantly stirred until it begins to boil, then immediately turned off.
- The resulting cream is cooled at room temperature.
- For impregnation, sugar is poured with water and boiled until thickened. Add lemon juice.
- Sponge cakes are first greased sweet water, then coated with cream.
Cooking with sour cream based impregnation
Sponge cake with sour cream It turns out tasty and juicy. It soaks in perfectly, so you don’t need to let it sit for a long time. Used as a basis classic sponge cake.


Ingredients for the cream:
- 800 g sour cream;
- 200 g powdered sugar;
- 1 g vanilla.
Actions.
- Powder is slowly poured into the sour cream, stirring constantly.
- Add vanillin and mix.
- Assemble the cake, coating the resulting cream on the sponge cake layers.
- It is enough to leave the sour cream biscuit in the refrigerator for just an hour for soaking.
With curd cream
Sour cream sponge cake with cottage cheese-based cream turns out very delicate and refined. Once you make this dessert once, you will return to this recipe again and again.

Products for the base:
- 5 fresh eggs;
- 100 g margarine;
- 100 g fat sour cream;
- 120 g sugar;
- 220 g flour;
- 10 g baking powder.
Cooking method.
- Separate the whites and yolks. Beat the whites with a mixer into a fluffy foam. The yolks are ground with sugar.
- Margarine and sour cream chopped with a knife are added to the sweet yolk mixture.
- Combine both mixtures. Beat with a mixer for 2 minutes.
- Sift the flour twice and add baking powder.
- The dry mass is added in parts to the first composition and beaten with a mixer at the slowest speed.
- The dough is transferred into a mold and baked for 35 minutes at 180° C.
- After the baked biscuit has cooled, it is divided lengthwise into 3 parts.
Ingredients for cream:
- 200 g butter 72.5%;
- 250 g of fresh non-grain cottage cheese with a fat content of 9%;
- 350 g powdered sugar;
- 1 g vanillin.
Cooking process.
- The butter is softened, combined with cottage cheese and vanilla. To make the composition homogeneous, beat the ingredients with a mixer on minimum setting for 1 minute.
- Powdered sugar is introduced into the resulting mass in parts, stirring constantly with a spoon.
- In conclusion curd cream For the sponge cake, beat again with a mixer until it becomes fluffy. Ready cream coat all the cakes.
A simple and delicious honey treat recipe
Honey-based sponge cake is aromatic and very delicious dessert, which even a novice cook can prepare.
For honey cake cream will do from butter and condensed milk, sour cream or cream.

Ingredients:
- 4 eggs;
- 230 g flour;
- 180 g sugar;
- 60 ml liquid honey.
Sequencing.
- Beat the whites with a mixer until they form a strong foam, add sugar and continue beating.
- Beat the yolks into the sweet mass and stir again with a mixer.
- Add honey and beat until smooth.
- The sifted flour is introduced in parts, while the mixer speed is reduced to a minimum.
- The biscuit is baked for about 40 minutes in an oven preheated to 180°C.
Chocolate sponge cake
This dessert will delight you with its extraordinary aroma and freshness. Chocolate cakes better to soak thick cream from sour cream.
Required Products:
- 4 eggs;
- 120 g flour;
- 160 g sugar;
- 40 g cocoa powder;
- 6 g baking powder;
- 3 g salt.
Recipe.
- The egg whites are cooled in the refrigerator.
- Beat the yolks with 80 g of sugar with a mixer for 5 minutes.
- Cold whites are salted and beaten with a mixer, gradually adding the remaining sugar.
- Both masses are combined and stirred with a mixer on low.
- The flour is combined with cocoa and baking powder and only then sifted.
- The dry mass is added to the beaten eggs.
- The chocolate dough is poured into the mold. Bake at 180 degrees for about 40 minutes.
- The finished sponge cake is cooled, cut into 2-3 layers and soaked in cream.
With cream cheese cream and peaches
Cake with amazing taste will definitely lift your spirits! You should use a classic sponge cake as a base. Both fresh and canned fruits are suitable for cooking.

Ingredients:
- 0.5 kg of cottage cheese;
- 50 g of peach jelly powder;
- 350 ml fat milk;
- 400 ml natural or peach yoghurt;
- 50 g gelatin;
- 0.5 kg of peaches;
- 250 g sugar;
- 1 g vanillin.
So let's get started.
- Gelatin is allowed to swell in milk for 30 minutes.
- Beat cottage cheese, yogurt, sugar and vanillin.
- Peaches are cut into pieces or slices.
- The gelatin mass is slightly heated and mixed with the curd. Half the peaches are added here. Stir.
- The resulting mass is spread onto the cakes and leveled. Place the biscuit in the refrigerator for 2 hours.
- Dilute peach jelly according to the instructions.
- The cake is taken out of the refrigerator. The top cake is decorated with the remaining pieces of peaches, and the prepared jelly is poured on top.
With a layer of whipped cream and strawberries
The cake according to this recipe turns out beautiful and unusually tender. Prepared on the basis of a classic sponge cake.

Products:
- 600 ml cream (fat content from 33%);
- 250 g powdered sugar;
- 300 g fresh strawberries;
- a bag of jelly (with strawberry or neutral flavor).
Ingredients for impregnation:
- 200 g strawberries;
- 250 ml water;
- 40 g sugar.
Cooking steps.
- Using a mixer, beat the cream with powder until a dense mass is obtained.
- Some strawberries are cut into slices. A few whole berries are left for decoration.
- Strawberry impregnation for sponge cake is prepared as follows: the berries are passed through a juicer, the cake is combined with water and sugar and boiled for 5 minutes. The mass is filtered and added Strawberry juice, then boil again for 2 minutes. Cool and soak the cakes.
- Spread on each cake butter cream and add chopped strawberries. The top of the cake is decorated whole berries and pour the prepared jelly from the bag.
Today we offer classic recipe fluffy sponge cake, which is suitable for making various cakes and other desserts. There is no soda or baking powder here - the dough rises well due to the proteins whipped into an “airy”, strong mass.
This sponge cake can be divided into 2 or 3 layers and coated with any sweet cream, or cut into cubes and used in the formation of cakes like “.” The biscuit turns out very soft, tender and tasty. However, there are some nuances in the cooking process, which we will discuss below.
Ingredients: 
- eggs - 6 pcs.;
- sugar - 200 g;
- flour - 160 g;
- vanilla sugar - 1 sachet (10-12 g);
- butter (for greasing the mold) - 5-10 g.
Classic recipe for fluffy sponge cake with step-by-step photos
How to make biscuit dough
- Carefully separate the whites from the yolks and place in a clean and dry bowl. Beat at minimum mixer speed until light white foam is obtained. It is important that in protein mass not a drop of yolk got in, otherwise you won’t be able to beat the whites to the desired consistency. Also pay attention to the cleanliness of the bowl you use so that there are no traces of grease or any debris left on it. To be on the safe side, you can first wipe the bowl with a paper towel lightly moistened with lemon juice.

- Continuing to work with the mixer, gradually add half the amount of sugar. We increase the speed of revolutions and be sure to beat the mass until “stable peaks” form. That is, if you tilt the bowl, the whites remain motionless. This step in the cooking process is extremely important: if you do not beat the whites thoroughly enough, the sponge cake will not turn out fluffy.

- Mix the yolks with the remaining granulated sugar and vanilla sugar. Grind vigorously until smooth. You can work with a whisk, a regular fork or a mixer, but in any case you need to get a mass of light color that has significantly increased in volume.

- Add about 1/3 of the whites to the yolk mixture and mix gently from bottom to top. Be sure to sift the flour and then add it to egg mixture. We continue to knead the mixture from bottom to top until a homogeneous mixture is obtained without any flour lumps.

- Next, lay out the remaining whites and mix with the same movements from bottom to top until the components combine into a smooth, fluffy mass (the biscuit dough should not be stirred in a circle, as this may cause it to settle).

How to bake a sponge cake so that it turns out fluffy and does not fall
- Take a small springform baking pan, no more than 22 cm in diameter (if you use a larger pan, the sponge cake will turn out thin). We cover the bottom with oiled parchment, and grease the inside of the mold walls with a small piece of butter. Fill the form with the prepared dough. During the baking process, the biscuit will “grow” noticeably, so the mold should be filled with dough no more than 2/3.

- Place the form in an oven preheated to 180 degrees. Bake for about 30-40 minutes (use your oven as a guide). To ensure that the sponge cake turns out fluffy and does not collapse, we try not to slam the oven door during the baking process, and it is better not to open it at all for the first 20 minutes. When the dough has risen and slightly browned, lower the temperature slightly so that our biscuit does not burn and is thoroughly baked inside. We check the readiness with a toothpick by plunging it into the center of the sponge cake. If the stick remains dry, then the biscuit is completely ready. Don’t forget that a sharp change in temperature can cause the biscuit to fall, so leave it in the turned off oven with the door ajar until it cools completely.

- Carefully remove the split edge from the cooled biscuit. First we run a knife blade along the edge of the mold. Cover the sponge cake with a napkin and leave it at room temperature for 8-10 hours before forming the cake (a “rested” sponge cake will not become too soggy from soaking and will not crumble when cut into cake layers).

In our recipe, we tried to describe in detail all the subtleties and nuances in making a classic fluffy sponge cake, but if suddenly it falls off for you, don’t worry! Under a layer of cream it will be almost unnoticeable, but as a training just practice baking the sponge cake more often. This process requires skill and culinary experience, and much depends on the characteristics of a particular oven. Here everything is learned only through trial and error! Good luck!
Classic sponge cake is the basis of many cakes, rolls and pastries. Experienced housewives They know that biscuit does not tolerate fuss. You need to prepare all the products, dishes, baking dish in advance and turn on the oven. When baking a biscuit in the oven, it is advisable not to knock or slam doors so that the baked goods do not settle.
Light, delicate sponge cake is used in the form of sliced cakes, which are coated with cream. But not only. From biscuit crumbs, for example, they prepare delicious cakes.
Ingredients
- flour - 1 cup
- eggs - 4 large, fresh
- sugar - 1 glass
- vanillin - 1/4 teaspoon
How to make a classic sponge cake
To prepare the sponge cake you will need flour, eggs, sugar and vanillin.
Line the bottom of the baking dish parchment paper, which you lightly oil. Turn on the oven and set it to 190°.
Pour vanillin into sugar and stir.

Separate the yolks and whites into separate bowls.

Beat the yolks with a mixer until they begin to lighten.

Add half the sugar and beat again until the sugar has dissolved and the yolks are almost white.

Using a clean whisk, beat the egg whites until they form a good, stable foam.

Add the remaining sugar and beat again until the whites turn into a strong foam, which should not fall out if the bowl is turned over.

Add half the sifted flour to the yolks and mix carefully with a spoon or spatula.

Then add a third of the beaten egg whites and mix gently with a spatula or spoon. Stir not in a circular motion, but from top to bottom.

As soon as it worked homogeneous mass, add the remaining flour and mix gently again.

Add the remaining whites and mix again.


The dough turns out very airy. Spoon the dough into a baking dish and place in the oven.


Bake at 190° for 10 minutes. Then reduce the temperature to 160° and bake for another 30 minutes. Check for doneness with a wooden stick.

The kneaded dough cannot be left to stand, it must be baked immediately;
Do not open the oven for at least 20 minutes, otherwise the biscuit may fall off;
The finished sponge cake springs under your hand;
If it shrinks a little after you take it out of the oven, that's normal: it always drops a little;
Do not use freshly baked sponge cake immediately; let it sit for at least 6-8 hours. Fresh biscuit it is difficult to cut, it is very fragile;
If you need to use freshly baked, then keep it in the oven for another 7-15 minutes after cooking, then it will dry out more;
Best baked in springform for baking;
All utensils used must be clean and dry; droplets of water are not allowed.

