The history of brewing exists since Ancient Egypt. Now this popular drink is everywhere, sold in large quantities in grocery stores and bars in many varieties.
It's quite can be cooked at home, using only natural products and ordinary equipment. In this regard, a simple recipe can give best result than when prepared in production.
There are many beer recipes with interesting ingredients. In the traditional case, it consists of the following components:
- Malt— barley grains, a natural filter during production. The raw materials must be white, have nice smell, do not drown when lowered into water. It is ground, leaving the husk intact.
- Hop divided by variety. Aromatic and bitter types are used, which are combined in the preferred proportion: either the beer will be bitter or with a hop aroma.
- Yeast It is preferable to choose beer houses. Ordinary ones are also suitable if the required type cannot be found.
- Spring, filtered or (worse) boiled water.
- A little Sahara for carbonation, it improves taste and makes the foam dense. Recipes homemade beer They also come with honey.
All products for making beer at home are easy to purchase. The requirement for yeast (like all other ingredients) is the best quality.
Interesting! Recipe light beer Use with conventional drying. And in dark varieties add 10% caramel, dried in the oven with light frying.

Home brewery equipment
All cooking recipes only require. Namely:
- 30 liter saucepan (preferably enameled);
- fermentation;
- thermometer for temperature control;
- gauze up to 5 meters;
- silicone hose to remove sediment from the drink;
- chiller - a device for cooling wort or a bath with cold water;
- a hydrometer that measures sugar content (optional);
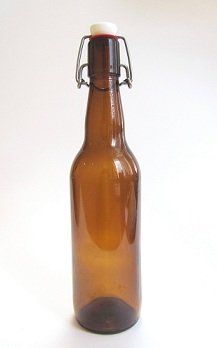
- bottles for the finished product.
Attention! Sometimes a tap is installed at the bottom of the pan through which the liquid is drained. How to brew homemade beer is described below.

Classic recipe
To implement traditional method brewing beer at home, you must first wash, dry, sterilize all the dishes. Product composition:
- water - 32 l;
- barley malt - 5 kg;
- hops - 45 g;
- brewer's yeast - 25 g;
- sugar (sand) 8 g/l.
It is possible to prepare beer at home according to step by step instructions:
- Pour 25 liters of water into a pan and heat it to 80°C. Ground malt is immersed in a gauze bag, covering the container with a lid. Keep the composition for 1.5 hours at a temperature of about 72°C, periodically turning on the heat under the pan.
- Increase the temperature to 80 degrees and hold it for 5 minutes. After this, the bag of malt is removed, washed with 7 liters of the remaining water, which is added to the wort in a large saucepan. Now all the sugars in the malt have been used.
- Boil the wort, remove the foam and add 15 g of hops. Boil for 30 minutes, then add a second portion of hops - 15 grams. After boiling for another 50 minutes, pour out the last of the hops and simmer for up to 15 minutes, then turn off.
- The wort must be cooled quickly (in no more than 30 minutes). The purity of the drink depends on this. The pan can be lowered into a bath with as cold water as possible. After this, the contents are poured into a new container through gauze.
- Brewer's yeast is diluted according to the instructions on the package and poured into the wort with stirring. The container is transferred to a dark place where the contents ferment for a week (up to 10 days) with a water seal at a temperature of about 22°C.
- After 12 hours, fermentation will become intense, lasting up to 3 days. Bubbles should come out of the water seal. As carbon dioxide escapes, the drink will become lighter in color. The absence of bubbles for a whole day is a sign of readiness.
- Carbonation (saturation with carbon dioxide) improves taste and creates dense foam. Sugar (8 grams per liter) is poured into bottles and beer is poured using a narrow hose, eliminating sediment. Leave about 2 cm near the throat (for “breathing”) and seal it. After this, secondary fermentation begins.
- Bottles are stored for up to 3 weeks at temperatures up to 23°C in the dark, after which they are transferred to the refrigerator.
This recipe contains step by step guide: how to brew beer at home. Product you can try right away, but if you keep it in the cold for a month, the taste will improve thanks to endurance.
Based on this cooking method for beginners (and not only) you can come up with other recipes.

Other DIY cooking recipes
Beer is prepared at home using recipes based on a variety of components.
It is made from grain, berries, bread or crackers, with or without yeast. The following methods will help you make homemade beer with original ingredients.
Cherry
Beer, the recipe of which includes cherry fruits, has long been made in Belgium under the name scream. This is not the only cherry variety beer drink, but the most traditional.
In fact 30% liquid, from which it is prepared, is juice. The cherry beer recipe includes the following products:
- Pilsen lager malt - 4 kg;
- Crystal malt - 0.3 kg;
- chocolate malt - 135 g;
- corn flakes -700 g;
- barley popcorn (puffed) -700 g;
- 20 g each of Whitbread Golding and Tettnang hop varieties;
- Saaz hops - 10 g;
- Irish moss - 10 g;
- water - 28 l;
- ripe cherries - 4.5 kg.
The preparation steps are as follows:
- The wort is boiled for 1.5 hours, with the first two varieties of hops added at the beginning of the process. And 15 minutes before the end of the boil, add the Saaz variety. Irish moss is added 10 minutes before the end.
- Cool to 22°C.
- This is a beer without yeast. It is poured into barrels, where it is stored for up to 4 months, after which cherries are added.
- Ripening lasts up to 8 weeks, while the strength increases.
Cherry beer can be made with yeast, but this method preferable.
How to make rye?
There is rye beer dark and light depending on the type of malt. The shade can be copper-orange or dark red.
Making light beer at home involves reduction in share rye malt up to 50%, replacing it with barley or wheat, and also eliminating the light roasting of this ingredient.

- rye malt - 3 cups;
- honey - 2 cups;
- hops - 100 g;
- yeast - 1.5 sticks;
- sugar - 1 tbsp. l;
- water (boiling) - 10 l.
You need a container with the ability for liquid to flow out at the bottom, like a samovar.
The stages are as follows:
- Grind hops and malt, place in a linen bag. Mix the yeast with a tablespoon of sugar and leave to rise.
- Put honey in a saucepan, boil the samovar and pour water from it through a bag into a large container. Stir the malt.
- When there is enough water in the pan with honey, you need to mix the contents, let it cool and add yeast.
- The yeast will drop, after which you need to pour the liquid into bottles and keep in a dark place for up to 4 days. The drink is ready.
There are many other similar methods for making grain beer.
Bread based
Beer is also produced from bread, including the stages of brewing, fermentation and maturation. Compound:
- malt - 400 g;
- sugar - 200 g;
- hops - 200 g;
- crackers - 800 g;
- yeast - 35 g;
- pepper - peas;
- water - 13 liters.
The recipe for homemade bread beer is implemented in the following steps:
- In a large saucepan, mix half the sugar, malt and crackers. Add pepper to scalded hops with boiling water.
- Dissolve the yeast in 6 liters of warm water, combine it with hops and pepper, and stir. Place in a dark place for a day, without covering. Add the remaining sugar and pour in warm water, 4 liters. Cook over low heat, without bringing to a boil, for 4 hours.
- Boil the next day, then drain the liquid. Add 3 liters of boiled water to the porridge. After an hour, drain the liquid, combining it with the previous portion.
- Boil the wort, remove the foam and filter. Fill the bottles with the product, close tightly, and place in a cool place for two weeks until ready.
Viennese
Recipe Viennese beer will require the following composition:
- Vienna malt - 3.8 kg;
- Pilsen malt - 1 kg;
- “Istra” hops – 28 g;
- hops “Early Moscow” - 20 g;
- yeast (S-33);
- 2 oranges - zest.
Beer is prepared in the following steps:
- Wort is made: malt is mashed and water is added. Cooking lasts 75 minutes at 65°C.
First, Istrinsky hops are added, and after 20 minutes, Early Moscow hops are added. The beer is brewed for an hour, then cooled to 22°C. - Yeast is added, everything is mixed and left to ferment for up to 10 days. Temperature - from 18 to 25 degrees.
- The composition is filtered and added orange peel. The beer is left to mature for 2 weeks.
- The composition is filtered. It's ready, but we can wait another month. The general storage period is up to six months.
Velvet
The recipe for making velvet beer deserves attention with honey and cinnamon. Compound:
- rye malt - 12 kg;
- wheat malt - 1.2 kg;
- black bread - 4.8 kg;
- yeast - 100 g;
- cinnamon - 1 g;
- molasses - 1 kg;
- honey - 200 g;
- raisins - 600 g;
- hops - 140 g;
- water.
It is prepared in the following steps:
- Dry, grind the bread, mix with other ingredients except water. The hops are scalded with boiling water.
- Water is added, the mixture is brought to a porridge state, after which it ferments for 6 hours.
- 26 liters of boiled water are poured in. In a tightly closed form, the composition settles for a day in a warm place.
- The liquid is drained, water is added, 6 liters. The container is left for another 6 hours.
- Drain again, mix the drained liquids and pour into sealed bottles.
- Ripening is carried out in the cold 12 days.

But the result that will be obtained using home technology, will not work. That is why it is recommended to study the secrets of brewing.
Beer is an extremely common drink all over the world; it was invented back in Ancient Egypt. Currently we can see it in bars and shops in a huge number and the most different varieties. But one cannot but agree that homemade beer made with one’s own hands is much better than factory beer. After all, we know for sure that only natural products were used to make it, without any preservatives.
Many people mistakenly believe that home brewing technology requires serious equipment, but this is not entirely true. To brew beer at home, you can easily use a regular kitchen utensils, for example, large-volume pots. Besides, everything necessary ingredients for the recipe can now be purchased in stores, and it is not at all necessary to prepare hop cones in advance and brew wheat and barley malt.
Eat different recipes making homemade beer, which abound in considerable quantities interesting components, because beer is a very multifaceted drink. But if we talk about the traditional classic recipe, then it includes yeast, hops, malt and water. If you do everything correctly, take the necessary pauses and correctly follow the recipe, then in the end you will get a homemade drink with thick foam and rich taste. No pasteurization or filtration, like store-bought beer, only natural ingredients - this is the only way to get foamy homemade beer with a pure, original taste.
Brewing beer at home: what do you need for this?
The art of home brewing is not an easy task, so not many people take the risk of making beer with their own hands. Most of us find it easier to buy a bottle of beer at the store than to bother with own kitchen. Therefore, all home brewing recipes are designed for loyal fans of this foamy drink who prefer pure taste, without impurities and preservatives.
To brew traditional beer, in addition to water, three ingredients are needed: brewer's yeast, hops and malt. The only “but” is that it is not recommended to experiment with yeast, but to immediately buy the best ones in a special store, because the successful outcome of brewing depends on their quality. The first two ingredients can theoretically be made at home, but this will take additional time, so it is also better to purchase them ready-made.
An important nuance: to obtain light beer, the malt must be dried naturally, to obtain a dark one, a special caramel variety is added to the main mash, no more than 10% of the total mash; it is cooked in the oven, lightly fried.
 Malt
- These are, in fact, sprouted dried barley grains in a hard husk, which serves as a natural filter in the production of beer.
Malt
- These are, in fact, sprouted dried barley grains in a hard husk, which serves as a natural filter in the production of beer.
This ingredient should be white, sweetish, pleasant smell and don't drown in the water. Before use, the malt must be ground in a special roller mill so that intact husks remain.
 Hop
All varieties are divided into two types: aromatic and bitter, and it is selected depending on what you want to achieve more in homemade beer, aroma or bitterness. The main thing is that the hops are of good quality, this plays an important role in the density homemade drink. Before using it, the cones should be carefully examined; they should be reddish and yellowish.
Hop
All varieties are divided into two types: aromatic and bitter, and it is selected depending on what you want to achieve more in homemade beer, aroma or bitterness. The main thing is that the hops are of good quality, this plays an important role in the density homemade drink. Before using it, the cones should be carefully examined; they should be reddish and yellowish.
 Yeast
It is very advisable to take beer ones, but if you were unable to purchase them, then regular ones will do. The main thing is that they are dry and alive. As for water, it must certainly be clean and soft; purified, filtered water or water from a spring is ideal. As a last resort you can use boiled water. If it's bad, your homemade beer won't taste good and you'll be wasting your time.
Yeast
It is very advisable to take beer ones, but if you were unable to purchase them, then regular ones will do. The main thing is that they are dry and alive. As for water, it must certainly be clean and soft; purified, filtered water or water from a spring is ideal. As a last resort you can use boiled water. If it's bad, your homemade beer won't taste good and you'll be wasting your time.
Ideally, it is better to buy water. It will, of course, be a little expensive, but the taste of the intoxicating drink will be simply excellent. And one more important nuance: sugar. It must be taken at the rate of 8 grams per liter of beer (to saturate with carbon dioxide); some recipes use glucose or honey.
Equipment needed for home brewing
 All the equipment you need for self-made beer at home, you can find it in any kitchen, or you can get it without any problems, there is no need to purchase a special expensive device or a mini brewery. So, you will need a large saucepan (enamel is ideal) for 30 liters, it can be improved by installing a drain tap at the bottom. The saucepan is where you will cook the wort, as well as another container for fermenting the beer.
Be sure to stock up on a thermometer to monitor temperature regime, And big piece gauze 4-5 meters long. Next you need to prepare glass and plastic bottles, where you will pour homemade beer, and a narrow silicone hose (with its help, the drink is carefully removed from the sediment).
A chiller is needed to cool the wort. You can make it yourself at home from a copper tube. You can do without a chiller and use a bathtub or a very large tank of ice water at home to cool the beer wort. Some people also stock up on a hydrometer - a device that determines the sugar content and density of the future drink, but this is not at all necessary.
Recipe for traditional beer at home with photos
To make grain beer in your own kitchen, according to the classic recipe, maintaining all temperature moments and pauses, you must first pay attention preparatory stage: Thoroughly wash and dry all equipment (except the thermometer) and begin the process with clean hands.
Everything must be sterile, otherwise you risk contaminating the wort wild yeast or other microbes and get sour mash instead of beer and waste all your efforts. Then prepare the ingredients: 32 liters of water, 5 kg of barley malt, 45 grams of hops, 25 grams of brewer's yeast and granulated sugar(from the calculation given above).
- Pour 25 liters of water into a saucepan, heat to 80°, and immerse the ground malt in it, poured into a gauze bag (it is made from a long piece of gauze). Close the pan with a lid and pause for an hour and a half at a temperature of 65-72°, turning the heat on or off. It is at this temperature that the malt is saccharified; as a result, the wort becomes sweet and easily fermentable sugars appear in it.

- After an hour and a half, increase the fire temperature to 80° and maintain this pause for another five minutes. Then remove the bag of malt from the pan and rinse in the remaining seven liters of water, which should then be poured into the wort. This way we wash out the remaining sugars from the malt.

- Next, according to the recipe, the wort should be brought to a boil, remove the foam that has formed and add the first 15 grams of hops. The wort needs to be boiled intensively for half an hour, then add another 15 grams of hops. Then cook for another 50 minutes, add the last portion of 15 grams of hops, and cook for another 10-15 minutes. In total, this will take about an hour and a half.

- Now, the wort needs to be cooled very quickly, within 20-30 minutes. The sooner you do this, the lower the risk of contamination of future beer with wild yeast and harmful bacteria. Transfer the pan to a bathtub filled with ice water, then pour through cheesecloth three times into another container.

- The next step is to dilute the brewer's yeast and add it to the wort, stirring thoroughly. It is very important to follow the instructions on the yeast package. Next, the container is transferred for fermentation to a dark place with a temperature of 18-22°, a water seal is installed on it, and the wort is left to ferment for a week or ten days.
- Intensive fermentation will begin within 6-12 hours and will last for two to three days. All this time, the water dispenser will actively blow bubbles, carbon dioxide will escape, and the beer at the end of fermentation will become much lighter. Readiness is determined by the absence of bubbles during the day - this means that the fermentation process has completed.

- Now the recipe requires carbonation of beer (filling the drink with carbon dioxide) - to improve the taste, to achieve the appearance of a dense thick foam. Don't be scared by this “scary” name, the carbonization process is quite simple. You need to take the sterilized bottles that you have prepared for storing beer (it is highly desirable that they be made of dark plastic or glass) and pour sugar into them (8 grams of sugar per 1 liter of beer).
- After this, the drink must be carefully drained using a narrow silicone hose and fill the bottles, being careful not to touch the sediment (otherwise the beer will turn out cloudy). Do not pour to the very top, but leave a couple of centimeters so that the beer “breathes”, and seal tightly with lids. Then, without any pause, the secondary fermentation process will begin, which will supply the young beer required quantity carbon dioxide.
For better quality, you need to put the bottles in a dark place with a temperature of 20-23° and leave them alone for two to three weeks. After the first week has passed, the bottles must be shaken periodically, and at the end of the period, transfer them to the cellar or refrigerator.
Home brewing can be divided into two main types: using ready-to-use malt extract- extract and when the malt is directly prepared by the brewer himself - grain. In one production cycle, an amateur brewer produces from 10 to 30 liters of foamy drink. When making beer at home, processes such as pasteurization and filtering are usually not used.
How to brew beer at home
For home brewing, sterility and disinfection are mandatory. One of the special equipment that you cannot do without when making homemade beer is an electronic thermometer to quickly determine the temperature of the liquid. This plays an important role, since at some stages of brewing it is necessary to strictly adhere to desired temperature. The rest of the equipment can always be found on the farm.
Home brewing technology involves the following steps:
- Preparation. During this stage, the necessary ingredients and equipment are prepared. All necessary containers are washed hot water and dried thoroughly. Before working with beer ingredients, you must wash your hands with soap and water. Sterilization should not be neglected: for example, if beer wort is contaminated with pathogenic microorganisms, the result will not be beer, but mash.
30 minutes before actually brewing beer, tremors need to be activated warm water. Universal method to properly dilute the yeast, no. You just need to follow the instructions on the container. - Mashing brewing wort. At this stage, crushed malt is mixed with hot water. This is necessary to break down cereal starch into sugar and polysaccharides. If the grains were sprouted on their own, they are first dried and then crushed with a crusher or meat grinder. The grind should not be superfine or coarse. Best option– medium grind with peel particles as in the photo. Next, the enamel container is filled with 25 liters of water and heated to 80 degrees. The finished malt, poured into a gauze bag, is immersed in water and boiled for 1.5 hours at a temperature of 70 degrees, while the container is closed with a lid. With the “mash in a bag” method, you don’t need to use filtration, which requires special equipment and repeated pouring from container to container
- Boiling the wort. The liquid is boiled, then hops are gradually added. Without reducing the heating intensity, boil for another hour and a half.
- Cooling. The wort should be cooled quickly (15–25 minutes), which minimizes the risk of contamination with bacteria that are harmful to further fermentation. Cooling can be done by submerging the pan in a bath of cold water or an immersion cooler. The cooled wort is poured through a gauze filter into the fermentation tank.
- Fermentation. Brewer's yeast diluted with water is added to the wort while stirring. The container with the water seal installed is placed in a dark place for 7–8 days. Fermentation lasts several days, towards the end the beer becomes lighter in color. The readiness of the product is determined by the water seal (the absence of carbon dioxide bubbles) and a hydrometer.
- Capping and carbonation. Carbonation is the simple process of adding carbon dioxide to beer to improve flavor and create foam. 8 g of sugar per liter of beer is added to the dark bottles where the drink will be stored. Sugar, provoking additional fermentation, will saturate the drink with carbon dioxide. After this, the beer from the sediment is bottled. When draining, it is advisable to minimize the contact of beer with air. To do this, you can use a silicone transfusion tube. For glass containers you will need yoke stoppers.
- Maturation. It is better to let the finished product sit for about a month to improve the taste. Beer should be stored in the refrigerator for no more than 8 months, and open bottle no more than a couple of days.
Brewing equipment
A mini-brewery does not necessarily mean professional equipment and fixtures that cost a lot of money. For cooking you will need the following equipment:
- Pan (25 liters) for making wort.
- Fermentation tank.
- Foam removal hose.
- Digital Thermometer.
- Chiller. For varieties requiring rapid cooling.
- Hydrometer. Measures the density of a liquid.
- Gauze for filtration.
- Water seal.
Beer recipes at home
The beer recipe directly determines its taste, level of bitterness and strength, but there are basic components without which you can make a traditional beer. foamy drink it simply won't work. To brew beer at home, you will need four components:
- Hop. Hop varieties are divided into fragrant and bitter. The variety is selected based on what taste is planned to be obtained - sweetish or bitter. The main condition is good quality hops, because it is responsible for the density of the drink. Before use, its buds must have a yellow or red tint.
- Malt. This ingredient affects the taste and quality of beer. Experts recommend using malt from spring barley, explaining this by its low protein content and high percentage of starch. For brewing, the finished component must have a sweetish odor, White color and float on the surface of the water.
- Brewer's yeast. They are responsible for the fermentation process and the strength of beer. It is better not to experiment with the choice of yeast, in order to avoid unpredictability of taste, but to buy the best strains in stores. They must be dry and alive.
- Water. Must be clean, soft, filtered. Bad water will certainly affect the taste of the drink.
Classic recipe
By making beer according to the classic recipe, you can get a drink with 4–5% strength. It has a rich malt taste that lasts for a long time in the mouth, hop astringency, aroma and thick foam. The color varies from light gold to light brown. This drink does not contain anything unnecessary, much less preservatives or impurities.
Ingredients:
- water – 30 liters;
- hop cones – 45 g;
- malt – 3 kilograms;
- brewer's yeast – 25 g;
- sugar – 8 g per liter of beer.
Cooking method:
- A large enamel pan is filled barley malt, filled with water room temperature, stir and leave for 12–15 hours.
- After this time, the pan is put on fire. After boiling, the contents should be simmered over low heat for two hours, stirring occasionally.
- Then hops are added and the whole thing is boiled for another 30 minutes.
- The brew is cooled, filtered and poured into a large container.
- Yeast and corn syrup are added, everything is thoroughly mixed, covered with a lid and removed for a day.
- A day later, the beer is bottled and infused for 12 hours without capping.
- Afterwards, tightly closed bottles are sent to the refrigerator.
Beer in a pan
Boiling a beer drink in a saucepan will yield about 5 liters of output finished product. A volume of more than five liters will take for a long time, will cause a lot of inconvenience and lead to increased pollution.
Ingredients:
- water – 10 liters;
- malt – 1 kilogram;
- hops – 12 grams;
- yeast – 10 grams;
- dextrose – 10 tsp.
Cooking method:
- 3–4 liters of water are poured into the pan, which is heated to 70–72 ºС.
- While stirring the water, pour in the malt. The mixture should have a temperature of 65–67 ºС and cook for at least 90 minutes.
- The pan is removed from the stove, wrapped in a blanket and kept at a temperature of 65–67 ºС (left for 1 hour).
- After an hour, you should make a test with iodine (a few drops of iodine are added to the wort). If the wort acquires Blue colour– it still contains starch. To get rid of it, you need to keep the pan on the fire for another 15 minutes.
- A small part of the wort should be poured into a jar, sealed tightly, cooled to 20 ºС, then add yeast to it, close tightly again and place in a shaded, warm place.
- The pan is placed on the stove again for an hour. When the contents boil, the foam should be removed.
- After sampling the foam, hops are added to the pan.
- The container, closed with a lid, is cooled.
- The cooled wort is poured through a hose into a large bottle, and the wort with yeast is poured into it from the jar. By installing a water seal on the lid, the bottle is tightly closed for a couple of weeks.
- After 14 days, the drink is poured into a container. This is done for carbon enrichment (dextrose is added to beer, 5 grams per 1 liter).
- The beer is bottled and placed in a dark place for 10 days.
Mint
This beer has an unusual refreshing taste, it is gentle, has no bitterness and is easy to drink. It can be prepared at home without much difficulty, similar to the previous types. The main condition is not to overdo it.
Ingredients:
- water – 3–4 l;
- yeast – 20 g;
- sugar – 2.5–3 cups;
- mint - one bunch;
- vanilla sugar – 1 sachet;
- crust of rye bread.
Cooking method:
- The mint is poured with water heated to a boil and kept under a closed lid for one hour.
- The yeast is covered with sugar.
- The mint infusion is filtered, yeast with sugar and bread crust are added to it.
- After the mixture ferments, foam forms. After that it pours out there vanilla sugar, everything is thoroughly mixed and poured into containers for storage.

Beer recipes with the addition of juniper berries come from Scandinavian countries. There it is believed that it has a beneficial effect on health. The drink has a thin pine aroma and a sweetish tart aftertaste. The average strength is five degrees.
Ingredients:
- water – 3 l;
- juniper fruits – 250 g;
- honey – 300 g;
- yeast – 30 g.
Cooking method:
- The berries are boiled for 30 minutes, the liquid is cooled and filtered.
- Honey and yeast are added to the mixture, the contents are mixed and left to ferment.
- When the yeast rises, everything is stirred.
- The resulting drink is bottled and sealed.
- The beer is placed in a cool place for five days.

No malt
One of the simplest recipes without malt. To make this product, you do not need to spend time on preparing and mashing malt, and the drink itself can be consumed within a few days after brewing.
Ingredients:
- water – 10 liters;
- hops – 1/3 cup;
- yeast (liquid) – 250 ml;
- molasses – 500 ml.
Cooking method:
- Water is poured into the pan, molasses is added there, the contents are stirred and put on the stove to boil. The liquid is boiled until the smell of molasses disappears.
- The hops, wrapped in a gauze bag, are dropped into the contents of the pan. All this is cooked for another 30 minutes.
- The liquid is cooled, liquid yeast is added to it. Everything is thoroughly mixed.
- The drink is bottled until yeast foam is released. The bottles don't close.
- After foam appears, the bottles are sealed, tarred and placed in a cool place for 4 days.
From dried fruits
The beer drink made from dried fruits has extraordinary taste qualities and a specific aroma. The drink is not something everyone can make, but the recipe for making it is relatively simple.
Beer homemade compares favorably with cheap store-bought analogues due to its richer taste, thick foam and lack of preservatives. The result is a drink that does not contain anything extra. I'll tell you how to brew beer according to the classic recipe, using only traditional ingredients: hops, malt, water and yeast. To save original taste, we will not resort to filtration and pasteurization.
It is believed that to make real beer you need to buy a mini brewery or other expensive equipment. This myth is imposed by manufacturers of such products. Together with the brewery, such offices will happily sell the finished concentrate, which only needs to be diluted in water and fermented. As a result, a novice brewer pays exorbitant prices for beer whose quality is best case scenario slightly higher than store-bought cheap brands.
In fact, you can make homemade beer without special equipment, using available tools: a large cooking pot, a plastic or glass fermentation container, any bottles and other available equipment, full list which are published below.
You will only have to buy hops, malt and brewer's yeast. I do not insist on choosing a specific company or brand. The assortment is quite wide, purchase any product you like.
In theory, malt and hops can be grown at home. But these processes are beyond the scope of this article. We will further assume that all the necessary ingredients are available: homemade or purchased. The only thing I don’t recommend is experimenting with brewer’s yeast, but immediately choosing the best strains in the store, because grain mash Beer is distinguished by its special yeast.
Ingredients:
- water – 27 liters;
- hops (alpha acidity 4.5%) – 45 grams;
- barley malt – 4 kg;
- brewer's yeast – 25 grams;
- sugar – 8 grams per liter of beer (needed for natural saturation with carbon dioxide).
Necessary equipment:
- 30 liter enamel pan - for boiling wort;
- fermentation tank - for fermentation;
- thermometer (required) - if moonshine from sugar or wine can be made only by approximately controlling the temperature, then with beer this is initially a disastrous idea;
- bottles for dispensing finished beer (plastic or glass);
- small diameter silicone hose - for removing beer from sediment;
- ice water bath or beer wort cooler;
- gauze (3-5 meters) or a fabric bag;
- iodine and white plate (optional);
- hydrometer (optional) – a device for determining the sugar content of wort.
Making homemade beer
1. Preparation. The first stage, during which the brewer checks the presence the necessary ingredients and equipment readiness for operation. I also advise you to pay attention to the following points.
Sterilization. Wash all containers and equipment used well with hot water and dry. Before working with ingredients, the brewer thoroughly washes with soap and wipes his hands dry. It is very important not to contaminate the beer wort with wild yeasts and pathogenic microorganisms, otherwise you will end up with mash instead of beer. Neglecting sterilization negates all further efforts.
Water. It is better to use spring or bottled water. In extreme cases, regular tap water will do. Before brewing beer, tap water is left to sit for 24 hours in open containers. This time is enough for the chlorine to disappear and heavy metals and salts to settle at the bottom. Subsequently, the settled water is carefully drained from the sediment into another container through a thin tube.
Yeast. For normal fermentation, brewer's yeast is activated 15-30 minutes before adding to the wort. a small amount warm water (temperature no higher than 28 degrees). There is no universal method that allows you to properly dilute any brewer's yeast. Therefore, you need to follow the instructions on the package.
2. Mashing the wort. This term refers to the mixing of crushed malt with hot water to break down the starch in the grains into sugar (maltose) and soluble substances (dextrins). Sometimes malt is sold ready for brewing, crushed, which makes the task a little easier. If not, you need to grind the dried sprouted grain yourself using a grain crusher or mechanical grinder.
Attention! Grinding does not mean grinding into flour; you just need to crush the grains into small pieces, making sure to save particles of the grain skin, which will then be needed to filter the wort. Correct option grinding is shown in the photo.
 Correct grinding
 IN enamel pan pour 25 liters of water and heat on the stove to 80°C. Next, the ground malt is poured into a fabric or homemade bag measuring 1 by 1 meter, made of 3-4 layers of gauze. The bag of malt is immersed in water, the pan is covered with a lid and boiled for 90 minutes, maintaining a stable temperature of 61-72°C.
Mashing malt at a temperature of 61-63 degrees promotes better release of sugars, increasing the strength of homemade beer. At 68-72°C the density of the wort increases, although the alcohol content in the drink will be slightly lower, but the taste will be richer. I recommend sticking to a temperature range of 65-72°C, which results in a tasty, dense beer with an ABV of 4%.
 Cooking malt in a bag
 After 90 minutes of cooking, an iodine test is done to ensure that there is no starch left in the wort. To do this, 5-10 milligrams of wort are poured onto a clean white plate and mixed with a few drops of iodine. If the solution turns dark blue, you need to cook the contents of the pan for another 15 minutes. If the iodine has not changed the color of the wort, it’s done. You don’t have to do an iodine test, but simply increase the mashing (cooking) time by 15 minutes; the quality of the drink will not suffer from this.
Then the temperature is sharply raised to 78-80°C and the wort is boiled for 5 minutes to completely stop the enzymes. Next, the bag with the remaining malt is removed from the container and washed with 2 liters of boiled water at a temperature of 78 degrees. This way, the remaining extractive substances are washed away. Wash water is added to the wort.
This mashing method is called “in the bag” and allows you to do without filtration - separating spent grains (undissolved malt particles) from the main wort. In turn, filtration requires specific equipment (purification systems) and repeated transfer of wort from one container to another. Mashing in a bag does not affect the quality of the brewed beer in any way, and takes much less time.
3. Boiling the wort. The contents of the pan are brought to a boil and the first portion of hops is added, in our case it is 15 grams. After 30 minutes of intense boiling, add the next 15 grams, and after 40 minutes, add the remaining 15 grams of hops and cook for another 20 minutes.
Depending on the chosen beer recipe, the time intervals and the amount of hops may vary. But by adhering to the specified sequence and proportions, you are guaranteed to get a normal result.
Boiling takes an hour and a half, during which time it is important to maintain intense heat to keep the wort bubbling.
 Adding hops
 4. Cooling. Beer wort you need to quickly (in 15-30 minutes) cool to 24-26°C. The faster this is done, the less the risk of contaminating the drink with bacteria and wild yeast that are harmful to fermentation.
You can cool the wort with a special immersion cooler (one of the possible designs in the photo) or carefully transfer the container into a bath of ice water. Most beginning brewers use the second method. The main thing is not to accidentally turn it over hot pan, scalding himself with boiling water.
 Cooler design
 The cooled wort is poured through cheesecloth into a fermentation container.
5. Fermentation. Diluted brewer's yeast is added to the wort and mixed well. In this case, it is very important to follow the temperature and proportions indicated in the instructions on the bag label.
Yeast can be top-fermenting, which is introduced at a temperature of 18-22°C, and bottom-fermenting, which works at 5-16°C. These two types make different beers.
The filled fermentation container is transferred to a dark place at the temperature recommended by the yeast manufacturer. In our case it is 24-25°C. Then install a water seal and leave it alone for 7-10 days.
 Example of a fermentation container
 After 6-12 hours, active fermentation will begin, which usually lasts 2-3 days. At this time, the water seal intensively releases bubbles, then the frequency of carbon dioxide release slowly decreases. At the end of fermentation, young homemade beer becomes light. Readiness is determined by two methods: a saccharometer (hydrometer) and a water seal.
In the first case, the readings of two hydrometer samples over the last 12 hours are compared. If the values differ slightly (by hundredths), then you can move on to the next stage. Not everyone has a sugar meter, so at home they often just look at the water seal. The absence of bubbles within 18-24 hours indicates the end of fermentation.
6. Capping and carbonation. Carbonation of beer is the saturation of the drink with carbon dioxide, which improves the taste and the appearance of thick foam. Despite the complex name, the process itself is very simple.
Sugar is added to beer storage bottles (preferably dark) at the rate of 8 grams per 1 liter. The sugar will cause a slight secondary fermentation, which will saturate the beer with carbon dioxide. The beer is then drained from the sediment through a silicone tube, filling the prepared bottles.
 Spill completed
 One end of the tube is lowered to the middle of the container with beer, the other to the very bottom of the bottle, this minimizes the contact of the drink with air. It is important not to touch the yeast, which, depending on the type, can settle at the bottom or accumulate on the surface, otherwise the beer will turn out cloudy. Bottles are not topped up 2 cm from the neck and are tightly sealed.
The easiest way is to use plastic containers, since the lids can be screwed on by hand. For glass bottles you need yoke caps or a special device for sealing regular beer caps (pictured).
 Bottle with yoke stopper
  Device for closing conventional plugs
 Bottles filled with beer are transferred to a dark place with a temperature of 20-24°C and left for 15-20 days. Once every 7 days, the containers should be shaken well. After this, the drink is placed in the refrigerator.
7. Maturation. Homemade beer is ready. But if you let the drink sit for another 30 days, the taste will improve significantly.
Beer can be stored in the refrigerator for 6-8 months, an open bottle for 2-3 days.

Another method of brewing beer without special equipment is shown in the video.
1. Pour 25 liters of water to 38°C, add all the malt -> 55°C
2. Raise the temperature to 63° C —> 63° C
3. Raise the temperature to 72° C —> 72° C
4. Raise the temperature to 78° C —> 78° C
5. Rinse with 8 - 10 liters of water. —> 78° C
6. Boil for 90 minutes:
6.1. Slavyanka hops - 30 grams 60 minutes before the end.
6.2. Zhatetsky hops - 20 grams 5 minutes before the end.
7. Cool the wort to 25° C
8. Rehydrate and add T-58 yeast
Beer Bavarian Fruit Wheatbeer

Ingredients
- 2.5 kg Wheat malt;
- 3.5 kg Vienna malt
Preparation
A total amount of malt of 6 kg is poured into water (19 liters) at a temperature of 38° C.
1. pause 35-38 ° C – 10 minutes
2. pause 43-46 ° C – 10 minutes
3. pause 50-55 ° C – 10 minutes
4. pause 64-66 ° C – 20 minutes
5. pause 72 ° C – 30 minutes
6. pause 78 ° C – 5-10 minutes.
Beer Koenigsberg Alt Schwarzbier (dark ale)

Ingredients
- 3 kg - Kursk light barley;
- 1.5 kg – Munich malt;
- 0.2 kg - Burnt Black;
Preparation
- Pour the total amount of malt (without burnt) into 19 liters of water at a temperature of 54°C.
- Maintain a pause of 52°C for 30 minutes, while the mash must be stirred periodically.
- Heating to 72°C, pause 60 minutes.
- After 20 minutes from the start of the 72°C pause, add the roasted malt and mix the mash thoroughly. Continue pause.
- Heat to 78° C, pause 10 minutes.
Boiling with hops:
- Hopping: (introduction time - before the end of boiling) 60 minutes. - 20 gr. El Dorado, 20 min. – 20 gr. Saaz
- Initial density – 13 – 13.5%
- Final density (after fermentation is complete) 5 - 5.5%
- Estimated alcohol 4.6%
Beer IPA (Indian Pale Ale)

Ingredients
- 4 kg - Latvia Pilsen;
- 1 kg – Latvia Munich 25;
- 0.5 kg – Germany Aromatic
Preparation
- Pour the total amount of malt into 19 liters of water at a temperature of 70°C.
- For 90 minutes, the descending pause is 68-64 ° C, while the mash must be stirred periodically.
- Heating to 78-80° C and filtration.
- Filtration is carried out until the amount of wort reaches 27 - 28 liters.
- The amount of rinsing water at a temperature of 78 - 80 ° C is 14 - 15 liters.
Boiling with hops:
Hopping: (time of application - before the end of boiling)
- 60 min. - 15 gr. Hercules
- 20 minutes. – 15 gr. Hercules
- 10 min. – 10 gr. El Dorado
- 5 minutes. – 10 gr. El Dorado
- 0 min. – 5 gr. El Dorado
- After boiling, cool the wort to 80 degrees and let it sit for 20 minutes.
- For better work 40 minutes before adding yeast to the wort, they should be poured into clean boiled water at a temperature of about 20 degrees and vigorously stirred periodically.
- After rehydration, pour the yeast into the wort cooled to 20 degrees (for ale yeast).
- Fermentation at a temperature of 20 - 22° C.
- After the end of the main fermentation (3-4 days), you need to add (for dry hopping) 10 g Ella HPA and 25 g Eldorado hops to the beer (put it in a bag and hang it in a container).
- After 7-10 days of dry hopping - transfer to another container for post-fermentation and clarification (secondary)
- After carbonation, it is best to age the beer for a couple of weeks in a cool place with a temperature of 10-12 ° C
