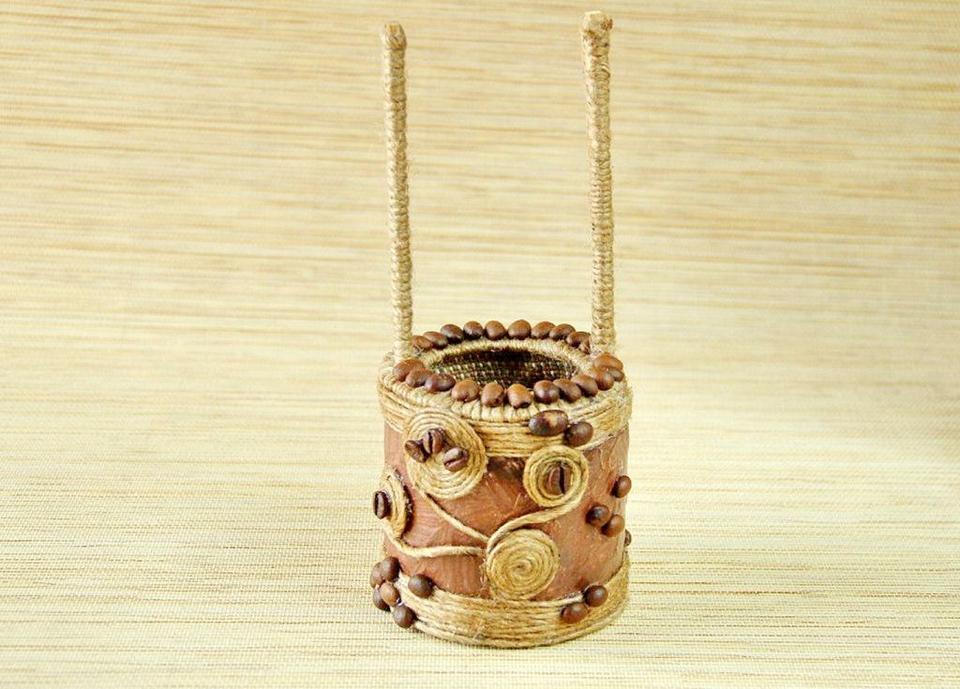
Continuing the theme of coffee interior elements, we suggest you make another decorative coffee figurine - “Well”. It looks very original in the interior, smells nice of coffee, and can be used as a desk stand for stationery.
Materials for making a decorative coffee figurine:
- sheet of cardboard
- plaster bandages (you can take a ready-made box)
- putty finish (if you use a ready-made box for the well ring, then putty is not needed)
- a small container for making a bucket, but you can just use cardboard
- small wooden slats, bamboo napkin or ice cream sticks
- coffee beans
- wire
- a small piece of fabric to decorate the inside and warp
- thin jute rope or twine
- scotch
- paints
Tools for making a stationery stand:
- tweezers
- metal scissors or wire cutters (for wire and wooden slats)
- pencil
- tassel
- ruler
- utility knife or scissors
- drill and thin drill bit (optional)
- compass
- threads
- water container
- matches or lighter.
I don’t indicate the sizes and quantities, everything is individual and depends on what materials you use and the desired size of the coffee figurine.
How to make a decorative coffee figurine “Well”
Making a well ring
You can take a ready-made box of the desired size and shape, cover it with wooden slats, paint it in the desired color, decorate it with rope and coffee beans.
But I wanted to work with plaster and make a decorative element to my taste. It's not as difficult as it might seem at first glance.
Draw and cut out a rectangle on cardboard. The size depends on how large a pen holder you need. The photo shows that I took the dimensions 7x25 cm.

We connect the rectangle into a pipe. Glue along the edge.

It is better to fix the paper pipe on some surface so that it does not deform when working with water and plaster.

Pour water into the container. We cut the plaster bandage into small ribbons.

Briefly dip the plaster strips into the water, and then paste them over the paper blank. We try to do this as evenly as possible, smoothing out unevenness with our fingers or a brush.

Let the plaster dry. After a few hours, remove the paper and leave the ring to dry (for about a day).

When the plaster is dry enough, apply putty. The putty can be applied either with a spatula or a brush. Draw the desired texture.

Leave the figure to dry for the time indicated on the putty packaging.
When the putty has hardened, coat the ring with paint.

To add antiquity and texture, the paint can be “aged.” To do this, just use a dry cloth to slightly absorb the wet paint applied to the figure.

When the paint dries, coat the top with varnish.
Let's start decorating the inside of the ring.

To cover the sides, we cut out a rectangle from cardboard, slightly smaller in size than we initially cut out for the ring itself.

Let's check if it fits well. If everything fits, cover it with fabric and decorate with coffee beans.

To cover the bottom, cut out two circles from cardboard. The diameter of the outer one should match the diameter of the well ring, the inner one should be slightly smaller (the difference depends on the thickness of the fabric that we will use in the design).

We decorate the outer circle with rope.

To do this, apply glue to it and wind the rope in a spiral, layer by layer.

We cover the circle that will be inside with fabric and decorate it with coffee beans.


We make a rim on top of the well ring.
To do this, draw a circle with a diameter equal to the ring itself, and inside a circle with a smaller diameter, for example 1-2 cm. Cut it out and wrap it with rope.

Glue the rope, glue coffee beans on top.

The result should be a “constructor” like this:

We assemble it into a single well ring, which will directly serve as a stand for the office. We carefully glue the parts together.


We decorate it using rope and coffee beans to suit your taste and imagination.
Decorative elements made from rope do not have to be made directly onto the figure. It is much more convenient to prepare them in advance and then glue them.
This is done like this: the shape you need is formed on the tape. The glue is applied on one side. Then you need to let the glue dry.


Peel off the rope pattern from the tape and glue it to the coffee figurine. Decorate the top with coffee beans.

Making a well roof

Small wooden slats, or popsicle sticks, or bamboo doily sticks

glue them into two identical blocks that will serve as roof slopes.

We connect the blocks together at an angle; this can be done using paper (replacing the roof ridge with it), or just glue. We paint the resulting roof in the color we need, varnish it, and decorate it with a pattern of rope and coffee beans.

Making a bucket

To make the bucket, I took an empty plastic medicine bottle. You can glue the cardboard base.
We cover the base with wooden slats, paint it in the desired color, varnish and decorate it. We make a handle from the wire, which we also cover with rope.

The main set of the well is ready.

Small details remain.
The stands that will hold the well cover are made from wooden slats. I used wooden disposable ones Chinese chopsticks. We measure the required length, cut it, wrap it with rope, which we glue firmly. We drill two small holes in the posts if we want the gate to rotate, which is not at all necessary.

Making a well gate

We cut out a small rectangular strip from cardboard, glue it along the edge into a pipe and glue it with wooden slats. We also cut out circles from cardboard with a diameter a couple of millimeters larger than the pipe. We glue the circles with slats, and in the center we make small holes for the wire.

We connect the parts and get a well gate. We paint it, varnish it, and decorate the edges with rope.

All that remains is to make the handle.
I wanted it to be in the form of a wheel. To do this, I braided the wire with rope. The rope was securely fixed with glue.

Then I connected it into a circle, made axles with wire and rope and decorated it with coffee beans.

To make it more convenient to turn the wheel, I glued a small wooden handle to it. The handle was painted and varnished.

All the parts for the coffee figurine are ready, all that remains is to assemble them together and securely fix them with glue.

Approximation New Year's holidays It just beckons you and me to do something unusual and special with our own hands at home, for example, some interesting craft in the New Year spirit, which you can use to fabulously decorate your home or please your loved ones. And even if you are not at all a high-profile master in any kind of creativity, but simply an amateur - a beginner, then this does not prevent you from revealing yourself fully and creating beautiful products with your own hands in your own personal manner and taste. The hand made technique is so fascinating and addictive that you want to create funny little things again and again. One has only to put all the effort, patience and, of course, desire into this matter, then real masterpieces of art will appear, the author of which will be you. There are a great many materials for creating creative works, but in our article we recommend that you focus on one of them in order to, so to speak, get comfortable enough. As a visual example, we provide 6 photos of ideas for cool crafts made from coffee beans at New Year 2019 made with your own hands very quickly and easily. If you have a little doubt about your abilities in this area, then we have for you a sufficient number of master classes with step-by-step instructions and a number of irreplaceable tips. So, let's get started, dear friends!
New Year's candle made from coffee beans
Any holiday can be decorated with a beautiful candle, as in the photo, and New Year 2019 is no exception. Now in stores you can find a large selection of candles, different in color and design. You can make an equally beautiful craft with your own hands if you use a simple master class.
To do this you will need:
- paraffin or candles;
- wick;
- coffee beans;
- vanillin;
- ribbon;
- candle mold.
Progress:
- The candle must be cut with a knife into small pieces, leaving the wick. The paraffin will melt in a water bath. Since it is difficult to wash, it is better to use unnecessary dishes for this. At this time, you can start making the mold. A box from baby juice, because with it the candle will not stick. The box must be cut to the desired length. The wick must be secured in this container. Since the paraffin is still melting, you should add coffee beans to it and wait another 10 minutes. You need to add a little vanillin to this solution for flavor. The base for making a candle is ready!
- You need to pour aromatic grains into the bottom of the juice box, and then add half of the previously made paraffin solution. It will take about 2 hours for the candle to harden. Then you need to add the remaining solution and let it harden overnight.
- The box should be cut slightly to make it easier to remove the candle. After this, the DIY craft for New Year 2019 is ready. It is important to do the work step by step and not rush. The result is a fragrant candle that is perfect even as a gift.
For a more detailed look at the process of making a candle at home using the technology we propose, we recommend that you watch the video tutorial.
Master class on creating a candle from coffee beans
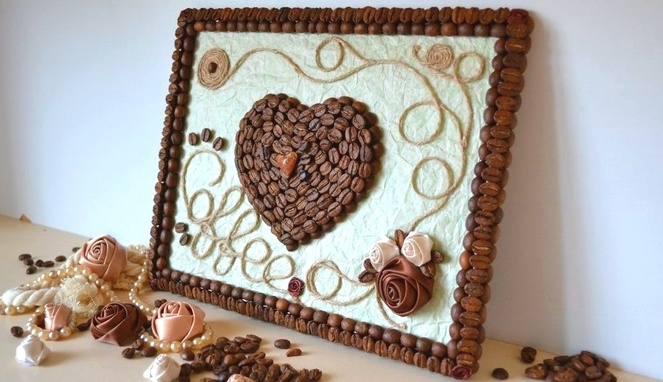
New Year's picture made from grains

For the New Year 2019, you can also make a wonderful picture from coffee beans with your own hands. It is important to choose a solid base and use the right materials to create such an original craft.
To do this you will need:
- coffee beans;
- cardboard;
- glue;
- dye.
Progress:
- To make a New Year's picture, you need to take durable cardboard and carefully create a drawing on it. For the New Year, Santa Claus, Snowman, snowflakes, etc. are perfect.
- Coffee beans are then superimposed onto the image. You can use glue for this.
- If you want to highlight certain areas in the painting, you can use paint. The finished craft can be hung on the wall and it will always lift your spirits, delighting you with its beauty and unusualness. For children, such an activity will be one of the simplest and most exciting.
Master class on creating a New Year's painting with your own hands
Candy bowl

Every New Year usually brings a lot of candy, and 2019 is no exception. In order for the sweets to be beautifully folded, you need, of course, a candy bowl. You can make such dishes from coffee beans with your own hands without unnecessary difficulties. This craft will certainly delight all your relatives, as well as children, who will enjoy rummaging around in a beautiful vase in search of yummy food! Look at the photo and start working immediately.
To do this you will need:
- coffee beans;
- plastic container;
- glue;
- dye.
Progress:
- You need to take a small plastic container from under the food.
- Then its surface outside and inside should be covered with coffee beans. If desired, they can be repainted. The resulting product is ready to decorate New Year's table. For kindergarten the craft will be the simplest, because it requires a minimum of materials.
Watch our video tutorial and you will have the opportunity to make a charming composition of aromatic coffee beans with your own hands for the New Year 2019.
Master class on creating a New Year's composition
Coffee Christmas tree

To make a wonderful craft from coffee beans for the New Year 2019 with your own hands, easily and unsurpassedly, you will need your developed imagination. So, let’s say, it can play out well when creating a Christmas tree. The variety of decorations that can be used to transform the holiday product you have made will allow you to set off on a flight of personal dreams and fantasies.
More beautiful ideas for crafts you can find in our other article .
To do this you will need:
- coffee beans;
- cardboard;
- glue;
- rope.
Progress:
- To make it work beautiful craft in the form of a Christmas tree for the New Year 2019, you first need to draw it with your own hands on cardboard.
- Then it is covered with coffee beans and cut out along the contour. At this stage, you need to immediately make a hole for the rope. After this, the product should dry. If desired, you can decorate it with sparkles, beads or beads, as in the photo. Simple step-by-step instructions allow you to create a wonderful New Year's toy even for children for kindergarten or school.
Master class: three-dimensional Christmas tree for a gift
Picture frame

An equally beautiful and also useful craft for the New Year 2019 will be a frame decorated with coffee beans, as in the photo. Doing this kind of work with your own hands is quite easy. Convince yourself of this by getting started.
To do this you will need:
- coffee beans;
- cardboard;
- glue;
- dye.
Progress:
- To make a beautiful photo frame, you need to prepare a solid base for it. You can take thick cardboard or a box. It is necessary to create a square frame onto the margins of which the grains are glued.
- Glass can be taken from an old frame.
- The grains can be repainted or left as is. If desired, the design on the margins of the frame can be different. Unusual ornaments look great. The resulting craft, made with your own hands on the eve of the New Year 2019, can be placed on the wall or placed on the table. It doesn't matter where you place it, the main thing is that the aroma from the coffee beans will come from everywhere.
Topiary made from coffee beans

A wonderful decoration for your festive table and at home in general there will be a DIY craft made from coffee beans for the New Year 2019 in the form of a topiary. Anyone can make it very easily, and it does not require anything supernatural or difficult to obtain.
To work you will need:
- foam ball or newspapers;
- coffee beans;
- trunk in the form of a wooden stick;
- fabric for decoration;
- flower pot or other container;
- thick cardboard;
- scissors;
- special glue for foam plastic;
- gypsum mortar;
- any decorative elements.
Work process:
- First we have to make a tree. For this purpose, we will need to create the heart itself and the trunk adjacent to it. We take cardboard and draw a large heart or the size you want on its dense surface.
- After this, our drawing should be cut out.
- Then we find a wooden stick, we don’t need to take a very thick one, since we should slightly cut its base in half. This is necessary in order to fasten it to the cut out heart.
- Next, we proceed to designing our decorative tree. We take all the coffee beans that you have at home and start gluing them on both sides of the cardboard heart, placing them tightly together.
- When the top of the tree has formed, we should decorate it to our taste. For this you will need satin ribbons, beads, seed beads or something like that. Such decorations must be attached to the surface of the product using hot glue.
- The final stage will be the preparation of fasteners for the tree. It will be a flower pot filled with gypsum mortar. It is necessary to insert the trunk of our craft into this mixture.
- The surface of the gypsum base can be decorated with aromatic grains or simply covered with a piece of burlap along with the pot and secured at the base of the trunk with a thin rope in the form of twine.
- To transform a flower pot, you have the right to use, in addition to all kinds of ribbons and strings, also incense sticks cinnamon, cloves and other spices, dried citrus fruits, nuts, etc. Everything is at your discretion! This is how you can easily and simply create a wonderful craft for the New Year 2019 with your own hands and add it to any corner in your home.
Watch our video tutorial to take a closer look at the technology for making holiday topiary at home.
Master class on creating topiary
Finally
Our article has now come to its end. We hope that it has become very useful and quite interesting for you, since making crafts from coffee beans for the New Year 2019 with your own hands is not at all difficult and, moreover, exciting for all family members, especially children. With every product you create, you gain experience, which subsequently sharpens your abilities and develops your talent. If you are new to this area of needlework, then our master classes will certainly help you. They, like no one else, will convey to you all the necessary information that will reveal all the subtleties and secrets of your chosen creativity. Decorate your home with unusual New Year's decor made by yourself, give gifts to loved ones and friends into which you have invested all your warmth, love and respect for loved ones, please those around you and enjoy positive emotions yourself. Then the world will become much kinder and more fun for you! Happy holiday, dear friends! All the best to you!
A huge number of crafts can be made using coffee beans. This is a wonderful decoration element with a pleasant invigorating aroma. In this article, we will look at: what crafts can be made from coffee beans with your own hands.
You will need: coffee beans, polystyrene foam, PVA glue, plaster, stick for the trunk, brown threads, flower pot, ribbon.
Master Class

You will need: coffee beans, thick cardboard, glue gun, pencil, scissors, cotton or linen fabric.
Master Class
- Cut a square of cardboard to the desired size.
- Cut a piece of fabric of the same size + 2 cm as allowance.
- Glue the fabric to the cardboard and secure the edges of the fabric to back side.
- Wait until completely dry.
- Sketch the drawing with a simple pencil. (This could be a heart, a world map, an inscription, a number, a declaration of love, a cup of coffee, owls, trees, cats, bears, flowers, and much more...)
- Glue the coffee beans along the edges of the pattern with the convex part down.
- Glue the coffee beans, filling the middle of the design with the convex part down.
- Wait for it to dry completely and decorate to your taste.

You will need: coffee beans, glue gun, cardboard, scissors, hands and numbers for a clock.
Master Class
- Cut out a clock shape of the desired size from cardboard. It can be a circle, square, rectangle, triangle, heart, and much more...
- Glue the coffee beans with the convex part down along the edges, then filling in the middle.
- Attach the hands and clock numbers.
- Decorate to your taste.

You will need: coffee beans, cardboard, PVA glue, scissors, water-based varnish.
Master Class
- Make 2 templates for the frame in this way: cut out 2 identical rectangles from cardboard, cut a hole in one of them the size of the photo.
- Set the entire rectangle aside.
- Cover the frame with coffee beans with the convex part facing down.
- Wait until completely dry.
- Glue the templates together, leaving space for the photo.
- Decorate to your taste.
We bring to your attention a second, simpler option for making a photo frame from coffee beans. You just need to buy or take a ready-made photo frame and cover it with coffee beans.
Coffee mug

You will need: mug, coffee beans, thread, sponges (cotton pads), super glue and acrylic paint Brown.
Master Class
- Glue cotton pads to the mug. (Tight, no gaps).
- Wrap the mug with thread.
- Paint the mug with acrylic paint.
- Glue coffee beans to the mug.
The coffee mug is ready!
Coffee candles

First option
You will need a ready-made candle, all that remains is to decorate it with grains. You can glue them with glue or hot wax.
Second option
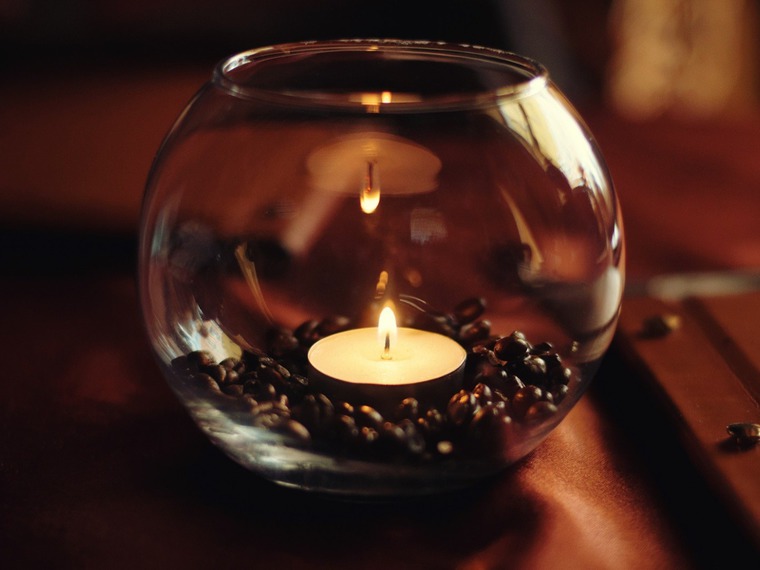
Take the candle and place it in a transparent wide container. Fill the space between the candle and the glass with coffee beans.
Hello, dear readers! Coffee is common an invigorating drink, some may like it, but others, on the contrary, may not like it... But today we will not talk about the taste of this well-known drink, but about coffee beans, or rather, in this review, interesting crafts made from coffee beans will be presented to your attention.
Coffee beans, thanks to their warm color, alluring aroma and smooth oval shape Simply great for making all sorts of cute little things, home accessories or school crafts.


What to make from coffee beans?
Decorative Christmas trees.
An excellent solution for using coffee beans is a cute decorative Christmas tree. To make it, you should stock up on super glue, thick paper folded into a cone and coffee beans. After sequentially gluing all the grains, the tree can be decorated with small beads, beads or miniature bows.


Crafts from coffee beans photo
Filler for decorative vases.
In addition, coffee beans can serve as an excellent filler for vases. Take a transparent glass vase and pour into it required amount grains, into which we install decorative branches at the final stage.


Crafts from coffee beans photo
Stand for cosmetic accessories.
The essence is the same as in the previous example. We select a transparent vase of a suitable shape, pour coffee beans into it and install brushes, cosmetic pencils, etc.


Candles decorated with coffee.
Perhaps the most popular use of coffee beans is to decorate candles. Moreover, most often, ready-made candles are simply placed in a glass filled with coffee. Personally, I like solid candles in a glass cup with coffee beans in the bottom. To make such a candle you will need: wax, a mold, coffee beans and a wick. Pour into the bottom of the mold a small amount of coffee beans, install the wick (take a match, tie the wick to it and lower it into a glass, as in the diagram below), pour in the melted wax.
Scheme for convenient wick fixation.

We wait for the wax to cool completely, cut off the match holding the wick and admire the result. By the way, to make a homemade candle, you can buy a very ordinary candle, cut it into small pieces and melt in a water bath; in addition, the resulting wax can be colored with all kinds of dyes.


Crafts from coffee beans photo
Tree made from coffee beans.
Crafts made from coffee beans are so diverse that it is quite possible to make a whole tree from the beans in question.
To work you will need: super glue, a plastic ball, coffee beans, a straight or curved stick for the trunk, a small pot, a string of twine and small stones to fix the tree in the pot.
We pierce the plastic ball with a stick, place the tree trunk in the pot and fill it with stones, after which we proceed to decorate with coffee beans; it is better to glue the beans onto the ball in several layers so that no gaps are visible. Finally, we decorate the trunk of the tree with twine. Products made from twine (ropes) can be viewed.


Frame.
You can purchase a photo frame made from wooden planks onto which you carefully glue coffee beans. It should be noted that such a frame will simply perfectly highlight an interior decorated in the style.

DIY coffee bean topiary (video):
Tree or flower made from coffee beans (video master class):
What else can be made from coffee beans:
Dear readers, do you have items at home decorated with coffee beans? Curious to know how you use coffee beans in decor? I look forward to your feedback, and also suggest subscribing to receive news from the “Comfort in the Home” website.
Maybe we can take a break?!
Find 10 differences!

Show hidden content

