Why are eggs painted for Easter? An interesting Answer combines several historical versions at the same time. Many peoples have long believed that an egg is the personification of life-giving force. Christians considered it a symbol of the resurrection and the tomb. For this reason, Mary Magdalene presented an egg to Tiberius to inform him of the miraculous resurrection of the Savior.
Easter egg color
Why are eggs painted red for Easter? Initially, eggs were painted red to represent the blood of Christ. Over time, eggs have become a traditional attribute, which represents the “foundation” of festive games. Colored eggs with letters, drawings, floral and geometric patterns lift people's spirits.
Well, painting them didn’t matter. To color eggs you can use a lot of techniques. Our team has collected 19 color options. Let's get started.
How to color eggs with onion skins
Many people are no longer interested in this method of painting, but we offer not a traditional, but a slightly modified version.
What you will need:
- a dozen eggs (preferably white);
- red onion peel;
- a bunch of cilantro;
- 1/2 tbsp. l. salt;
- nylon stockings.
How to do:

For high-quality painting of 10 eggs you will need at least half liter jar husks. Here we need to build on the rule “The more, the better.”


To get different shades, you can experiment and cook several decoctions by mixing the husks of red and golden onions in different proportions.
To get a pattern, take limp greens; they stick better to the surface of the egg.
How to color eggs with herbs
Another method is to paint Easter eggs with your own hands using natural dyes - pharmaceutical herbs. 
- Green eggs can be obtained by making a decoction or infusion of birch leaves or nettles.
- Yellow shades can be obtained with a decoction of lemon peel or chamomile.
- Orange color add turmeric, saffron and orange peels.
- Beige eggs they will be if you dye them with coffee or if you boil them with walnut shells.
In addition to pharmaceutical herbs and culinary spices, you can color eggs with food. 
- Sugar beet juice will color pink palette, from delicate to rich.
- Spinach gives deep green color .
- Juice red cabbage paints in blue.
We dye eggs for Easter with our own hands using natural dyes:
- Pour water into a container, add 1 tbsp. l. 9% acetic acid, add natural product, which we will use to paint.
- Let it boil, boil for 10 minutes, turn off the heat, let it brew for 40 minutes.
- Place eggs in the broth, place on pita bread, bring to a boil, cook for 15 to 30 minutes.
- Using a spoon, take the colored eggs out of the pan, cool in cool water, dry, and spread with sunflower oil.
If you want the color to be more intense, you can place the decoction in the eggs uncovered with oil and leave for several hours or overnight.
How to color eggs with napkins
Interesting unusual method decorate the eggs with different patterns.
What you will need:
- chicken eggs;
- dry dyes;
- gloves to protect hands;
- cotton buds;
- napkins.
How to do:

We dye eggs with threads for Easter
What you will need:
- bright threads (wool, silk, floss);
- 1-2 tbsp. l. vinegar (per 1 liter of water);
- 1 tbsp. l. salt (per 1 liter of water).
How to do:

Marble eggs for Easter step by step recipe
What you will need:
- red and gold onion skins;
- plain paper;
- scissors;
- nylon stockings;
- 1-2 tbsp. l. salt.
How to do:

Marble eggs with nail polish
What you will need:
- eggs;
- water room temperature;
- colored varnishes;
- toothpick;
- latex gloves.
How to do:
- Pour clean water into a deep bowl.
- We drip nail polish into it. You can take 2, 3 or more colors.
- Using a toothpick, we make stains, patterns, and cobwebs (as in the water manicure technique).
- We put on gloves, take a clean, boiled egg, dip it first on one side, then on the other. Let it dry.
Don't forget, varnish is not a substance intended for human consumption. This method egg painting has an interesting design. Therefore, whether to eat such eggs or not is up to you.


Other ways to design an Easter egg
- Speckled painting. How to make dots on eggs? Easily! Take an old toothbrush, dip it in any paint, run your finger along the bristles of the brush, directing the splashes to colored egg. This creates an unusual decor with randomly located dots of different sizes.


- Paint the eggs with powdered sugar. Take the powder, mix it with water, you should get a runny paste. We take the mixture with a syringe without a needle and draw the patterns we want.

- Lacy eggs for Easter. We take scraps of lace, fasten them to the eggs, and place them in paint for 15-20 minutes. We remove the shreds.


- Eggs with sprinkles for Easter eggs. Take a boiled egg, dip it in raw white, then sprinkle generously Easter sprinkles. When the whites dry, the sprinkles will remain.


- How to make a gradient on eggs. We dilute the dye according to the instructions. Take a boiled egg, put it in a ladle, and immerse it in the dye. First, more than half the egg for 3 minutes, while gently raising and lowering all the time, then raise the egg to the middle and hold for 5 minutes, also lifting and lowering, the remaining 10 minutes. We hold only the lower part and also raise and lower.


- Striped eggs for Easter. We take several glasses, dilute dyes of different shades with different concentrations. Lower the eggs one at a time to different depths.

- Electrical tape patterns on Easter eggs. Take a boiled egg, stick it with electrical tape, creating the necessary pattern. We dip the workpiece into the dyes one by one, removing fragments of electrical tape.

Preparing for Easter is an occasion for creativity. In I told you how you can paint eggs for Easter using natural dyes, that is, juice various plants, vegetables, coffee or onion skins. But if you want brighter, more festive colors and some real fun, you can also use food coloring. I don’t think this is harmful, because we already eat them in many foods, and the egg will still be protected by the shell.
Nowadays buying food coloring is not a problem; before Easter they are sold literally everywhere in special sets. Also in online stores or confectionery stores there is a rich assortment - from helium to water. You can use what you have on hand. Dry dyes from special Easter sets must be dissolved according to the instructions. And in the case of liquid ones, drop a few drops into water; adjust the saturation of the solution yourself as you wish.
And then the fun begins, because there is room for imagination. I think this kind of creative preparation for Easter is great fun with kids. I offer many fun step-by-step egg coloring tutorials in this article.
By the way, when preparing for Easter 2019, don’t forget to prepare.
Most often, eggs must be hard-boiled in advance to color with food coloring. If you are doing some kind of multi-step coloring, then it is best to use hot, freshly boiled eggs - the dye on them will dry instantly and you can move on to the next step!
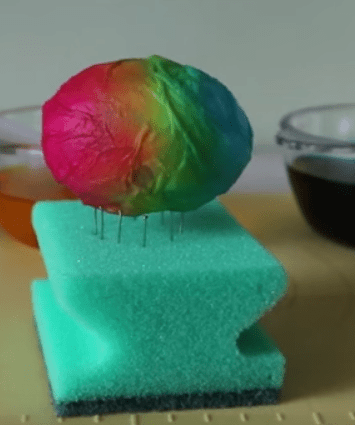
Preparation: how to dry colored eggs
To prevent the color of the egg from deteriorating during drying, you can make a special stand by inserting several needles or safety pins into a sponge or foam paste or something similar. If you are not a perfectionist, you can also dry it on a wire rack, but then there will be stripes where the egg comes into contact with the wire rack.

How to Dye an Easter Egg Using Shaving Foam or Whipped Cream

Here's a quick and easy way color your Easter eggs! Use shaving cream. You can also use whipped cream from a can (vegetable). I think this method is more fun for kids than traditional coloring.
You will need:
- Shaving foam or whipped cream,
- Food colorings,
- Gloves
When painting, do not forget to wear rubber gloves! Food dyes wash off well from dishes, but they stay on your fingers for about a day.
Preparation:
- To begin, squeeze an even layer of shaving cream into a baking pan, baking sheet, or other suitable container. Pour it out colorful dyes a few drops at a time, mix them with shaving foam, and make stripes, mix some to make a beautiful pattern. This can be done using a straw or a regular spoon.
 2. Roll the egg until it is colored on both sides. Dry for 10 minutes. And rinse!
How to make lace Easter eggs

You can make very beautiful Easter eggs by decorating them with lace.
Some housewives have some scraps of lace at home, or you can buy some at the store, it’s inexpensive.
You will need:
- Eggs,
- Food coloring,
- Rubber bands or hair ties (or threads)
- Lace
- Scissors
- And a stand or rack for drying
Preparation:
- Cut the lace into strips large enough to wrap around the egg and a little more.
- Wrap the eggs, tie the lace, and secure with rubber bands or thread.

3. Color according to the instructions (or if you are using food coloring not from the Easter set, then hold the egg in the coloring until it is colored (10 minutes).
4. Dry on a rack or rack. Then remove the lace.
How to color eggs using rice and paint

Here's another one unusual way how to get tender marble color on eggs.
You will need:
- Boiled eggs,
- Plastic cup or container with lid
- Food coloring, better than two colors
Preparation:
- Take a small glass or Plastic container with a lid, add rice there. Add a few drops of dye and stir to color the rice.

2. Place the egg, close the lid and shake.

3. The egg will be colored with delicate specks.

4. You can leave it as is, or you can add more color. Wait for the egg to dry and repeat the process. Add a few drops of dark dye to the rice and repeat coloring. The result is a delicate marble color.

The colored rice remaining from this coloring can be used for games with the child, for example, to make a small colored sandbox in which to bury various items or just let him go through this beautiful rice for the development of fine motor skills. You can also make appliqués with it.
How to make striped eggs using rubber bands

Striped eggs can be made using threads, rubber bands or rubber bands for weaving bracelets, which are sold everywhere.
You will need:
- A set of rubber bands for weaving or stationery rubber bands
- Dyes different colors(dissolve them according to instructions)
- Freshly boiled, hot eggs
If you are dyeing an egg with several colors, start with the lightest color.

3. Then pull the rubber bands over it.

4. Dip the egg into the darker dye solution.

4. When it’s colored, pull it out, remove the rubber bands, and dry it.
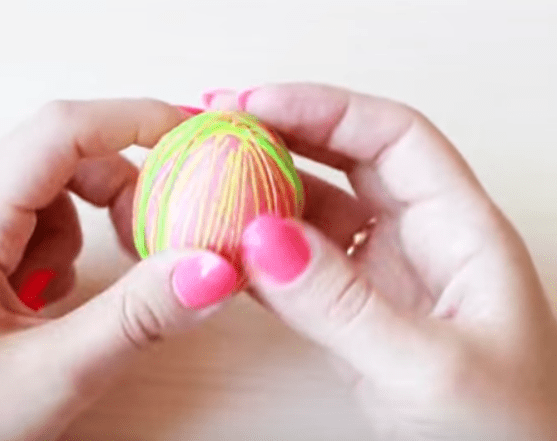
5. Then put on the rubber bands again and paint them with dark dye.

6. Remove the rubber bands, dry, and you will have an unusual striped egg!

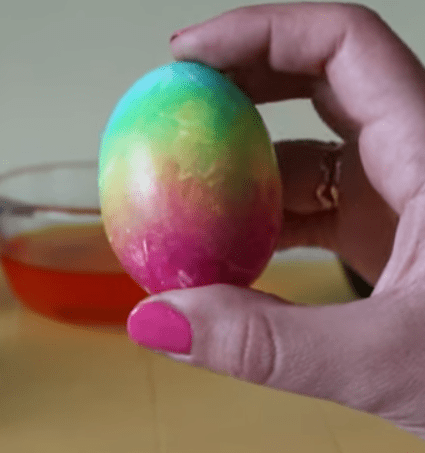
How to dye an egg rainbow colors

- Take an egg and dip one side in red first. Hold for 1-2 minutes
 2. Remove and let dry.

3. Then dip the side of the egg in yellow.

4. Remove again, dry and then dip the other end of the egg in blue. 
5. Mixing colors will give rainbow colors.

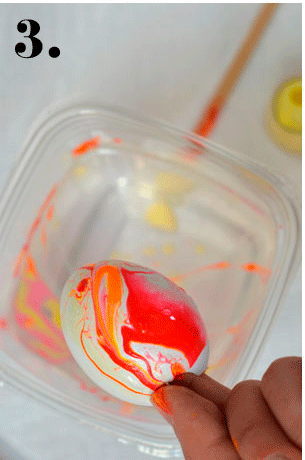
How to color an egg using a napkin
Coloring with a napkin is very simple technique, which allows you to get easy marble effect and bright colors with soft transitions
- Wrap the egg in a napkin.
 2. Start pouring dyes on it using a spoon or medical syringe. Pour red over the top. The middle is yellow.

3. Pour blue dye over the bottom of the egg.
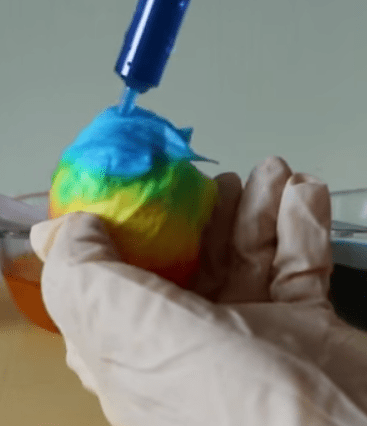
4. Then turn the egg in your hands, pressing the napkin firmly against it. Leave to lie in a napkin for 10 minutes.
5. You will get a beautiful rainbow egg with soft transitions.
6. If you randomly pour dyes on an egg in a napkin, you will get such a beautiful fantasy egg. 
How to make a pattern using wax

Using wax you can make beautiful dots on an egg and any other patterns. The places where you applied wax will remain white, and the rest will be painted over.
- Light a candle, take a cotton swab and use it to apply dots of wax onto the egg.
 2. Next, dip the egg into the cup of food coloring.
3. After 10 minutes, remove. When the egg is completely dry, you can remove the wax with a knife. You can make other patterns in the same way.
How to make patterns on an egg using tape or tape

You can do this on a white egg or one pre-dyed in a light color.
- Wrap duct tape or tape around the egg.

2. Dip into dye; when colored, remove and let dry.

3. Remove the tape.

How to make a mosaic paint job

A very beautiful mosaic color can be given to an egg using ordinary electrical tape.
- Paint the egg a light color.
2. Cut the electrical tape into small pieces.

3. Cover the egg with them, as if with a mosaic.

4. Dip the egg into the darker dye. It will color in about 1-2 minutes.  5. Then remove the egg and dry it.

6. Remove any pieces of tape.
 7. The result is an egg with a beautiful mosaic effect.

How to paint eggs using watercolors
Instead of watercolors, you can use food coloring and paint eggs with them using the same principle.
Who said that to achieve beauty you have to do something difficult? Watercolor is perfectly suited for scales - just as delicate, fluid and, by the way, quite natural. Just wet your brush well and watch the watercolor spread across the shell, mixing with the other color. Very fun and beautiful!

You can just make streaks of watercolor, or you can paint randomly. Watercolor loves unexpected mixtures. Even simple blots on an egg will look very picturesque. All you need is a brush, water and paint. And the best news is that nothing can be spoiled here!
No need here step by step instructions just go with the flow. You may want to draw dots with cotton swabs or flowers, or maybe it will just be streams of different colors. Watercolor will show the way!
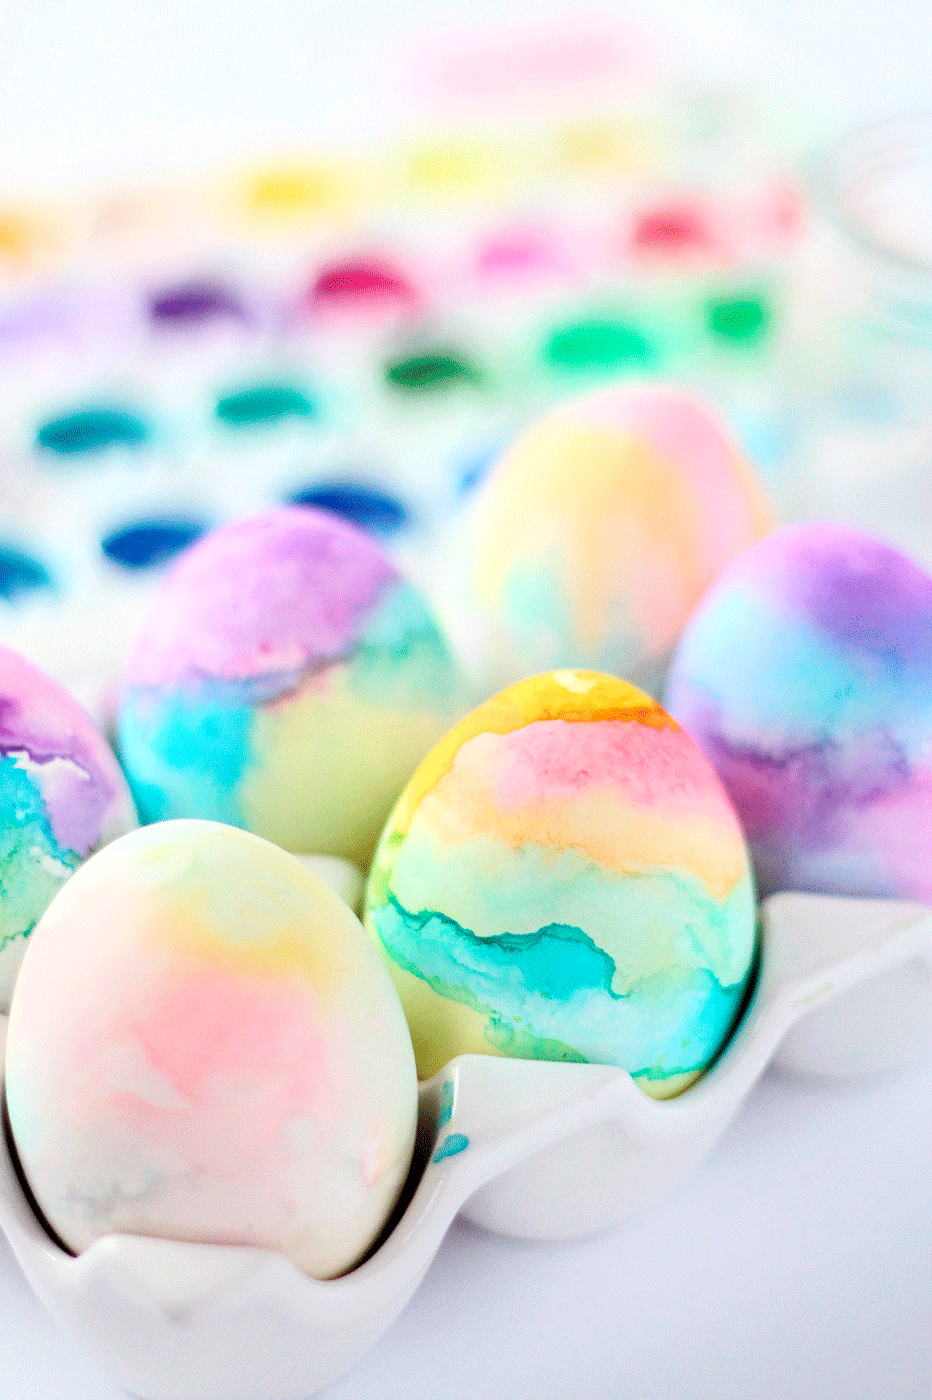
This can be a wonderful color lesson for a child. Show him how green is born from mixing yellow and blue. What happens when you splatter paint on an egg. Use stamps or some of the techniques described above, for example, you can apply wax. Have fun!

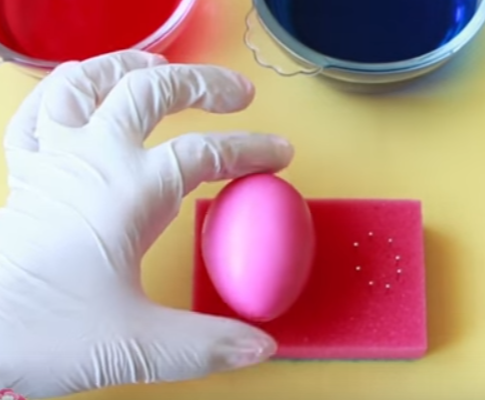
How to paint an egg with nail polish

A very bright and beautiful, festive marble effect can be created using ordinary nail polishes. Such bright decor is perfect for a spring holiday.
In addition, the process itself is exciting - it’s hard to stop, you want to paint more and more eggs to see what pattern you get this time, they are all different!
- Pour different colors nail polish in a bowl. Using a stick, mix them a little to create lines and a marbled effect.

2. Stir them a little with a stick to create streaks and a marble effect.

3. Submerge the egg completely in water and then quickly remove it.
4. Let it dry on a special stand; I wrote about how to make it at the beginning. Before dipping a new egg, remove all the old varnish and start over!

How to decorate eggs with sprinkles

Confectionery sprinkles are sold in all stores before Easter, you can also buy them online or in confectionery stores.
An egg decorated with sprinkles in the form of small balls looks especially impressive.
- Pour the sprinkles into a deep plate, there should be sufficient quantity. Moisten the egg with water or egg white. Or frost with royal icing made from powdered sugar and egg white (read more about it at the end of this article).
- Pre-color the egg in a light color.
- Take half raw protein and about half a cup of powdered sugar. Gradually add the powder to the egg whites, whisking or stirring until smooth. You should have the consistency of thick sour cream.
- Then the glaze must be transferred to pastry bag with a thin nozzle. If you don’t have it, you can use a regular bag, collect the icing in one corner, cut off the tip and paint.
- Or you can make a cornet for painting - roll up a paper bag from baking paper and cut off the tip.
- You can make patterns on the egg in advance with a pencil and simply trace them, or you can improvise.
- Let the icing dry and your lace egg is ready!
Very beautiful stains on eggs can be made using food coloring and vegetable oil.

2. Pour a little vegetable oil into the bowl with the dye.

3. Dip the egg into the dye and quickly remove it.
If you like to color anti-stress coloring books, or draw in the doodling style, then you should like making small lace paintings on eggs. It can be done using royal icing(icing), which is made from protein and powdered sugar.
You can follow the example of painting an egg that the girl in this video does. Only she uses acrylic paints, and you might as well use glaze instead!
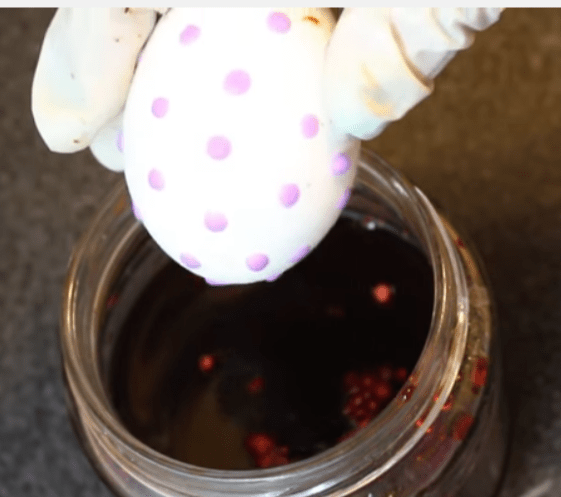
Painting eggs for Easter using rags will not be difficult for you. To implement your plan, you just need to find rags that will shed when cooked and leave their paint on the eggs. If there are no rags, then threads will do. All that remains is to wrap the eggs in accordance with the desired pattern and boil.
To make the eggs colorful, it is better to take pieces of silk rags. So, we place a silk rag on the table with the front surface up, put an egg in the center of the rag and tie it tightly, but carefully, with an elastic band, as in the picture:

Wrap the sevrkha once again with regular cotton fabric and secure it again with reindeer.
Now pour water into the pan and add 4 tbsp. white vinegar. The dyes used in silk fabrics will transfer their color to the shell when exposed to vinegar. Bring to a boil, turn the heat to low and simmer for 30-40 minutes. Carefully remove the finished eggs with tongs or a spoon and cool, preferably in cold water.
Dyeing eggs using rags is one of the dyeing methods. We take bright rags, wrap the front side of the egg, and tie the ends with thread. Pour water into a saucepan, add eggs, also add three tablespoons of vinegar, cook for 15 minutes after boiling. Then pour cold water, remove the fabric. The eggs will have the same pattern as the fabric.
One of the simplest and most unpretentious, but nevertheless effective ways of coloring eggs for Easter is precisely the method of coloring eggs in rags.
To do this, we need scraps of colored fabric with a pattern or simply brightly colored, and we need to choose the fabric that fades well.
We select scraps of fabric according to the color scheme, wrap the egg and wrap it with threads, then boil the eggs for 15-20 minutes in water and vinegar.
The video tutorial below will help you paint beautiful Easter eggs in patches:
One of simple ways dye eggs for Easter - using ordinary rags. It is better to take bright rags (so that the pattern on the egg is clearly visible) and silk (such rags shed well).
Place the selected piece of paper on the egg with the right side and press firmly. Then we wrap it tightly with white threads or wrap it tightly on top with white cotton cloth.
Place the eggs in a cloth in a saucepan, fill with water, add vinegar (3 tablespoons per saucepan), and after boiling, cook for 15 minutes.
Then fill it with cold water and remove the fabric. The result is a beautiful pattern appears on the eggs.


For painting you need a fabric that will actively shed and dye the water. The more flowers there are, the more fancy the painted shell will be. It is better to buy pieces of fabric from second-hand stores and flea markets. The front side should be pressed tightly against the shell so that the egg does not slip on the fabric. Then wrap the egg tightly in cotton cloth. white and put it in a saucepan, pour in water and 3 tablespoons of vinegar. Cook for 15 minutes after boiling. Then pour cold water and remove the cloth. Ready!

The result is like after an art workshop. The fabric must be chosen with an unstable, that is, easily transferable dye. It can be silk or silk jersey, muslin or chintz. Wrap the egg tightly but carefully in fabric, and then sew the edges with thread for security. After this, the workpiece must be wrapped in a piece of cotton fabric.
The next stage is the main one. The eggs are placed in a pan of water, to which vinegar must be added. Place the casserole on the fire and boil it hard. After this, cool the eggs and - here it is! - a work of art that is a pity to eat.
The resulting drawing can be made independently, that is, with hands, a brush and paints, only after many years of preparation.
There are several ways to dye eggs for Easter in a variety of colors. If you want to show originality and get eggs with shells of uneven or multi-colored colors, then you can use textile industry products, for example, colored threads, as well as fabrics with bright colored patterns, the main condition is that they must be new and prone to molting.


In order to get a beautiful and unusual pattern on the egg shell, you can boil it after wrapping it in a new one. colored fabric, which is still capable of giving off paint. The following types of fabrics with unstable dye are better suited for this.
Holiday Happy Easter They greet you generously: they bake Easter cakes, prepare Easter, and even children know how to paint eggs for Easter. Why eggs have become the main dish with which the holiday is celebrated is also quite clear. During the long fast, a lot of eggs accumulated in the house, because laying hens had no need to fast, so there were baskets full of large white eggs in the village houses. Christed colored eggs in the morning, and the careful and kind words were spoken, rejoicing in God’s protection. The testicles were not specially prepared for staining, sometimes with the same beets or onion skins the eggs were colored at the same time as they were boiled. Easter in 2017 falls on April 16, which means you need to paint eggs on Thursday - it is also called clean. Houses will be cleaned and paints will be prepared so that there will be plenty of eggs for the holiday. Boiled eggs can now be colored dyes or do napkins decoupage, but the emergence of new methods of coloring requires preparation so that the color is bright and the shell does not burst.
How to paint eggs for Easter - video recipe
Preparing Easter eggs for coloring
To prepare the egg “wealth” for painting, do the following:
- Trays of eggs are usually stored in the refrigerator, and to prevent the shell from bursting due to temperature changes, the trays must be taken out an hour and a half before cooking;
- it seems that the shell is clean, but no, there are remnants of a fatty layer on it, so you need to wash the raw eggs with soap, but not under running water, but in a plastic bowl or basin;
- rinse clean testicles in cool water and dry with a cotton towel or simply let air dry
After coloring, the eggs must be cooled, allowed to dry, and lightly rubbed with vegetable oil to give them a shiny appearance.
In the old days they divided:
- dyes (the shell is completely painted, in one tone, without patterns or stripes);
- specks - dots were applied to the shell using a stencil;
- Easter eggs - the surface is painted with flowers and patterns.
Now housewives and needlewomen decorate Easter eggs with patterns of amazing beauty, because all that is needed is patience and the desire to make Easter even more joyful.
What color are eggs painted for Easter, and why is red most often chosen?
For believers, the question “what color are eggs painted for Easter” is resolved unambiguously – only in red, because it personifies the “blood of Christ” and his sacrifice in the name of people. But you can paint eggs in the most rainbow of colors or make a simple drawing, and all this is not as difficult as it sometimes seems.

It is not recommended to use black color in dyeing, but if the egg is painted with a Gzhel or fancy design, then thin dark lines are allowed. Usually the color black is not used at all, because the holiday is bright, joyful, as if it is calling for spring. Blue, cyan, purple shades are a symbol of heavenly purity, yellow, green, pink shades are colors vitality nature.

How do you usually paint eggs for Easter?
For coloring, use solutions of natural or food coloring, in which eggs are boiled or already boiled eggs are painted with a brush or by dipping into multi-colored liquids.

How do you color eggs for Easter? The easiest way is to peel onions or beet juice, but even these regular staining can be made amazingly beautiful. Birch leaves When boiled with them, they gave a delicate yellow tint to the shell of amazing beauty, and cranberries made the eggs crimson. If you take the petals of a forest violet, you can get a purple tint. Nettle or spinach give a magnificent green color, and you can leave the eggs in the broth for 12 hours, and then the color will be unusually radiant.

Be careful: the enamel of the pan will stain along with the eggs, so you should wash the dishes immediately after use.
- to color 6 eggs green, you will need to boil them “in a bag” and let them cool;
- Pour water (1 liter) into a small saucepan with a wide bottom, add 200 g of spinach, bring the broth to a boil and add a tablespoon of 9% vinegar. Remove the broth from the heat and let it brew for an hour.
- Place the eggs in the broth, bring to a boil, and cook for another half hour. Then remove the pan from the heat and leave the eggs in the broth overnight.
In the morning you'll get emerald green Easter eggs, which will decorate the basket with other Easter decorations.
How to paint eggs for Easter with napkins, or Simple Easter decoupage for beginners
Sometimes stencils are used to enhance the design, since not everyone knows how to paint eggs for Easter with decoupage napkins. The stencil is cut out of an ordinary napkin, glued with wax onto a boiled egg and dropped into a bowl of dye.
Decoupage eggs for Easter using napkins
To make cute, delicate designs from napkins, you will need already boiled eggs and special decoupage (multi-layer) napkins. Don’t forget PVA glue for children’s work, acrylic paint “gold”, soft brushes (wide).

Boil the eggs and let them dry. Prepare napkins and glue.

Cut out the design you like from a napkin

Dilute the glue slightly with water. Separate the parts of the napkin, separating the layer with the pattern

Gently apply glue to the egg with a brush and glue the cut out part of the napkin, smooth out the unevenness with a brush. After the napkin has dried, glue the other side of the egg.

After the napkins have completely dried, paint over those parts of the napkin that are colorless. The egg will have a golden hue

Eggs covered with napkins are very beautiful, but they cannot be stored for a long time, even in the refrigerator. It’s better to immediately give it as a souvenir, or display a vase with them on festive table like a treat.
How to paint Easter eggs in onion skins
An ancient and very popular way of decorating Easter eggs, so how to paint eggs for Easter in onion skins All adults know, but here you can find a twist.
A good video recipe on how to paint eggs for Easter in dry onion peels
Step by step how to paint Easter eggs in onion skins

How to color eggs for Easter with food coloring
All Easter cooking kits contain dyes, and you can use them to make the dyes more interesting.

Covering Easter eggs with food coloring
- The eggs must be boiled first;
- dip hot eggs into bowls with dye solutions;
- keep in solution until desired color is obtained.
All the pleasure of working with food or confectionery dyes– this is confidence that the dye composition is absolutely safe for humans. Usage medicines, such as a solution of iodine or brilliant green (brilliant green) gives an excellent color, but you absolutely cannot eat such eggs! You can paint eggs this way to decorate a holiday table, but not for eating.

How to dye Easter eggs with beets or beet juice
Beautiful bright borscht we get it from one single product - beets or beets. Moreover, all the vegetables in the soup acquire a light raspberry tint, so in the old days, in addition to onion peels, beets or beet juice were often used to color Easter eggs. Moreover, the color that beets give is even more suitable for Easter.
Let's clarify how to dye eggs for Easter with beets: To obtain a crimson color per liter of water, you will need two or three medium-sized beets. Vegetables must be peeled, boiled until soft, then removed from the broth. Cool the broth, add raw eggs and cook for 40 minutes.

The color will be soft pink or raspberry, but not red. This color stands out nicely among the brown-red eggs, and the eggs can be eaten.
Other ways to dye eggs for Easter
In principle, it doesn’t matter what color you paint eggs for Easter 2017, the main thing is that they are elegant, decorate the table, and bring health and well-being to every home, because everything once started with an egg...
Coloring with solutions of vegetables and spices
You can dye Easter eggs in different colors with natural dyes:

Of course, dye eggs beets or in onion skins, dyes or decorate ready eggsnapkins easier than finding your own way to color Easter treats. But the white shells of eggs will be painted with multi-colored stripes if the eggs are wrapped with bright floss threads before cooking. The brighter the threads, the more beautiful the coloring, and instead of floss threads, you can take beautiful woolen threads, which are also wrapped around raw egg and tied tightly. You can cook the egg a little longer than usual so that the paint penetrates more tightly into the texture of the shell.
Video recipe for how to dye eggs with threads:
Decorating Easter eggs using decoupage technique.
Eggs must be hard-boiled (10-12 minutes) and cooled completely. To decorate eggs, paper napkins should be used primarily with a beautiful, not very large design. It is advisable to take smooth napkins, three or two layers. You will also need a brush for painting and fresh egg white. Before separating the white from the yolk, the egg must be washed well with soap and wiped with a napkin.
The whites must be beaten thoroughly with a fork. Egg white- This is the simplest "glue" you can use. You can also make a paste from starch and water (heat 50 ml of water and 1 tablespoon of starch to a thick, almost transparent mass), and you can also use gelatin glue (pour 0.5 teaspoon of gelatin into 100 ml. cold water, after 30 minutes bring almost to a boil and cool to room temperature). All three methods are environmentally friendly and safe.

Separate the bottom white layer of the napkin from the colored one. There are napkins where you can easily separate 2 white layers, and there are napkins where the colored layer adheres very tightly to the white layer. On initial stage You need to separate the part that comes off easily.

For further convenience of decoupaging eggs, it is convenient not to cut out fragments of the drawings, but to tear them out with your hands, then when gluing, fewer wrinkles will form.

When you tear out the design, you will see if your napkin has another white layer. If you are decorating eggs with white shells, this white layer of the napkin must be removed; if your eggs are not white, then it is better to leave the bottom white layer of the napkin so that the design on the egg is clearer.

So in a simple way preparing drawings for decoupage eggs. Fragments should be pulled out both larger, on the sides of the egg, and smaller, on the top and bottom of the egg.

To glue a pattern to an egg, you first need to grease the desired area of the egg with egg white, attach a dry piece of napkin with the pattern to it, and then use a brush to cover the top of the pattern with white. This should be done from the center of the picture to the edge.

It's best to glue small designs to the top and bottom of the egg first, and then glue larger pieces to the sides of the egg. The drawings should be glued slightly overlapping so that there are no empty spaces left (especially if the egg is not white). For decoupage, it is advisable to use an egg stand (for me, a yogurt lid successfully plays its role).

To dry completely, place the glued egg on a wire rack. After 30 minutes the eggs will be dry.

The decoupage technique will help you not only make beautiful eggs, and also have fun with the children, because this is an exciting creative process.
 An express method for decorating Easter eggs with napkins.
But if you suddenly have no time left to decorate Easter eggs, napkins come to the rescue again. For decoration boiled eggs you just need to wrap them in colored, or even white, napkins like in knots and tie these knots with colored ribbons, ribbons, serpentine, New Year's rain or just colored threads. Decorative Easter eggs are ready!
