New Year's holidays are almost at the doorstep. In this regard, many families began to worry about how to decorate their homes beautifully and unusually, so that the mistress of the coming year, the Yellow Earth Pig, would be amazed with surprise and bestow her favor. Since this animal prefers everything homemade, through which comfort is achieved, most people resort to preparing for creativity at home. Excellent crafts are created with one’s own hands from various kinds scrap materials that can later be used to decorate not only the Christmas tree, but also the entire room interior. Gifts that include a lot of love, warmth and respect for the person to whom this souvenir is presented are also quite interesting and creative. If you, too, are eager to please your loved ones with similar amenities, then check out our article, in which we will provide you with 17 photos of ideas for cool crafts made from salt dough for New Year DIY 2019 ideal forms and variegated colors. Such wonderful tricks will interest not only adults, but also your little children, for whom this activity will be very useful and exciting. And if any difficulties arise in this area, our master classes will come to you at ambulance. Don’t delay your holiday preparations, make the world much more interesting and colorful, richer and kinder today!
Preparing salt dough
Before you start creating holiday crafts for the New Year 2019 from salt dough, you should prepare it yourself. Allow your child to do this, who will receive in this way not only a certain experience, but also great pleasure. Arm yourself necessary products and get to work.
For production you will need:
- 2 cups wheat flour;
- 1 glass “Extra” salt;
- 250 gr. water.
Work process:
- To prepare the dough you need to mix flour and salt.
- Then you need to pour in water. Mix well, gradually adding the remaining amount of flour. Remember, the mass should not be liquid or sticky. By the way, to make the salted dough more elastic and shiny, you should add a little vegetable oil to it during the kneading process.
- Roll the dough into a ball and visually check whether it holds its shape. If yes, it does not spread or crawl on the table, then the material for creativity is ready.
This is how you and your children can easily and simply create with your own hands an excellent pliable material for future creations for the New Year 2019.
Video: recipe for making salt dough for crafts
Salt dough coloring process

Modeling from salt dough is, of course, a fun activity. It’s so nice to make something cool and unusual with your own hands in the form of cool figures for the Christmas tree, magnets for the refrigerator, figurines for beauty and harmony in your home, and so on. However, the further process of coloring them is not convenient for everyone and, let’s say, is within their control, since, if you take into account small children, they do not have the ability to delicately paint over all the details in their crafts, so they need a simpler option with already bright and colorful finished material. And it’s quite easy to make variegated salt dough at home. You can try to decorate it yourself in all the colors of the rainbow, rest assured, you will even like it. For the New Year 2019, such splendor will yield equally attractive creations.
Coloring methods:
- gouache;
- food colorings;
- instant coffee;
- cocoa;
- acrylic paints;
- brilliant green;
- multi-colored ink;
- mascara;
- vegetable or fruit juices;
- sparkles.
Thanks to such a variety list, you can achieve excellent results in a fairly short period of time. But you just need to remember that the dye you choose must have a liquid or paste consistency. If you received the coloring element in the form of tablets or powder, then it is advisable to dilute it a small amount water. All you need is a few drops of this substance, squeezed onto the salt dough for a delicate, faint shade, and if you want to achieve a more rich color, then, naturally, more. After this, you should knead your “building” material properly, adding flour if necessary, and begin the direct creative process. But some craftsmen, after drying decorative items, still resort to re-saturating their crafts using acrylic, watercolor, oil paints. This finishing touch will add an alluring and perfect gloss to any figurine.
New Year's mosaic made of beads and bugles

If you don’t know what crafts to make from salt dough for the New Year 2019 with your own hands for holiday decor at home, then take advantage of our master class. It is very simple and therefore your children can freely work in this direction on their own, creating beautiful holiday decorations. This activity is perfect for labor lessons at school or the development of children in kindergarten.
To work you will need:
- salty dough;
- plastic covers;
- beads and seed beads;
- gold paint.
Progress:
- To get beautiful toys for the New Year tree, you need to take small lids. Perfect for coffee or other products.
- Then the parts you have chosen need to be decorated with gold paint or you can leave them as they are.
- After this, they need to be filled with salt dough, and a mosaic should be attached on top. If desired, you can use beads, glass beads or other interesting things.
- By attaching a thread to the product, you will get a wonderful DIY craft for the New Year 2019.
To expand your knowledge in the field of New Year's decorations from the above-mentioned material, made with your own hands, we recommend watching our video tutorial. From it you will learn about the existence of some secrets in this work.
Master class: 11 secrets when working with salt dough
New Year's candles

You can create a pleasant magical atmosphere for the New Year 2019 if you have salt dough candles at home. To make this kind of craft, it is important to follow all the work step by step, and the result will be magnificent decoration, made with your own hands is quite simple.
To do this you will need:
- salty dough;
- cardboard;
- corrugated paper.
Progress:
- It is necessary to make rings from the salt dough, which should be put on the roll. The latter can be made from ordinary cardboard or use a base from toilet paper.
- Corrugated paper will be needed to create a visible flame that needs to be placed inside the candle. By color you can choose red, yellow or orange paper. If you wish, you can put a candle on cardboard base, decorated with salted dough. This handmade craft is ready to decorate your home environment for the New Year 2019.
Christmas tree decorations made from puff pastry

Before New Year holidays You can organize a great fun activity for children related to puff pastry modeling. This process is very easy to perform and, among other things, brings a lot of pleasure, just like salt dough.
To work you will need:
- puff pastry;
- cookie cutters;
- decorations: beads, beads, rhinestones, etc.
Progress:
- You need to roll out the puff pastry prepared by yourself and form it into figures, which in your own way appearance will remind you of the approaching New Year 2019. And for this, ordinary cookie cutters are used. The resulting crafts can be left in the condition in which they are, but it is best to paint them in different colors. It is recommended to decorate the surface with beads, seed beads or rhinestones. If you prefer plastic beads, you should remember that such products cannot be dried in the oven. Can be used various cereals. Nowadays, handicraft stores sell a large assortment of accessories, and therefore you can buy absolutely any kind of jewelry.
- Depending on the types of shapes, you get wonderful crafts in the shape of hearts, Christmas trees, stars, etc. Cocktail tubes are used to create holes in the product, with which you can make cool patterns with your own hands. Organizing such an activity is perfect for kindergarten. The kids will probably enjoy fiddling with such a pleasant-to-touch material as puff pastry. It is as pliable and soft as salt dough. The point here is diversity, and it’s up to you, dear friends, to choose what you like best.
Don’t forget to look at our photo ideas on this topic, and we also have a cool article with many more cool crafts, follow the link to see for yourself.


Christmas tree toys “Hearts” made of puff pastry

For a festive tree for the New Year 2019, it is not necessary to buy toys in the store, because handmade crafts from puff pastry or salted dough will also look great. Moreover, independent creativity is always doubly pleasant. There are no specific instructions required here, it is important to use some recommendations and you will get beautiful decorations.
To do this you will need:
- puff pastry;
- materials for creating prints: hearts or other types of shapes;
- beads;
- ropes or ribbons.
Progress:
- You can create jewelry with your own hands using a method such as a print. To do this, you need to roll out the puff pastry or salt dough and form it into shapes as you wish. You can use baking dishes or any other utensils for this.
- To make a design on the surface of the craft, you need to attach shells to it and press a little. The result will be a shell design, but you can use leaves, twigs, etc.
- After this, it is best to decorate them with beads and beads. Painted toys look beautiful. So that they can be hung on the Christmas tree for the New Year 2019, you should make a hole for the rope.
Browse our photo ideas to expand your imagination.


Master class on creating Christmas tree decorations from salt dough
New Year's wreath made of salt dough

What could be cooler and more noticeable than a DIY craft made from salt dough for the New Year 2019, made in the form of a wreath. Such a wonderful and quite spectacular decoration can transform not only the doors in your house or apartment, but also, simply, complement and clearly emphasize your New Year's decor generally.
To work you will need:
- salty dough;
- water;
- rolling pin;
- file;
- gouache;
- spray - paint;
- newspapers;
- an oval or round bucket as a base;
- thin tree branches;
- threads;
- a small piece of fabric;
- sponge;
- self-hardening plastic;
- ring for fastening;
- PVA glue;
- heat gun.
Work process:
- To begin with, you should make snowmen from salt dough. They can be the same as in our photo or yours personally, born from your fantasies.
- After this process, it is necessary to dry the resulting products. To do this, you will need to place your creations on a file with a stand and wait a few days for them to strengthen and harden.
- After making sure that your crafts have dried, proceed to their further transformation by painting. To do this, you can use black and brown gouache or something else, more colorful. We take a sponge dipped in paint and carefully treat our product with it.
- Then we wash off the paint with a damp cloth, making it less noticeable, but with a slight tint of brownishness. Then, using other colors, you should bring the decorative coloring to the desired result.
- After this, you need to take a small piece of self-hardening plastic and mold it into a small ball, the size of cherry pit. Flatten it and attach a metal ring - fastening so that its upper edge slightly peeks out from behind the plastic.
- We take the newspapers you prepared and roll them up thin tubes, the edges of which should be fixed with PVA glue.
- Then we take out a bucket, which we will use as a base for making a wreath. We turn it upside down and wrap the resulting newspaper tubes around it, connecting them together with a glue gun. You should end up with an oval or a circle, it all depends on the shape of the container you choose.
- Pre-soak selected tree branches, preferably birch, in boiling water. This way they will become elastic and obedient. Then, after drying them, you should carefully wrap them around a newspaper base (circle or oval) and attach them using threads. The wreath should look lush and not glow through.
- When the DIY craft for the New Year 2019 is almost ready, it will need to be spray-coated with white and then silver paint.
- Decoration should be done using dried orange slices, berries, bows, satin ribbons, rhinestones, beads and other assortment. But most importantly, don’t forget to attach the snowmen you made earlier from salt dough.
Conclusion
Most people associate this holiday with magic and fun. Decoration Christmas tree in many apartments it turns into a real ritual in which all family members take part, including the smallest members of the household. To make it more interesting for kids to prepare for the holiday, you can offer them to make New Year's toys from salt dough with your own hands. Such jewelry will look original on the forest beauty and, most importantly, they will be completely unique. The best way to create toys is with the whole family. great way have fun and usefully spend your free time, introducing the younger generation to creativity.
Methods for preparing salt dough
To make your Christmas tree decorations beautiful and durable, you need to make the dough for them correctly. There are several options for preparing it. For the first method you will need:
- flour - 1 glass;
- salt - 1 glass;
- vegetable oil- 1 tablespoon;
- cold water - about 125 ml (its volume depends on the quality of flour).
The dough is kneaded from the prepared ingredients. It should turn out elastic and plastic. The resulting dough is covered with cellophane and placed in refrigerator for no less than 3 hours. After this, it can be used to make Christmas tree decorations.
There is another recipe that you can use salty dough. New Year's toys made from this material will be more durable. For this you need to prepare:
- flour - 1 glass;
- salt - 2/3 cup;
- PVA glue - about 15 ml;
- cold water - 100 ml.
The dough, as in the first version, after mixing all the components should be quite elastic and retain its shape perfectly. Water should be mixed into the mass in small portions, making sure that it does not turn out to be too thin. Salted dough prepared using this method hardens quickly, so it must be used immediately after kneading.

Necessary tools and decorative elements
To make New Year's toys from salt dough with your own hands with your baby, in addition to the raw materials itself, you will need to prepare a convenient wooden board on which the entire creative process will take place. You will also need a rolling pin, a plastic knife for plasticine, shaped molds, acrylic paints and several brushes of different thicknesses. To decorate crafts, you can use everything you can find in the house (for example, beads, beads, sparkles or rain).
Toy making process
Having prepared everything you need, you and your child can start creating masterpieces from dough. The easiest way is to make flat figures using molds. These can be stars, hearts, Christmas trees, angels, outlines of various animals, etc. To make such toys, you need to roll out the dough on a board (it should be 0.6 to 1.5 cm thick), and then use prepared molds to cut out different figures from it. The more crafts you get, the better. Since the toys will be hung on the Christmas tree, you need to remember to make holes in them (for these purposes it is most convenient to use a toothpick or a match).
The finished figures are dried for one hour in an oven heated to 80 degrees, or on a hot radiator. You can let the Christmas tree decorations dry on their own by laying them out on a piece parchment paper and leaving it on the table, but in this case they will harden for several days.

If there are no molds in the house, there is no need to despair. funny New Year's figures can be cut from rolled out dough with a regular plasticine knife. In all other respects, the process of their manufacture is no different from the method described above.
Decorating figurines
New Year's toys made from salt dough should be painted after they are completely dry. You can cover them with one or more colors and draw funny faces and patterns on them. To ensure that beads, buttons, bows and other decorative elements adhere firmly to the products, it is best to attach them to the surface using PVA glue. When the paint and glue on the toys are dry, colored ribbons are threaded through them. Unusual and very beautiful new Year decoration, made with your own hands, are ready. You can hang them on the Christmas tree with your child.

Important nuances
There is nothing simpler than homemade New Year's toys from salt dough. The photos of Christmas tree decorations presented in this article are only a small part of what can be made from this plastic material. Modeling toys, like any other type of creativity, requires imagination. Salt dough is a universal material, and you can use it to create Christmas tree figures of any complexity. However, it is worth remembering that they should not be too thin or too thick, because in the first case the products will turn out fragile and quickly break, and in the second they will turn out to be heavy and will pull the spruce branches down.
From this article you will learn how to make salt dough yourself and how to dry it. Lots of photos and step-by-step instructions will help you make a dough craft for any holiday.
For modeling lessons with small children, it is better to use salt dough or Play Doh plasticine.
How to make dough for crafts: recipe
You can make the dough yourself; all you need is a few simple ingredients: flour, fine salt, citric acid, vegetable oil and water.
First mix 1 cup of flour with 0.5 cups of salt and 2 teaspoons citric acid. Pour into a saucepan, add 1 tablespoon of oil to the dry mixture. Place over medium heat, gradually add water and stir. No more than 0.5 cup of water should be used. When the mass pulls away from the walls of the pan and becomes one lump, remove the pan from the heat. Take out the mixture, place it on a board sprinkled with flour, and regular dough, knead with your hands.
If you want to do colored dough For modeling, you first need to dilute dry food coloring in water. It is also possible already in ready dough add a little gouache and knead it well until the color becomes uniform.
How to prepare salt dough for modeling?
Prepare salt dough. Paint it in different colors, depending on what you want to make. The dough can be made uncolored, divided into balls and add a little gouache of the desired color to each and knead. It's better to make the dough in regular colors, and then mix them to achieve the desired one.
Keep the dough in a bag, or wrap it in cling film, can be placed in a closed container to prevent it from drying out. If it is still dry, add a little water, and if it is too wet, add a little flour.


- Make the dough thinner and simply spread it on the base of the craft, so you can make butter on a piece of bread, or make it from brown dough chocolate glaze for the cake
- Try on the food you made with the toy plates that you will later play with so that they match in size
- To stick the salt dough pieces together, use a wet brush. Apply a brush to the joint and stick the parts to each other
- When making food for dolls, it is very important to make the dough as much as possible the same color as the original, for example, the carrots should be orange, not yellow or red
- To prevent the colors from fading, open the craft with varnish. For activities with children, you need to use special harmless varnishes; they do not have unpleasant odor because they are water based


Drying figures from salt dough for modeling
There are two ways to dry salt dough crafts.
- Air dry crafts. It is best if you place them on a smooth surface and leave them for several days. When the craft is dry, turn it over or lay it on its side so that it dries on all sides.
- Baking in the oven. Preheat the oven well, place baking paper on a baking sheet, place crafts on top, place in the oven and turn off the heat. The oven should be closed and not opened until completely dry. You can also bake crafts at a temperature of 100°C, but in this case you need to watch them so that they do not burn
These two methods can be combined, for example, dry it in the oven for an hour, then leave it in the air, after a while in the oven, and so on until it dries.
Of course, if the craft contains other decorations (beads, beads), you need to dry it using the first method.
New Year's crafts made from salt dough
The child will really enjoy decorating the house before the New Year and making handicrafts together with his parents.
Christmas tree toys made from dough

 You can make excellent Christmas tree decorations from salt dough, and even kids can handle making them.
- Prepare the play dough different colors or unpainted
- Roll out a flat cake from it and squeeze out a figure; you can use cookie cutters
- Make a hole with a cocktail straw so that you can hang the figurine on the Christmas tree.
- Decorate the toy as you and your child want: stick colorful balls on the Christmas tree, make a garland for it, let it rain, add a white snowball to the toy
- Unpainted dough can be dried first and then painted with paints or markers
- Dry the dough or bake in the oven
- Pass the ribbon through the hole and hang the toy on the tree
You can make a lot of holes in the figures.


Or stick beads, beads and other beautiful stones into the dough, but in this case these toys cannot be baked in the oven.


You can decorate toys with ribbons or decorative ropes.


After the dough has dried, apply PVA glue to it and sprinkle the figures with glitter.


Color the uncolored dried dough with a permanent marker.

Cut out a figure in the shape of a mitten, make it a beautiful colored ribbon from colored dough and decorate it with a homemade button. This figurine can be baked in the oven.


Print the baby’s palm and draw Santa Claus in it - it will not only be a wonderful toy for the New Year tree, but will also remain as a keepsake.


You can also make a Santa Claus toy like this. To give him a beard, use a garlic press. 

Make these other gingerbread toys from brown dough.


Making a New Year's candle from dough
To make a New Year's candle you will need modeling dough of different colors, a cardboard cylinder, for example, from a roll of paper napkins and red and yellow napkins.
- Let your child roll colorful sausages.
- Stick them on our cardboard base

- Decorate it with colorful balls
- You can simply cover a cardboard cylinder with one color and then decorate it


- Make a fire out of napkins and attach it to the top of our candle


Christmas tree made from dough
- First make a blank for the Christmas tree, for this you will need cardboard packaging from juice or milk. First cut off its top, cut along the side folds, and open it. You need to cut off the excess from the rectangles so that you get isosceles triangles. See how to do this in the diagram below

- Glue a cardboard base for your Christmas tree


- Now let your child decorate it: let him cover it with green dough - you will get a Christmas tree. All that remains is to add balls, a garland, a star, and don’t forget about the gifts under the Christmas tree


You can also make a Christmas tree like this

Easter crafts made from salt dough
For Easter you can make the following crafts from salt dough:
- Decorated eggs made from flatbread dough


- Bunny figures cut from salted dough flatbread.
- Decorated three-dimensional Easter egg

- Egg cup


Easter eggs made from dough
Even a baby can cope with this task.
- Take the dough and mold it into an egg-shaped figure.
- Decorate it as you and your child want.


You can use mixed dough of different colors for the base, or you can make a base from unpainted dough and then paint it with paints or markers. Open the eggs with glue and sprinkle with cosmetic glitter. Glue the multi-colored balls; to do this, moisten the joint with a wet brush. Press beads, pasta, cereal, and other decorations into the eggs. Make prints with different objects.
In general, fantasize!

Dough egg cup
For this you will need a cardboard cylinder, dough and paints.
Cover a cut circle of cardboard with unpainted dough and mold it into a tail, head and other parts, as shown in the diagrams below.

Don't forget to cover the stand on all sides with dough.

Decorate the craft as your imagination dictates; you can use gouache or watercolors.


Open with water-based varnish to make the colors brighter and the craft to last longer.

Dough crafts for February 14th for Valentine's Day
What does everyone associate with this wonderful holiday? Of course the heart! Let's make a festive heart with your child and give it to your parents.
Salt dough heart


Here, as everywhere else, we first make the base, in our case the heart, and decorate it!


You can decorate it with roses, it will be very beautiful. How to sculpt roses, see step-by-step instructions with photos below.


You can make a keychain like this with paws.


These cute couples are made very quickly and easily.


You can make a lot of these heart figures, make holes in them and make a garland out of them, which you can use to decorate a wall in your house.

Dough photo frame
Make a blank heart, decorate it and use it as a family photo frame with reverse side secure with colored cardboard.


Salt dough decoration
This kind of love fish will definitely suit your mother’s outfit on this special day.

Crafts from dough for March 8
On March 8th you can make these flower keychains for mothers, grandmothers, aunts and sisters. They can be done with younger children. You can use multi-colored dough or uncolored dough, and then decorate it with paints.


You can make this flower candlestick for a gift.

Make such interesting medals with your children, and most importantly, they are all different. Let the child give them himself.

Make figures in the shape of a figure eight and decorate them with flowers, stones, beads, in general, whatever your imagination allows.


Make a pendant with your child, for example, in the shape of a heart and decorate it: make flowers, leaves, decorate with paints, sign a congratulation.


Salt dough roses
- Take play dough, need colors
- Making a cone

- Roll the ball, flatten it carefully into a round cake
- Stick the ball to the cone

- We make a second ball and glue it on the other side - we have a bud
- We make a few more balls and also sculpt petals from them. We chain them in a circle


- We bend the upper edges of the petals slightly back, and press the sides to the center

- We make several side by side, depending on how lush you want the flower to be.
The rose is ready!

 If necessary, make leaves from green dough, press the veins with a toothpick. Make legs from sausages. Combine all the details into one flower.
Crafts from dough for February 23

You will definitely like this medal.


Airplane - craft made from salt dough
A wonderful gift for dad or grandfather would be a salt dough airplane.
- Roll out the base for the figure - this will be the body
- Bend one side of it a little - this will be the tail. Attach the remaining parts to it


- Roll up the wheels and fenders for it


- Go over with a damp brush and attach the parts to the body


- Blind and attach wings in the form of triangles on toothpicks


- Make a propeller and also attach it to the body using a toothpick


- Let the figurine dry for several days


- Decorate the airplane with gouache


Crafts from dough for Maslenitsa
Maslenitsa is an ancient holiday that has many symbols and traditions. Crafts for this holiday are very diverse, you have plenty to choose from.
For the little ones, you can suggest making a sun, which symbolizes the onset of spring.

 This is some sunshine for older children.

 Invite your child to make their own pancakes from salt dough.
 Pancake keychains


Panels and pictures made from salt dough
With older children, you can make a picture from salt dough.
For example, it could be a fruit basket. Follow step by step instructions from the photo below.
- Roll out the uncolored dough to about 0.5 cm thick
- Prepare a basket template and, applying it to the dough, cut out the basket from it.
- Squeeze out the dough using a garlic press, twist it into flagella, stick it, moistening the joint first, onto the handle of your future basket. You can also add flagella to the rim


- Using a stack or knife, push through lines to imitate basket weaving

- Squeeze out the rolled out dough with a mold or cut out several leaves according to the template. Sell them veins
- Stick leaves on the basket


- Now prepare the fruits: apples, plums, grapes, etc. Roll them into balls of different sizes and give them the required form. For apples, stick cloves in the place where the dried inflorescence should have been, the apples will look like real ones
- Combine everything in one picture


- Leave your craft to dry for several days, preferably naturally
- Decorate as you wish
This is a simpler picture you can make with smaller children.
- Draw a background for it
- Draw the outlines of the character figures
- Ask your child to stick the dough without going beyond the outline.
- Leave the painting to dry
- When it's dry, invite your child to decorate the characters with paints.
- Add small details
- Open the picture with varnish, put it in a frame and you can hang it on the wall

Step-by-step dough crafts
Below are some step-by-step instructions with photos for modeling salt dough with children.
Salt dough beads
- We take colored dough, it can be one color, it can be different
- We roll balls out of it, preferably evenly and of the same size. You can make the size descending
- Pierce the balls carefully in the center with a toothpick
- We leave them to air dry for several days. Periodically turn them over to different sides.
- When the balls are dry, carefully remove the toothpicks
- We string the resulting beads onto a string or ribbon.
- You can paint the beads with paints or markers

Horseshoe made of salt dough
- Roll out the dough into a flat cake, 1 cm thick
- Attach the horseshoe template and cut out the figure with a knife
- Blind the leaves, cut off the excess, push the veins onto them
- Make berries and a flower, use a toothpick to make holes in the berries and stripes on the flower
- Lubricate the horseshoe with water and stick all the parts
- Use a toothpick to make holes around the perimeter of the horseshoe. Make two through holes at the top to hang the figurine on a cord
- Leave the horseshoe until completely dry or bake in the oven
- The dough can initially be taken of a certain color for each part, or you can decorate it with paints at the end


Dough star
- Roll out the dough into a layer approximately 1cm thick
- Using a cookie cutter, cut out a star or other shape
- Gently lubricate the corners with a wet finger so that they are smooth
- Decorate the figurine: make eyes, mouth, nose, poke holes with a toothpick, add decorations
- Bake in the oven or air dry
- Open with varnish


Dough caterpillar
- Rolling a sausage from green dough
- Cut it into equal circles and roll them into balls
- We stick the balls together, do not forget to moisten the joint.
- Making a face for the caterpillar
- We pierce the figure with a toothpick or a pin in the place where we will attach it to the ring
- Drying our craft


Salt dough apple
- Roll out the ball of dough into the shape of half an apple. To ensure an even cut, press it onto a flat surface.
- Add a flat white center
- Roll apple seeds and a tail from brown dough. We make leaves from green
- We collect the figurine and dry it


Crafts made from salt dough - hedgehog
- Form the body and head of a hedgehog from uncolored dough.


- Make him a nose and eyes, you can use black dough or peppercorns

- Using nail scissors, cut the dough, making needles, lift them up a little. Cut the second row in a checkerboard pattern, and so on until the end.


- Leave the hedgehog to dry. When it has completely hardened, you can decorate it with paints and spray it with varnish.


Crafts made from salt dough - animals
You can sculpt many animals from salt dough with children. Below are some step-by-step instructions with photos.
Dough sheep
- Roll 4 balls - these will be the sheep's feet. Place them in a square, pressing their sides tightly against each other (look at the photo)
- Fold up a piece of foil and place it inside the dough ball. Roll it into a ball - this will be the body of a sheep
- Add a head to the sheep, make balls-eyes, horns and ears from sausages
- To imitate wool, make a lot of small balls and stick them around the back of the figure, pressing them down a little
- Dry your craft and decorate with paints and/or markers


Salt dough owl
- Roll out the dough into a round cake
- Use a felt-tip pen cap to press waves, imitating plumage.
- Fold the sides inward - these will be wings
- Fold the top part towards the center too, extending it a little on the sides - this will be the head and ears
- Cap the eyes and add a beak with a toothpick
- Dry and paint


Dough elephant
- Roll the ball, stretch it out a little - this will be the body of the elephant
- Make 4 thick sausages - these will be the legs
- Make a trunk from another one
- Make a tail out of a thin sausage
- Roll out two flat cakes, put plates of smaller diameter and pink color on them - you will get ears
- Collect everything into one figurine and don’t forget about the eyes
- Dry the elephant and open it with varnish


Dough crafts - cat
- Cut out a cat template from cardboard

- Roll out the dough into a 0.5 cm layer
- Attach the template and cut out the cat from the dough


- Let the dough dry
- Using sandpaper, sand around the perimeter of the figure.


Paint the cat with a pencil and then with paints, let dry


Frame the panel


Making fish from salt dough
- Roll out the dough to a thickness of 0.5 to 1 cm
- Cut out the fish according to the template
- Decorate it: make voluminous eyes, fins and a tail, imitate scales with caps from felt-tip pens or other improvised means
Let the mushroom dry and decorate it


Dough crafts - fruits and vegetables
You can make a lot of salt dough various vegetables and fruits, with which you can then play and feed the dolls.
Remember that the colors of food for dolls should be matched as closely as possible to the original ones.

By following step-by-step instructions and photos, you can make interesting figures from salt dough, which you can then give to friends and family on holiday. different holidays. We hope in this article you found many interesting works and useful information. Have fun activities and beautiful crafts!
VIDEO: Craft from salt dough “Owl”
Christmas tree decorations made from salt dough will be very beautiful and original. This is one of the most accessible materials for creativity. Salt dough can be used to make beautiful patterned balls, Christmas bells, fruits and gingerbread men, as well as figurines of Christmas characters and fairy-tale animals.
For the manufacture of New Year's toys from salt dough you need:
Salty dough;
Wire;
Hair fixation spray;
Ribbons;
Cookie cutters;
Beads;
Toothpick or cocktail straw.
How to make salt dough
Salt dough recipe.
Mix 2 cups flour, 1 cup salt, 1 cup water. To make the products more durable, you can add 1-2 teaspoons of wallpaper glue. Knead the dough well and put it in the refrigerator for 2 hours. Once cooled, it will be more plastic and homogeneous.
To make toys made from salt dough dry faster and not crack, we place a ball of foil inside the craft. For fastening, we can use wire or fasteners from broken Christmas tree decorations (1).

When the toys are dry, paint them with gouache, and then fix the paint with hairspray (2).

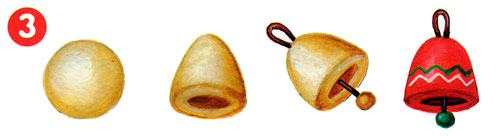
Bells are a wonderful decoration for the New Year tree. First, let's roll a ball, and then from it - a bell-skirt. And we’ll attach the ringing tongue to the wire. Let's paint them in bright colors and draw a beautiful pattern (3).
New Year's figures-pendants made of salt dough
Funny figures-pendants from salt dough can be made using ready-made forms or come up with your own unique image.

Poke a hole in the top of the salted figures using a toothpick or cocktail straw. After drying, we will paint the Christmas tree decorations and thread a silk ribbon or braid through the hole.
These are the toys you can make from salt dough

Gingerbread tree

For registration gingerbread tree will fit ready-made cookies and gingerbread. But the big disadvantage of such a Christmas tree decoration is its appetizing appearance; it may not survive until the holiday. To resist temptation and preserve gingerbread toys, you can fashion them from salt dough.
Roll out the dough into a flat cake and cut out the figure with a mold (1). Separate the figures from the excess dough (2). Make a hole with a toothpick or tube (3). Roll the dough into thin sausages and decorate the gingerbread bird (4).

