Guys, we put our soul into the site. Thank you for that
that you are discovering this beauty. Thanks for the inspiration and goosebumps.
Join us on Facebook And In contact with
We have a lot of things in our kitchen that can be used for interesting experiments for children. Well, for myself, to be honest, make a couple of discoveries from the “how did I not notice this before” category.
website I chose 9 experiments that will delight children and raise many new questions in them.
1. Lava lamp
Needed: Salt, water, a glass of vegetable oil, a few food colors, a large transparent glass or glass jar.
Experience: Fill the glass 2/3 with water, pour into the water vegetable oil. Oil will float on the surface. Add food coloring to water and oil. Then slowly add 1 teaspoon of salt.
Explanation: Oil is lighter than water, so it floats on the surface, but salt is heavier than oil, so when you add salt to a glass, the oil and salt begin to sink to the bottom. As the salt breaks down, it releases oil particles and they rise to the surface. Food coloring will help make the experience more visual and spectacular.
2. Personal rainbow
Needed: A container filled with water (bathtub, basin), a flashlight, a mirror, a sheet of white paper.
Experience: Pour water into a container and place a mirror on the bottom. We direct the light of the flashlight onto the mirror. The reflected light must be caught on the paper on which a rainbow should appear.
Explanation: A ray of light consists of several colors; when it passes through the water, it breaks down into its component parts - in the form of a rainbow.
3. Vulcan
Needed: Tray, sand, plastic bottle, food coloring, soda, vinegar.
Experience: A small volcano should be molded around a small plastic bottle from clay or sand - for the surroundings. To cause an eruption, you should pour two tablespoons of soda into the bottle, pour in a quarter cup of warm water, add a little food coloring, and finally pour in a quarter cup of vinegar.
Explanation: When baking soda and vinegar come into contact, a violent reaction begins, releasing water, salt and carbon dioxide. Gas bubbles push the contents out.
4. Growing crystals
Needed: Salt, water, wire.
Experience: To obtain crystals, you need to prepare a supersaturated salt solution - one in which the salt does not dissolve when adding a new portion. In this case, you need to keep the solution warm. To make the process go better, it is desirable that the water be distilled. When the solution is ready, it must be poured into a new container to get rid of the debris that is always in the salt. Next, you can lower a wire with a small loop at the end into the solution. Place the jar in a warm place so that the liquid cools more slowly. In a few days, beautiful salt crystals will grow on the wire. If you get the hang of it, you can grow fairly large crystals or patterned crafts on twisted wire.
Explanation: As the water cools, the solubility of the salt decreases, and it begins to precipitate and settle on the walls of the vessel and on your wire.
5. Dancing coin
Needed: Bottle, coin to cover the neck of the bottle, water.
Experience: The empty, unclosed bottle should be placed in the freezer for a few minutes. Moisten a coin with water and cover the bottle removed from the freezer with it. After a few seconds, the coin will begin to jump and, hitting the neck of the bottle, make sounds similar to clicks.
Explanation: The coin is lifted by air, which compressed in the freezer and occupied a smaller volume, but has now heated up and begun to expand.
6. Colored milk
Needed: Whole milk, food coloring, liquid detergent, cotton swabs, plate.
Experience: Pour milk into a plate, add a few drops of coloring. Then you need to take a cotton swab, dip it in the detergent and touch the swab to the very center of the plate with milk. The milk will begin to move and the colors will begin to mix.
Explanation: Detergent reacts with fat molecules in milk and sets them in motion. This is why skim milk is not suitable for the experiment.
7. Fireproof bill
Needed: Ten-ruble bill, tongs, matches or lighter, salt, 50% alcohol solution (1/2 part alcohol to 1/2 part water).
Experience: Add a pinch of salt to the alcohol solution, immerse the bill in the solution until it is completely saturated. Use tongs to remove the bill from the solution and allow the excess liquid to drain. Set the bill on fire and watch it burn without getting burned.
Explanation: As a result of combustion ethyl alcohol water, carbon dioxide and heat (energy) are formed. When you set fire to a bill, the alcohol burns. The temperature at which it burns is not sufficient to evaporate the water with which the paper bill is soaked. As a result, all the alcohol burns out, the flame goes out, and the slightly damp ten remains intact.
9. Camera obscura
You will need:
A camera that supports long shutter speeds (up to 30 s);
Large sheet of thick cardboard;
Masking tape (for gluing cardboard);
A room with a view of anything;
Sunny day.
1. Cover the window with cardboard so that light does not come from the street.
2. We make a smooth hole in the center (for a room 3 meters deep, the hole should be about 7-8 mm).
3. When your eyes get used to the darkness, you will see an inverted street on the walls of the room! The most visible effect will be achieved on a bright sunny day.
4. Now the result can be shot with a camera at a long shutter speed. A shutter speed of 10-30 seconds is fine.
How to interest a child in learning new substances and properties of various objects and liquids? You can set up an impromptu chemical laboratory at home and conduct simple chemical experiments for children at home.
The transformations will be original and appropriate in honor of any festive event or in the most normal conditions to familiarize the child with the properties of different materials. Here are some simple tricks that are easy to do at home.
Chemical experiments using ink
Take a small container of water, preferably one with transparent walls.
Dissolve a drop of ink or ink in it - the water will turn blue.
Add one tablet to the solution activated carbon pre-shredded.
Then shake the container well and you will see that it will gradually become light, without a tint of paint. Coal powder has an absorbent property, and the water returns to its original color.
Trying to create clouds at home
 Take a tall jar and pour some hot water into it (about 3 cm). Prepare ice cubes in the freezer and place them on a flat baking sheet that you place on top of the jar.
The hot air in the jar will cool, forming water vapor. The condensate molecules will begin to gather together in the form of a cloud. This transformation demonstrates the origin of clouds in nature when it cools warm air. Why is it raining?
Drops of water on the ground heat up and rise upward. There they cool and meet each other to form clouds. Then the clouds also combine into heavy formations and fall to the ground as precipitation. Watch a video of chemical experiments for children at home.
How your hands feel at different water temperatures
You will need three deep bowls of water - cold, hot and room temperature.
The child should touch cold water with one hand and hot water with the other.
After a couple of minutes, both hands are placed in a vessel with water at room temperature. How does water feel to him? Is there a difference in perception temperature?
Water can be absorbed and stain the plant.
 This beautiful transformation will require a live plant or flower stem.
Place it in a glass of water colored in any bright color (red, blue, yellow).
Gradually you will notice that the plant takes on the same color.
This happens because the stem absorbs water and takes on its color. In the language of chemical phenomena, such a process is usually called osmosis or one-way diffusion.
You can make your own fire extinguisher at home
 Necessary actions:
- Let's take a candle.
- It is necessary to light it and place it in the jar so that it stands straight and the flame does not reach its edges.
- Carefully place a teaspoon of baking powder into the jar.
- Then pour a little vinegar into it.
Next we look at the transformation - White powder baking powder will hiss, forming foam, and the candle will go out. This interaction of two substances produces carbon dioxide. It sinks to the bottom of the jar because it is heavy compared to other atmospheric gases.
The fire does not receive oxygen and goes out. This is the principle behind the fire extinguisher. They all contain carbon dioxide, which extinguishes the flames of fire.
What else you should definitely read:
Oranges have the ability to float on water
 If you put an orange in a bowl of water, it will not sink. Clean it and dip it in water again - you will see it at the bottom. How did this happen?
The orange peel has air bubbles that keep it floating on the water, almost like an air mattress.
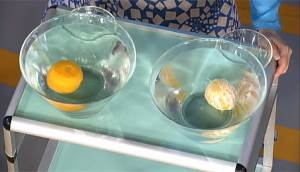
Testing eggs for their ability to float on water
 We use jars of water again. Place a couple of tablespoons of salt in one of them and stir until dissolved. Dip an egg into each jar. In salt water it will be on the surface, and in normal water it will sink to the bottom.
Children are always trying to learn something new every day and they always have a lot of questions. They can explain certain phenomena, or they can clearly show how this or that thing, this or that phenomenon works. In these experiments, children will not only learn something new, but also learn how to create various crafts, with which they can then play.
1. Experiments for children: lemon volcano
You will need:
– 2 lemons (for 1 volcano)
- baking soda
– food coloring or watercolor paints
- dishwashing liquid
– wooden stick or spoon (if desired)
- tray.

1. Cut off the bottom of the lemon so it can be placed on a flat surface.
2. On the back side, cut out a piece of lemon as shown in the image.
* You can cut off half a lemon and make an open volcano.

3. Take the second lemon, cut it in half and squeeze the juice into a cup. This will be the reserved lemon juice.
4. Place the first lemon (with the cut out part) on the tray and use a spoon to “remember” the lemon inside to squeeze out some of the juice. It is important that the juice is inside the lemon.
5. Add food coloring or watercolor inside the lemon, but do not stir.

6. Pour dish soap inside the lemon.
7. Add a spoonful to the lemon baking soda. The reaction will begin. You can use a stick or spoon to stir everything inside the lemon - the volcano will begin to foam.

8. To make the reaction last longer, you can gradually add more soda, dyes, soap and reserve lemon juice.
2. Home experiments for children: electric eels made from chewing worms

You will need:
– 2 glasses
– small capacity
– 4-6 gummy worms
– 3 tablespoons baking soda
– 1/2 spoon of vinegar
– 1 cup of water
– scissors, kitchen or stationery knife.
1. Using scissors or a knife, cut lengthwise (precisely lengthwise - it won't be easy, but be patient) each worm into 4 (or more) pieces.
* The smaller the piece, the better.
*If the scissors do not cut properly, try washing them with soap and water.

2. Mix water and baking soda in a glass.
3. Add pieces of worms to the solution of water and soda and stir.
4. Leave the worms in the solution for 10-15 minutes.
5. Using a fork, transfer the worm pieces to a small plate.
6. Pour half a spoonful of vinegar into empty glass and start putting worms into it one by one.

* The experiment can be repeated if you wash the worms plain water. After a few attempts, your worms will begin to dissolve, and then you will have to cut a new batch.
3. Experiments and experiments: a rainbow on paper or how light is reflected on a flat surface

You will need:
– bowl of water
– clear nail polish
- small pieces of black paper.
1. Add 1-2 drops of clear nail polish to a bowl of water. Watch how the varnish spreads through the water.
2. Quickly (after 10 seconds) dip a piece of black paper into the bowl. Take it out and let it dry on a paper towel.

3. After the paper has dried (this happens quickly) start turning the paper and look at the rainbow that appears on it.
* To better see a rainbow on paper, look at it under the sun's rays.


4. Experiments at home: rain cloud in a jar

As small drops of water accumulate in a cloud, they become heavier and heavier. Eventually they will reach such a weight that they can no longer remain in the air and will begin to fall to the ground - this is how rain appears.
This phenomenon can be shown to children using simple materials.
You will need:
- shaving foam
- food coloring.
1. Fill the jar with water.
2. Apply shaving foam on top - it will be a cloud.
3. Have your child start dripping food coloring onto the “cloud” until it starts to “rain” - drops of food coloring begin to fall to the bottom of the jar.
During the experiment, explain this phenomenon to your child.

You will need:
– 4 food colors
1. Fill the jar 3/4 full with warm water.

2. Take a bowl and stir 3-4 tablespoons of oil and a few drops of food coloring in it. In this example, 1 drop of each of the 4 dyes was used - red, yellow, blue and green.

3. Using a fork, stir the coloring and oil.

4. Carefully pour the mixture into a jar of warm water.

5. Watch what happens - the food coloring will begin to slowly fall through the oil into the water, after which each drop will begin to disperse and mix with the other drops.
* Food coloring dissolves in water, but not in oil, because... oil density less water(that’s why it “floats” on the water). The dye droplet is heavier than the oil, so it will begin to sink until it reaches the water, where it will begin to disperse and look like a small fireworks display.
6. Interesting experiments: in a circle in which the colors merge
You will need:
– a wheel cut out of paper, painted in rainbow colors
– elastic band or thick thread
– cardboard
- glue stick
- scissors
– skewer or screwdriver (to make holes in the paper wheel).

1. Select and print the two templates you want to use.

2. Take a piece of cardboard and use a glue stick to glue one template to the cardboard.
3. Cut out the glued circle from cardboard.
4. TO back side Glue the second template onto the cardboard circle.
5. Use a skewer or screwdriver to make two holes in the circle.

6. Thread the thread through the holes and tie the ends into a knot.
Now you can spin your top and watch how the colors merge on the circles.


7. Experiments for children at home: jellyfish in a jar

You will need:
– small transparent plastic bag
– transparent plastic bottle
- food coloring
- scissors.

1. Place the plastic bag on a flat surface and smooth it out.
2. Cut off the bottom and handles of the bag.
3. Cut the bag lengthwise on the right and left so that you have two sheets of polyethylene. You will need one sheet.
4. Find the center of the plastic sheet and fold it like a ball to make a jellyfish head. Tie a thread in the area of the “neck” of the jellyfish, but not too tightly - you need to leave a small hole through which to pour water into the jellyfish’s head.
5. There is a head, now let's move on to the tentacles. Make cuts in the sheet - from the bottom to the head. You need approximately 8-10 tentacles.
6. Cut each tentacle into 3-4 smaller pieces.

7. Pour some water into the jellyfish's head, leaving room for air so the jellyfish can "float" in the bottle.
8. Fill a bottle with water and put your jellyfish in it.

9. Add a couple drops of blue or green food coloring.
* Close the lid tightly to prevent water from spilling out.
* Let the children turn the bottle over and watch the jellyfish swim in it.
8. Chemical experiments: magic crystals in a glass

You will need:
– glass glass or bowl
– plastic bowl
– 1 cup Epsom salts (magnesium sulfate) – used in bath salts
– 1 cup hot water
- food coloring.
1. Place Epsom salts in a bowl and add hot water. You can add a couple of drops of food coloring to the bowl.
2. Stir the contents of the bowl for 1-2 minutes. Most of the salt granules should dissolve.

3. Pour the solution into a glass or glass and place it in the freezer for 10-15 minutes. Don't worry, the solution is not so hot that the glass will crack.
2Paper, scissors, heat source.
This experiment always surprises kids, but to make it more interesting for two-year-olds, combine it with creativity. Cut out a spiral from paper, color it together with your child so that it looks like a snake, and then start “revitalizing” it. This is done very simply: place a heat source below, for example, a burning candle, electric stove(or hob), iron with the sole upside down, incandescent lamp, heated dry frying pan. Place a coiled snake on a string or wire above the heat source. After a few seconds, it will “come to life”: it will begin to rotate under the influence of warm air.
For children 3 years old:rain in a jar 
Three-liter jar, hot water, plate, ice.
Using this experience, it is easy to explain to a three-year-old “scientist” the simplest phenomena of nature. Fill the jar about 1/3 full hot water, better hot. Place a plate of ice on the neck of the jar. And then - everything is as in nature - the water evaporates, rises upward in the form of steam, at the top the water cools and a cloud forms, from which real rain comes. IN three-liter jar It will rain for one and a half to two minutes.
For children 4 years old:balls and rings

Alcohol, water, vegetable oil, syringe.
Four-year-old children are already wondering how everything works in nature. Show them a beautiful and exciting experiment about weightlessness. On preparatory stage mix alcohol with water, you should not involve your child in this, just explain that this liquid is similar in weight to oil. After all, it is the oil that will be poured into the prepared mixture. You can take any vegetable oil, but pour it very carefully from a syringe. As a result, the oil appears to be in weightlessness and takes its natural shape - the shape of a ball. The child will be surprised to observe a round transparent ball in the water. With a four-year-old child, you can already talk about the force of gravity, which causes liquids to spill and spread, and about weightlessness, because all liquids in space look like balls. As a bonus, show your child one more trick: if you insert a rod into the ball and rotate it quickly, an oil ring will separate from the ball.
For children 5 years old:invisible ink

Milk or lemon juice, brush or feather, hot iron.
At five years old, the child probably already owns a brush. Even if he doesn't know how to write yet, he can draw a secret letter. Then the message will also be encrypted. Modern children did not read the story about Lenin and the inkwell with milk in school, but observe the properties of milk and lemon juice it will be no less interesting for them than for their parents in childhood. The experience is very simple. Dip the brush in milk or lemon juice (or better yet, use both liquids, then the quality of the “ink” can be compared) and write something on a piece of paper. Then dry the writing until the paper looks clean and heat the sheet. The most convenient way to develop recordings is with an iron. Onion or apple juice is suitable as ink.
For children 6 years old:rainbow in a glass

Sugar, food coloring, several clear glasses.
The experiment may seem too simple for a six-year-old, but in fact it is worth the painstaking work for a patient “scientist.” The good thing about it is that the young scientist can do most of the manipulations himself. Three tablespoons of water and dyes are poured into four glasses: in different glasses- different colors. Then add a spoonful of sugar to the first glass, two spoons to the second, three to the third, and four to the fourth. The fifth glass remains empty. 3 tablespoons of water are poured into glasses placed in order and mixed thoroughly. Then a few drops of one paint are added to each glass and mixed. Remains in the fifth glass pure water without sugar and dye. Carefully, along the blade of a knife, pour the contents of the “colored” glasses into a glass of clean water as the “sweetness” increases, that is, scientifically, the saturation of the solution. And if you did everything correctly, then the glass will contain a small sweet rainbow. If you want to talk science, tell your child about the difference in the density of liquids, due to which the layers do not mix.
For children 7 years old:egg in a bottle

Chicken egg, bottle pomegranate juice, hot water or paper with matches.
The experiment is practically safe and very simple, but quite effective. The child will be able to carry out most of it himself; an adult should only help with hot water or fire.
The first step is to boil the egg and peel it. And then there are two options. The first is to pour hot water into a bottle, put an egg on top, then put the bottle in cold water(into ice) or just wait until the water cools down. The second way is to throw burning paper into the bottle and put an egg on top. The result will not be long in coming: as soon as the air or water inside the bottle cools, it will begin to shrink, and before the novice “physicist” has time to blink, the egg will be inside the bottle.
Be careful and do not trust your child to pour hot water or work with fire himself.
For children 8 years old:"Pharaoh's Snake"

Calcium gluconate, dry fuel, matches or lighter.
There are many ways to get “pharaoh snakes”. We will tell you about one that an eight-year-old child can do. The smallest and safest, but quite spectacular “snakes” are obtained from ordinary calcium gluconate tablets; they are sold in pharmacies. To make them turn into snakes, set the pills on fire. The simplest and safe way to do this is to put a few cups of calcium gluconate on a “dry fuel” tablet, which is sold in tourist stores. When burning, the tablets will begin to expand sharply and move like living reptiles due to the release of carbon dioxide, so from a scientific point of view, the experiment can be explained quite simply.
By the way, if “snakes” made from gluconate do not seem very scary to you, try making them from sugar and soda. In this version, a pile of sifted river sand is soaked in alcohol, and sugar and soda are placed in a recess on its top, then the sand is set on fire.
It would not be amiss to remind you that all manipulations with fire are carried out away from flammable objects, strictly under the supervision of an adult and very carefully.
For children 9 years old:non-Newtonian fluid

Starch, water.
This is an amazing experiment, which is easy to do, especially if the scientist is already 9. The research is serious. The goal is to obtain and study a non-Newtonian fluid. This is a substance that, when exposed to a soft influence, behaves like a liquid, and when exposed to a strong influence, exhibits the properties of a solid. In nature, quicksand behaves in a similar way. At home - a mixture of water and starch. In a bowl, combine water with corn or potato starch in a ratio of 1:2 and mix well. You will see how the mixture resists when stirred quickly, and stirs when stirred gently. Throw a ball into a bowl with the mixture, lower the toy into it, and then try to pull it out sharply, take the mixture in your hands and let it calmly flow back into the bowl. You yourself can come up with many games with this amazing composition. And this great occasion Together with your child, figure out how molecules in different substances are connected to each other.
For children 10 years old:water desalination

Salt, water, plastic film, glass, pebbles, basin.
This study is best suited for those who love travel and adventure books and films. After all, while traveling, a situation may occur when the hero finds himself on the open sea without drinking water. If the traveler is already 10 and learns how to do this trick, he will not be lost. To experiment, first prepare salt water, that is, simply pour water into a deep basin and salt it “by eye” (the salt should completely dissolve). Now place a glass in our “sea”, so that the edges of the glass are slightly above the surface salt water, but were lower than the edges of the basin, and put a clean pebble or glass ball into the glass, which will prevent the glass from floating. Cover the basin with cling film or greenhouse film and tie its edges around the basin. It should not be pulled too tightly so that it is possible to make a depression (this depression is also fixed with a stone or a glass ball). It should be just above the glass. Now all that remains is to place the basin in the sun. The water will evaporate, settle on the film and flow down the slope into the glass - this will be an ordinary drinking water, all the salt will remain in the basin. The beauty of this experience is that the child can do it completely independently.
For children 11 years old:litmus cabbage

Red cabbage, filter paper, vinegar, lemon, soda, Coca-Cola, ammonia etc.
Here the child will have the opportunity to get acquainted with real chemical terms. Any parent remembers such a thing as litmus paper from chemistry course, and will be able to explain that this is an indicator - a substance that reacts differently to the level of acidity in other substances. A child can easily make such indicator papers at home and, of course, test them by checking the acidity in various household liquids.
The easiest way is to make an indicator from a regular red cabbage. Grate the cabbage and squeeze out the juice, then soak filter paper with it (available at a pharmacy or wine shop). The cabbage indicator is ready. Now cut the pieces of paper smaller and place them in different liquids that you can find at home. All that remains is to remember which color corresponds to which acidity level. In an acidic environment the paper will turn red, in a neutral environment it will turn green, and in an alkaline environment it will turn blue or purple. As a bonus, try cooking “alien” scrambled eggs by adding to egg white red cabbage juice. At the same time, you will find out what level of acidity is in a chicken egg.
Scientific discoveries have given humanity a lot original ideas. In rainy weather or when bored, some of them will become in a great way have some fun. We offer you 10 cool experiments. They can be carried out at home even by children, but preferably under adult supervision. These experiments use basic ingredients that are always available in the kitchen. Simple but interesting tricks are based on the principles of chemistry, physics and biology. Well, let's get started!
What you will need: a raw egg, two bowls (or plates), an empty water bottle.
Progress of the experiment. Squeeze the bottle to release some of the air. Then bring its neck close to the egg on the plate, almost close. Having unclenched plastic container, you will see how the yolk is sucked inside the bottle - together with the air, it rushes to occupy the empty volume.
Why is this happening? After compression, some of the air was “squeezed out,” which means that the pressure outside became greater. Thus, the air literally “pushes” the yolk into the bottle.
Experiment: Create Non-Newtonian Matter
What will you need? Water, cornstarch, deep mixing bowl, food coloring. Put it on old clothes so as not to get dirty, cover the table with oilcloth.
Progress of the experiment. Pour a glass of water into a deep bowl, then pour a glass there corn starch and mix everything well. You can add food coloring if desired. Now slowly dip your hand into the mixture. As you can see, this is very easy to do. Do the same thing, but with force - as a result, the substance will “repel” your hand.
Why is this happening? Oobleck is a non-Newtonian substance. Sometimes (for example, when it is poured), it appears as a liquid. But! When you put pressure on the mixture, it behaves like a solid body, and upon impact it can even have a repulsive effect.
Soda and vinegar - instead of a pump!
What we need: regular vinegar, bottles with a narrow neck, balloons, baking soda.
Progress of the experiment. A mini-geyser is made using a similar principle, but we slightly modify the well-known experiment. Pour 50–100 grams of vinegar into bottles. Having made a roll of paper, we put one end of it in balloon, which needs to be inflated. Inside the other end of a kind of tube we pour 2-3 tablespoons of soda. Now you need to carefully place the balls on the necks of the bottles. Be careful not to let the baking soda spill out of these rubber containers prematurely. The preparations are completed, you can start the fun part. Pour the contents of the balls into the bottle and enjoy watching.
Why is this happening? The molecules of soda and vinegar instantly combine and a powerful reaction occurs. As a result, carbon dioxide (CO 2) is produced, which inflates the balloon so much that it can even explode.
Coloring flowers using the capillary method
What we need: fresh white flowers (daisies and carnations work great, if you don't have flowers, you can even use celery), glass jar, food coloring, scissors. We also advise you to be patient, since you will see the full result of the experiment only after 24 hours. But after some time you can watch how an amazing transformation takes place.
Progress of the experiment. Pour water inside the jar and add dye of any color there. We dip flowers into this liquid and watch how the delicate white petals gradually turn a different color.
Why is this happening? Water evaporates from the flower's petals, so the stem absorbs the colored liquid from the jar. Gradually the colored liquid reaches its petals.
Determining the amount of sugar in soda
What will you need? Unopened cans of diet and sugary drinks, a large container of water (a bath will also work for this experiment).
Progress of the experiment. Immerse soda cans in water. Not all of them will sink to the bottom. Those that remain floating below the surface contain a lot of sugar. Fans of diets can safely drink “heavy” drinks.
What is the reason for this discrepancy? The density of regular and diet carbonated drinks is different, and its value is affected by the sugar content. As a result, some jars flop around in the water, while diet drinks boldly go to the bottom.
Magic bag
What you will need: A bag with a special plastic zipper, a couple of sharpened pencils, a mug of water. We recommend doing the experiment over a sink or bathtub, as the temptation to pull out the pencils after the experiment will be great!
Progress of the experiment. Fill the bag with water and zip it up. Then we quickly pierce it through with several pencils, one at a time. As you can see, the holes did not even create a gap - the bag remained completely sealed.
Why is this happening? The tightly sealed bag is made from flexible polymers. When punctured, the plastic surface seals tightly around the pencil, so it does not leak.
Cleaning copper coins at home
What do we need? Tarnished coins, 1/4 cup white vinegar, one teaspoon of salt, a glass of water, two bowls (non-metal), paper towels. We recommend wearing glasses to protect your eyes.
Progress of the experiment. Pour water, vinegar into a bowl and add salt. Place coins in the prepared solution. After some time, we evaluate the degree of their purification.
How it works? Acetic acid reacts with salt, which helps clean copper oxide from copper pennies. Rinse the coins with water after the experiment, otherwise they will turn greenish. After clearing a dozen copper coins, make another one interesting experience. Place a metal coin in the old solution. You will see the steel color change to yellowish. This happened because the metal attracted copper oxide molecules.
Flying ghosts
What do we need? An inflated balloon, ghosts cut out of tissue paper, and something to generate static electricity (your clothes or hair will work for this purpose!).
Progress of the experiment. We glue the paper figures at one end to the table using tape. Then we rub the balloon hard on clothes or hair, and bring it closer to the lying silhouettes. Oh no! The ghosts have woken up and are trying to take off!
How it works? Rubbing a rubber ball against fabric or hair creates a negative charge on the surface, which attracts paper ghosts to itself.
Dancing Raisins Experience
What we need: raisins, a bottle of mineral water, a transparent drinking glass
Progress of the experiment. This experience is extremely simple. Pour into a glass mineral water. Add a handful of raisins there and watch them “dance” in the glass container.
Why is this happening? Tiny bubbles of carbon dioxide (CO2) cling to the uneven surface of the raisins. As a result, they become lighter and rise to the surface, where the bubbles burst. Then the raisins become heavy and fall back down, where they are again overtaken by CO 2 bubbles.
Colored milk painting
What do we need? Two plastic dishes, milk, food coloring, cotton swabs, liquid soap. Since we will be dealing with dyes, it is advisable to cover your clothes with an apron.
Progress of the experiment. Pour a little milk into the bowl - just enough to cover the bottom. Then we drop colored dye onto its surface. Having dipped a cotton swab in liquid soap, we touch the epicenter of the color inclusions on the milky surface. Now we begin to draw surreal stains.
Why is this happening? Food coloring is not as dense as milk, so the drops will stick to the surface at first. But adding soap to the tip of a cotton swab breaks the surface tension of the milk by dissolving the fat molecules. The paint molecules move smoothly along the milky surface, pushing off the soap layer.
Do these interesting experiments at home, with children or in friendly company. You yourself won’t notice how quickly the time flies while enjoying this useful entertainment, and the inquisitive minds of young know-it-alls will board new scientific peaks.
