Oksana Seifert
Good afternoon, dear colleagues! Winter has come into its own and very soon a cheerful and joyful holiday will come - New Year! And as always, according to tradition, we decorate Christmas tree, forest beauty purchased toys: multi-colored balls, icicles, snowmen, snowflakes, tinsel, etc. Well, what if you decorate Christmas tree with toys made with your own hands. After all, such toys made with love, carry warmth and positive emotions of the one who gives them tinkered. Today I propose master class on making Christmas decorations (balls) from DIY salt dough. Such toys can be done with children, since working with test develops fine motor skills of children's fingers. For making New Year's balls for us will be needed: 1 cup flour, 1 cup fine salt, a little water, a cap felt-tip pen, gouache paints, brush, sippy cup, glue "Moment", or glue "Titanium", green, blue, silver sequins, star-shaped sequins, satin ribbons. Place flour, salt and a little water in a small bowl and knead dough. It must be hard and thick so that it can be sculpted. Dough Roll out to about 1 cm thick and cut out circles using a glass. Using the cap from felt-tip pen cut a hole for threading the ribbon. Then our balls should dry. To do this, you can bake them in the oven, or you can leave them on a sheet of paper for several days. After the balls are dry, you can begin the fun part - decorating them. Here you can show all your imagination. Can be colored toys with gouache paints, draw patterns, glue multi-colored sequins using any available glue. Thread a satin ribbon through the hole and tie a bow. Our Christmas ball is ready! Can be decorated Christmas tree! Thank you for your attention! I wish you all good luck and creative success!


Publications on the topic:
 The New Year will come only in a month, but we are preparing for the holiday now. By tradition, the guys and I senior group decided to do it.
 When the “Golden Autumn” exhibition was announced in the garden, I thought for a long time what we could do with our (almost) 3-year-old daughter. So that she too can participate.
Educator: Boeva Irina Yurievna MBDOU kindergarten No. 34 Objectives: - To promote the development of fine motor skills, imagination, and observation.
Master Class. Goal: to form an idea of the type of decorative and applied art - dough plastic. Objectives: Level up.
 Good evening, dear teachers. Today I want to share again my creativity from salt dough. I made it from an ordinary half liter bottle.
Easter is big and Holy holiday in the life of every Orthodox person. This year, a charity fundraiser was dedicated to this holiday.
 MASTER CLASS “BRIGHT COLORS OF AUTUMN” (AUTUMN TREES FROM SALT DOUGH) The autumn forest, playing with colors, Weaves wreaths from the crowns of trees, with its own.
0 55 542
Modeling is one of the most useful activities for kids. With its help, not only fine motor skills of the hands develop, but also perseverance, creative thinking and coordination of movements are developed.
One of the best materials for sculpting with your child - salty dough. It is absolutely safe and does not contain harmful additives and easy to work with. DIY salt dough crafts will become wonderful souvenirs for your relatives and friends.
Universal recipes
You can find a great variety of salt dough recipes. Each master adds his own additives to them, selecting the desired consistency. The main products for kneading dough are salt, flour and water.Depending on its purpose, its thickness may vary:
- dense dough - for large parts and creating massive panels;
- universal dough of medium consistency - it is convenient to make small pictures and figures from it;
- soft dough- delicate and pliable, it is suitable for small elements, exquisite flowers and figurines.
Thick dough
To work you will need:- wheat flour - 1 part;
- table salt - 1 part;
- water - 0.7 parts.
That is, to knead this type of dough you need to take one identical measure (glass, cup, tablespoon) of salt and flour and 0.7 of the same measure of water.
Combine the dry ingredients in a deep bowl and add cold water little by little. The dough should be homogeneous and very dense. There will be grains of salt in it - this is normal, don’t worry. Depending on the humidity and quality of flour and salt, you may need a little more or less water. Therefore, you can’t pour it into the dough all at once.
Medium consistency dough (all-purpose)
To work you will need:- wheat flour - 1 part;
- water - 1 part;
- table salt - ½ part;
- finely ground salt (extra) - ½ part.
Soft dough
To work you will need:- wheat flour - 1 part;
- hot water - 1/4 part;
- finely ground salt (extra) - 1 part;
- PVA glue - ¾ parts.
This dough is ideal for complex work. It holds its shape perfectly, preserving the prints and texture created on it. Its quality directly depends on the quality of the chosen glue.
The figures made from salt dough with glue differ special strength. They will delight their owner for many years.
- If you plan to paint finished products, it is better to take wheat flour, although rye can also be used for salted dough.
- Can't take iodized salt- finished figures may crack when drying.
- The dough can be tinted while kneading. For this purpose they are used food colorings or watercolor.
- Ready dough Be sure to wrap it in cling film or a plastic bag to prevent it from drying out.
- A failed dough can be revived. If the dough is liquid, you need to add a little more flour and knead it again; if the dough is too tight, moisten it with water and knead until it reaches the desired consistency.
- Do not add fat or hand cream to the dough from which you plan to paint the products - the paint will apply unevenly.
- The finished dough should be stored in the refrigerator for no more than 2 days. It loses its qualities and it will be inconvenient to work with it.
- It is best to sculpt volumetric products on wire or cardboard frames so that they do not fall apart.
- Crafts can be dried naturally, leaving them for a couple of days, baking them in warm oven or leave it near the battery. It is strictly not recommended to place figurines on the battery itself to avoid cracking.
- It is best to paint crafts with acrylic paint or gouache. Watercolors should not be used: there is a risk of getting wet and ruining the product.
- The junction of the parts must be moistened with water using a brush. This way they will connect firmly and quickly.
- The finished souvenir can be coated with clear nail polish or acrylic varnish. This will protect it from moisture and the paint from fading.
Cute hedgehog - toy for kids
Do you want to know what you can make with your child using salt dough? Start with the simplest crafts. The younger your baby, the simpler the products for joint creativity should be. Try to make a prickly hedgehog, and detailed description process in this MK guarantees excellent result And good mood from a useful activity.
First of all, prepare universal salt dough and nail scissors. Roll a piece of dough into a drop-shaped piece.

The hedgehog's eyes and nose can be made from beads, black peppercorns, or pre-colored dough.

The needles are made using cuts. Use the tips of the scissors to make small cuts, lifting the needles up.

Perform the next row in a checkerboard pattern - with an offset. Row by row, make cuts until the entire back of the hedgehog is covered with needles.

Dry the finished toy in the oven or simply in a warm and dry room. If you wish, you can color it or entrust this important task to your child.

Original souvenir - funny dachshund
You can start preparing for the future ahead of time. New Year's holidays and make a funny dachshund as a gift for friends.
To work you will need:
- universal salt dough (see recipe above);
- cardboard, pencil, scissors;
- paints and brush;
- a piece of rope;
- clear nail polish;
- toothpick;
- foam sponge;
- glue "Dragon".
Transfer the template to a piece of cardboard and cut it.

Roll out the dough to approximately 5mm thickness on baking paper. Attach the template and cut out the outline of the dachshund along it. Carefully remove the trimmings so as not to deform the workpiece.

Roll two balls and form them into oblong dachshund eyes. Glue them with a drop of water to the head of the workpiece. Moisten all sections of the dog with water and smooth it with your fingers to remove all irregularities.

Use two small pieces of dough to make eyelids and glue them above the eyes. Use a toothpick to outline the ear, paws, mouth, nose and body contours.

Now you need to add volume to the workpiece. Roll the dough into an oval, glue it onto the ear and smooth the joint with a wet finger.

Add volume to the dachshund's back and tail in the same way.

Use a toothpick to press oblong dents around the perimeter of the figure. Make them randomly of different lengths from the edges of the body to the center.

It's time to dry the workpiece in a warm oven. Bake it until it is completely firm.
The dry figurine needs to be painted. Cover all areas where there are bulges and dents with black gouache.

After the first coat of paint has dried, paint the dachshund yellow. Put a little paint on a foam sponge and tint the entire body, while the dents should remain black - do not overdo it.

Draw the eyes of the dried dachshund in white. Make any inscription you wish.

Glue a piece of rope to the back of the craft.

Cover the product with clear varnish and let it dry. The result of the work done is impressive - the mischievous puppy is ready.

Dog with original coloring:


Spectacular fish - step-by-step master class
Try making a beautiful fish with your child. Just follow detailed instructions- and even little helper will be able to master this modeling technique.
To work you will need:
- universal salt dough;
- brush;
- corrugated felt-tip pen cap;
- ruler.

Pinch the dough on one side of the circle with two fingers, forming a tail.

Correct it and smooth out any rough edges.

On the opposite side, make a mouth for the fish using the handle of a brush.


Use the edge of a ruler or the blunt side of a knife to press the marks on the tail and fins.

Roll small balls and glue them onto the fish's head. These will be the eyes.

Make pupils from smaller balls and press them onto the eyes with the handle of a brush.


It's time to decorate the blank. Use the cap of a felt-tip pen to press down the first row of scales.

Roll a lot of small balls. Glue them on a drop of water to the body of the fish immediately behind the cap prints and flatten them reverse side tassels.


If there is a suitable imprint, make imprints in the form starfish, no - make do with an already familiar cap or take a different template.

Then push two more rows of cap impressions.

Roll into a thin sausage to form a tail.

Glue it to the blank on the edge of the tail. Fill the entire tail in the same way.

Next, chaotically stick and push a few more small balls.
Dry the resulting workpiece in a warm oven.

Color the fish, guided by your ideas of beauty and the colors available. If you glue a magnet to the back of it, it will proudly take its place on the refrigerator, decorating the kitchen of its happy owner.
Here are some more ideas with fish:


Cheerful boletus mushroom
The initial stage of learning to sculpt is already over - you can take on more complex products from universal salt dough. Try to master the lesson of making a funny big-eyed boletus. Such an interesting mushroom will be appreciated not only by children, but also by adults.
To work you will need:
- universal salt dough;
- burnt out light bulb (classic pear-shaped);
- cardboard;
- acrylic paint or gouache;
- foil;
- paper napkins;
- masking tape;
- Super glue.

Cut a ring out of cardboard and put it on a light bulb - this is the basis of the future mushroom cap.

Form a hat of the desired size from crumpled paper napkins. Secure the structure with tape.


The result is something like this.

Wrap the hat in foil for added strength.


For the hat you can use dough of any color; later the whole toy will be painted. Roll out a piece of dough into a circle at least 3 mm thick and stick around the top of the mushroom cap.

Remove the hat and seal the bottom.

Use the blunt side of a knife to press the strips.

Secure the cap to the mushroom stem using superglue or Moment. It should be slightly tilted towards the back.

Get started with the design. Blind and attach the arms, legs and nose to the fungus.


You can decorate the figurine with a funny caterpillar or make another decorative element, such as a ladybug.

Dry the finished piece.

Paint the figurine, draw eyes and a nose and varnish. The amazing fungus is ready. You won’t be able to pickle it and eat it, but you can easily decorate a shelf with it.

Funny pig pendants
Such funny pendants are an idea for an unusual Christmas tree decoration or a cute souvenir for people dear to you. Such a themed gift will come in handy, because the patron of 2019 is the yellow pig.
To work you will need:
- universal salt dough;
- toothpick;
- thin rope;
- paints and brush;
- foam sponge;
- black gel pen;
- Super glue.
Christmas tree from salt dough. Step-by-step instruction with photo
Modeling from salt dough for schoolchildren.
Master class “Christmas tree”
This work is intended for teachers and parents, as well as for school-age children.
Target: teach how to make a Christmas tree from salt dough.
Tasks:
- teach how to knead and color the dough;
- teach how to make needles by cutting salt dough with scissors;
- develop hand motor skills,
- develop creative abilities.
Required material:
- 1 glass of flour,
- 0.5 cups fine salt,
- 0.5 glasses of water,
- container and spoon,
- gouache,
- beads, beads, sequins,
- stapler,
- cardboard.

Progress of the lesson:
Guess the riddle:Needles grow on it
Thick and prickly
And resinous cones,
Sticky, fragrant.
She's on New Year's Eve
He will come to visit us!
Slender, fluffy
With golden lights
Today we will make a Christmas tree from salt dough and decorate it with decorations. There is a very beautiful song from the cartoon " Christmas story» Poems: I. Shaferana
Christmas tree, Christmas tree - forest scent
Christmas tree, Christmas tree -
Forest aroma.
She really needs it
Nice outfit.
Let this Christmas tree
At the festive hour
With every needle
Makes us happy
Makes us happy.
Stages of work
1. Take half a glass of water and pour it into a container. Add half a glass of fine salt and mix well. Gradually add flour until it reaches a batter consistency.


2. Add gouache Green colour and mix to form a green batter.

3. Gradually add the remaining flour and mix.

4. Pour the resulting mass onto the table and knead the dough with your hands. The dough should be plastic, not stick and crumble in your hands. If the dough sticks, then add a little flour; if the dough crumbles, then add a little water.


5. Cut out a semicircle from cardboard. Roll out the resulting dough and cut out a semicircle from the dough using a template.


6. Use a stapler to fold the template into a cone.

7. Carefully wrap the cone in a semicircle of salted dough and glue the seam using water, slightly moistening it with a brush. Gently smooth the seam with your finger.


8. Take scissors with sharp ends and begin to cut the needles in rows. It is better not to lift the Christmas tree so that the dough does not slip, and keep the scissors at an angle of 30 degrees. You need to cut the needle from the top row.


9. Knead the dough for decorations and paint it with gouache different colors. Proportions: 0.5 cups of water; 0.5 cups of salt and a cup of flour.

10. Make a star from red dough and glue it with water.

11.You can decorate the Christmas tree different ways. The first method: we make a lot of multi-colored balls and toys from colored dough and glue them to the Christmas tree using water.


12. Second method: decorate the Christmas tree with beads, beads, sequins, which we simply gently press into the dough. They stick well without glue, but if the beads fall off after drying, you can glue them with varnish or glue.

13. When the tree is dry, it can be coated with varnish or gloss to children's creativity. The Christmas tree is ready!

14. Works of my students!


Master class with step by step photos“New Year's gifts” using the salt dough modeling technique.
Author: Daria Galanova, 9 years old student of the municipal budgetary institution of pre-school and youth education, association “Salty Fantasies”, MillerovoTeacher: Tatyana Nikolaevna Nazarova, teacher additional education MBU DO DDiU Millerovo

The master class is very simple in terms of complexity, perhaps it will be useful for kindergarten teachers of older and older children. preparatory groups. In this case, you can cut out snowmen and mittens from the dough in advance. Dry them, and during the lesson ask the children to make the rest of the molds. The master class will also be interesting
for everyone who loves to sculpt salt dough. Make gifts for friends and loved ones. As well as additional education teachers, primary school teachers, teachers of extended day groups.
Purpose: New Year gifts.
Target: creating New Year's gifts using the salt dough modeling technique.
Tasks:
Educational: master the technique of making gifts from salt dough;
Educational: develop accuracy in modeling and artistic thinking;
Educational: encourage the desire to give new Year gifts made with my own hands;

Required material:
Paper napkin, glass, glass of water, “Extra” salt, flour premium, cut out for dough “snowman” 10.5 x 6 cm, photo frame, colored paper, floral mesh “snow”, “small mitten” 5 x 2.5 cm cocktail tube, ballpoint pen without paste, rolling pin, simple pencil.
Salt dough recipe:
Combine 1 cup flour and 0.5 cup salt. Stir, make a well. Gradually, in a thin stream, pour in 1 cup cold water. Knead it tight elastic dough. Store the dough in a cellophane bag.
Recipe for "snow"
In a small saucepan, combine 2 tablespoons water and 1 teaspoon potato starch. Stir and place on low heat. Stir constantly while doing this. As soon as the mixture becomes transparent, remove it from the stove and immediately add 1 cup of Extra Salt. First, use a spoon, and once the mixture has cooled slightly, you can stir with your hands. The snow is ready. Place it in a plastic bag and seal tightly. It is important that no air enters the bag.
Progress:

Roll out the dough to a thickness of 5-7 mm. Use a cookie cutter to cut out the “snowman” and place on a paper napkin.

Mark the eyes with a pencil, push the mouth with a stack. Use a stack to make a mark for yourself where you will glue the snowman’s hat.

Form a flat cake from a small lump of dough. Cut it in half. Moisten the snowman's head with water and glue on the hat. We glue all the elements of the composition together cold water. Roll up a small, thin flagellum and glue it to the hat. We are making a fur hat. Form a ball from a small lump and glue a bell.

Form a very small carrot and glue a nose on the snowman.

Roll up a thin rope and glue a scarf on the snowman.

From small, identical lumps, form two lumps similar to beans and glue the legs.

Using a ballpoint pen without paste, press the buttons down the center of the snowman.

Form a gift box from a lump the size of a large plum and glue it onto the snowman’s hand. It turns out that the snowman is holding a gift in his hands. Glue the gift tightly so that after the craft dries, it does not fall off.
The snowman is ready, let's start sculpting the mittens.

Roll out the dough to a thickness of 3-4 mm. Cut out two small mittens.

Stack the cuffs on the mittens. Use a cocktail straw to make holes.

Make a very small snowman on one of the mittens.

Glue the Christmas tree and toy balls onto the second mitten.
We made the mittens so quickly.
Place the snowman and mittens on a sunny windowsill. Crafts dry in air for about 5-7 days. Although the mittens will certainly dry in a couple of days, since they are not as bulky as a snowman.
The crafts are dry. Paint them with paints and cover them with glossy varnish.
We glue the snowman into a frame and decorate it with glitter. Spread a layer of PVA glue under the legs of the snowman, put “snow”. Compact it lightly. Once the glue dries, the “snow” will stick firmly. This “snow” can be stored for a couple of days in a plastic bag.
The snowman is ready.
Thread the ribbon into the mittens. Decorate with glitter
Gifts for the New Year are ready.


Happy New Year!
One of the favorite materials used for creative children's work is salt dough. You can make a lot out of it fun crafts, for example or . It is very easy to work with such a dough; it is somewhat reminiscent of plasticine, so not only adults, but also children can use it freely. In order to make Christmas tree decorations from salt dough, you will need minimal amount ingredients that everyone probably has.
New Year's toys made from salt dough
So, the recipe for making dough for crafts.
We will need:
- two glasses of flour
- one glass of salt
- 250 grams of water
The most common flour will do, without any impurities or additives. The water should be cool. Salt – you can take “Extra”.
How to make salt dough
1. In a small cup or saucepan, combine salt and flour, add water and stir to form a dough. How good the material turned out to be for making New Year's toys from salt dough can only be understood with the help of your hands; if it is dry and crumbly, add a little more water, and if you realize that there is enough water, you can add a little flour.
2. Some people recommend adding a little to the dough sunflower oil, no more than two tablespoons. Then the dough will have the correct consistency and will not quickly become crusty while working.
3. Roll out the finished dough using a rolling pin, take cookie cutters and make figures. Here you go, New Year's toys Salt dough is almost ready. They can be left as is or decorated to make them more original.
How to decorate a finished dough product
1.
 Using a cocktail straw, make holes in the figure to make them more airy.
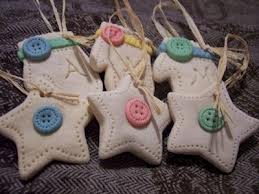
2. Multi-colored buttons will make the toys more homey.
3. You can also decorate the toys using shells, spreading them over the surface while the dough is not yet dry enough.
4. To prevent the toys from looking boring, they can be painted in bright colors and decorated with additional elements made from the same salty text.
You can endlessly list the options, since in fact they exist great amount. Show your imagination and spend quality time with your children.
A selection of ideas for Christmas tree decorations made from salt dough